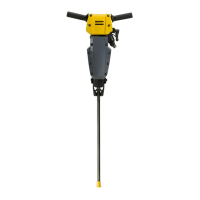
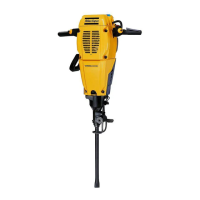
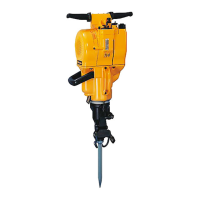
The Secoroc YT29A Pusher Leg Rock Drill is a heavy-duty pneumatic rock drill designed for high efficiency and low air consumption. It is primarily intended for drilling in mines, hydropower stations, and road construction projects, making it suitable for tunneling and other stone works in the mining and metallurgical industries. The YT29A is versatile, capable of drilling both horizontal and upward anchor holes in medium-hard and hard rocks (100-350 MPa). It is designed to be used with a pusher leg (FT160A, FT160B, FT160C, or FT170) to adapt to various tunneling and work conditions. Additionally, it can be mounted on rigs for either dry or wet drilling operations. The rock drill is equipped with a lubricator, the FY250, which ensures continuous lubrication of its internal components.
Usage Features
Before operating the Secoroc YT29A, several preparations are necessary to ensure safe and efficient drilling. Upon receiving the rock drill, its interior is coated with heavy oil to prevent corrosion. After unpacking and installation, a small amount of lubrication oil should be poured into the air connection, and the tool operated on partial throttle to clean the interior, followed immediately by a liberal amount of air tool oil. The rock drill and pusher leg are lubricated by oil mixed with compressed air, which is metered into the air line using the FY250 lubricator.
Daily checks are crucial. All drilling equipment must be in good working order, and the impact surface of the working tool shank should be flat and free of wear. The air inlet and exhaust ports must be clear of obstructions, and the flushing holes in the working tool and drill bit should not be blocked, ensuring unobstructed flushing air/water flow. All fittings must be tight and leak-proof. Before each use, the air hose should be blown out to remove dirt and moisture, and the lubricator filled with oil if necessary. The chuck and working tool shank should always be covered by a film of oil. Only recommended lubricants should be used, as operation without lubrication is not permitted.
The rock drill's performance is sensitive to air and water pressure. High air pressure (>6.3 bar) can cause rough operation and damage, while low pressure (<4 bar) results in slow drilling. The water pressure should be set to around 3 bar, but always at least 1 bar less than the working pressure to prevent water from entering the impact mechanism. Dry drilling is strictly prohibited. The air hose diameter should be at least 25mm, and the inner diameter of the connection nipple and hose no less than 19mm, with an ideal overall air hose length of less than 15m.
Fitting and removing the working tool requires specific steps. Before fitting, ensure the tool shank is the correct size and length, clean, and in good condition. The shank's quenching hardness should be HRC48-53; deviations can cause piston damage or deformation. The shank end face must be flat and perpendicular to the axis, with no sharp edges. Dull bits should be replaced to avoid slowing drilling speed and overstraining the mechanism. The flushing hole in the working tool must be checked for blockages. To fit the tool, push the retainer outwards, insert the drill into the chuck until it bottoms, then push the retainer back to lock it. To remove, push the retainer outwards until the tool collar disengages, pull the tool out, and then push the retainer back.
The pusher leg is attached by mounting the pusher leg (1), lock sleeve (2), rubber pad (3), washer (4), and locking nut (5) in the specified order, then turning the locking nut clockwise with a wrench until a "click" is heard.
The rock drill features a throttle lever for regulating compressed air to the percussion mechanism and flushing water. Its positions include: extra blowing (water flushing off, impact and rotation off), stop (air and water off), low throttle (air to pusher leg, water flushing), medium throttle, and full throttle. A feed control lever adjusts the feed force: pushing it increases force, pulling it decreases force. A trigger (A) allows for abrupt stopping of feed force, retracting the piston rod in the pusher leg automatically, useful for adjusting drill height or preventing jamming. Releasing the trigger reactivates the feed control setting. The oil regulating valve controls oil dosing, adjusted with a screwdriver. Proper lubrication is indicated by a thin film of oil on the hand when placed in front of the exhaust port after a few seconds. Oil consumption should be 2.5-6 ml/minute.
To start drilling, open the main valve for compressed air and the cock for flushing water. Adjust the feed control lever for suitable collaring force. Align the drill, move the throttle lever forward slightly to start water flushing, percussion, and rotation. Collar the hole with reduced feed force, then move the throttle lever fully forward once the tool is secure. Adjust feed force for maximum penetration rate. Avoid bending the working tool, as this increases wear and risk of breakage. To stop, pull the throttle lever backwards.
Re-positioning the pusher leg involves switching off percussion and flushing, pressing the trigger to retract the piston rod, re-positioning the leg, releasing the trigger to extend the rod, and moving the throttle lever to the working position. The feed control lever does not need adjustment during this. For blow-cleaning the drill hole, move to the side and cover eyes, as particles and dirty water can emerge at speed. Always wear impact-resistant eye protection. If powerful blow-cleaning is needed, turn the throttle lever fully backwards beyond the stop position; this can be done during drilling.
Maintenance Features
Regular maintenance is essential for machine safety and longevity. Damaged and worn components should be replaced promptly. For major service, contact an authorized workshop. The machine and tools should be checked for wear and damage regularly, and very worn or damaged tools should not be used. When cleaning mechanical parts with solvents, ensure compliance with health and safety regulations and adequate ventilation. Daily maintenance, checking wearing parts, and timely repairs prevent breakdowns and extend service life.
Before storage, the rock drill and pusher leg should be well oiled. Store them in a clean, dry place, ensuring no foreign matter enters the machine. Protect the chuck with a wooden plug or clean cotton waste. After use, hose down and wipe clean the rock drill and pusher leg. For long-term storage, pour oil directly into the air intake and run the air briefly to protect against corrosion.
Only genuine spare parts should be used to ensure stable performance, as pattern parts can have a short working life and cause damage due to differing measurements and manufacturing methods.
Once a shift (after 8 hours of operation), check the chuck bushing for wear; excessive wear can lead to faster working tool wear, stoppages, and increased tool consumption. Check the tightness of the side-bolt nuts (tightening torque: 80 Nm). Inspect the rock drill's connection to the pusher leg, and check hoses, couplings, and controls for leakage and damage. Verify sufficient lubrication and fill the lubricator if needed. Drain the water separator. Check air and water pressure, ensuring water pressure is at least 1 bar lower than air pressure.
Once a week (after 40 hours of operation), perform a basic check of all drilling equipment functions.
Once a month (after 200 hours of operation), send the rock drill to a workshop for inspection; local operating conditions will determine if this is the appropriate interval for overhauling. Dismantle and clean the lubricator, and clean out the water separator.
To prevent freezing in low ambient temperatures, remove water from compressed air by using water separators and drainage points. If the rock drill freezes, do not heat it; allow it to thaw at room temperature. Never pour methylated spirits or similar substances into the rock drill, as this interferes with lubrication and increases wear.
Used and worn-out machines should be disposed of in a way that maximizes material recycling and minimizes environmental impact.