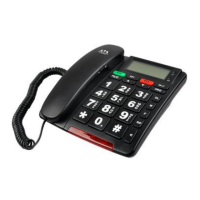
5.13.2 Recording Daily alarm message.
⚫ Press PRO
⚫ Press 1 x ▼ to select “DAILY ALARM”.
⚫ Press
⚫ Press 2 x ▼ select “RECORD MESSAGE”
⚫ Press and hold and wait for the beep, “VOICE” icon
is flashing. Keep holding .
⚫ After the beep, Keep holding .please speak the
message you want recorded.
⚫ Now release the button to finish the recording.
⚫ Once you are complete the recorded message will play.
⚫ Press PB/D to leave menu
5.13.3 Check Daily alarm message.
The message you recorded in previous chapter can be
verified.
⚫ Press PRO
⚫ Press 1 x ▼ to select “DAILY ALARM”.
⚫ Press
⚫ Press 3 x ▼ select “CHECK MESSAGE”
⚫ Press to listen to the recorded message.
⚫ Press PB/D to leave the menu.
Page 18
5.3 LCD CONTRAST
You can set the LCD display contrast to 5 different levels:
• Press PRO
• Press to select “LCD CONTRAST”
• Use ▲ and ▼ to select desired level
• Press to confirm
• Press PB/D to leave menu
5.4 ENTER TIME AND DATE
When you have subscription to Caller ID service and your
telephone provider sends date and time together with
telephone number, the phone’s clock will be set
automatically when you receive a phone call.
• Press PRO
• Press ▲ 1 x to select “ENTER TIME / DATE”
• Press to enter settings
• Use ▲ and ▼ to change hour
• Press to confirm
• Use ▲ and ▼ to change minutes
• Press to confirm
• Use ▲ and ▼ to change month
• Press to confirm
• Use ▲ and ▼ to change date
• Press to confirm
• Press PB/D to leave menu
5.5 SET AREA CODE
When you have subscription to Caller ID service, it can be
necessary in some countries to enter your area code. You
can set up to 5 digits for the area code.
• Press PRO
• Press ▼ 2 x to select “LOCAL AREA CODE”
Page 11