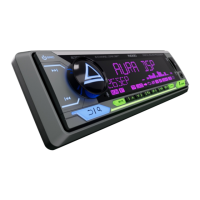
B5 Channel 1 left + (white)
B6 Channel 1 left – (white-black)
B3 Channel 2 right + (grey)
B4 Channel 2 right – (grey-black)
B7 Channel 3 left + (green)
B8 Channel 3 left – (green-black)
B1 Channel 4 right + (purple)
B2 Channel 4 right – (purple-black)
WARNING
DO NOT OPEN
5
RED
ACC +12V
YELLOW
constant
power
+12V
BLACK
ground
MINUS
BLUE
control
wire
+12V
ANT - radio antenna connection input
(not included)
MIC - external microphone input (not included)
Connecting steering wheel buttons
A1 brown/black- SWC key:
A2 : brown- SWC key
A8 - GND (ground): black
1. Make sure that your vehicle's on-board voltage is +12 volts.
2. Before connecting wires, remove the fuse from the device.
3. Connect the yellow (A4) wire to the +12 volt DC power circuit.
4. Connect the red wire (A7) to the ACC terminal of the ignition switch.
5. Connect the black wire (A8) to a metal part of the car body.
6. Blue wire (A5) - connect to the remote input of the amplifier (Remote) or the power input of
the active antenna.
7. Connect the orange wire (A6) to the circuit where +12 volts appears when the headlights are
turned on.
8. Connect the remaining wires according to the diagram.
Note:
To avoid increased current consumption and unstable operation of the receiver, when
connecting the red wire (A7) to constant +12 volts (together with yellow A4),
set the “CAR ACC” function in the “SYSTEM” menu to “NO”!
1L-2R: RCA-output, 1 (left) and 2 (right) channels
3L-4R: RCA-output, 3 (left) and 4 (right) channels
5L-6R: RCA-output, 5 (left) and 6 (right) channels
7L-8R: RCA-output, 7 (left) and 8 (right) channels
ANT
MIC
15 A
fuse
1
2
4
6
5 7
1
2
3
4
B
5
6
7
8
A
8
4R
2R
6R8R
7L
5L
3L
1L
Power connection
Connecting speaker and RCA cables