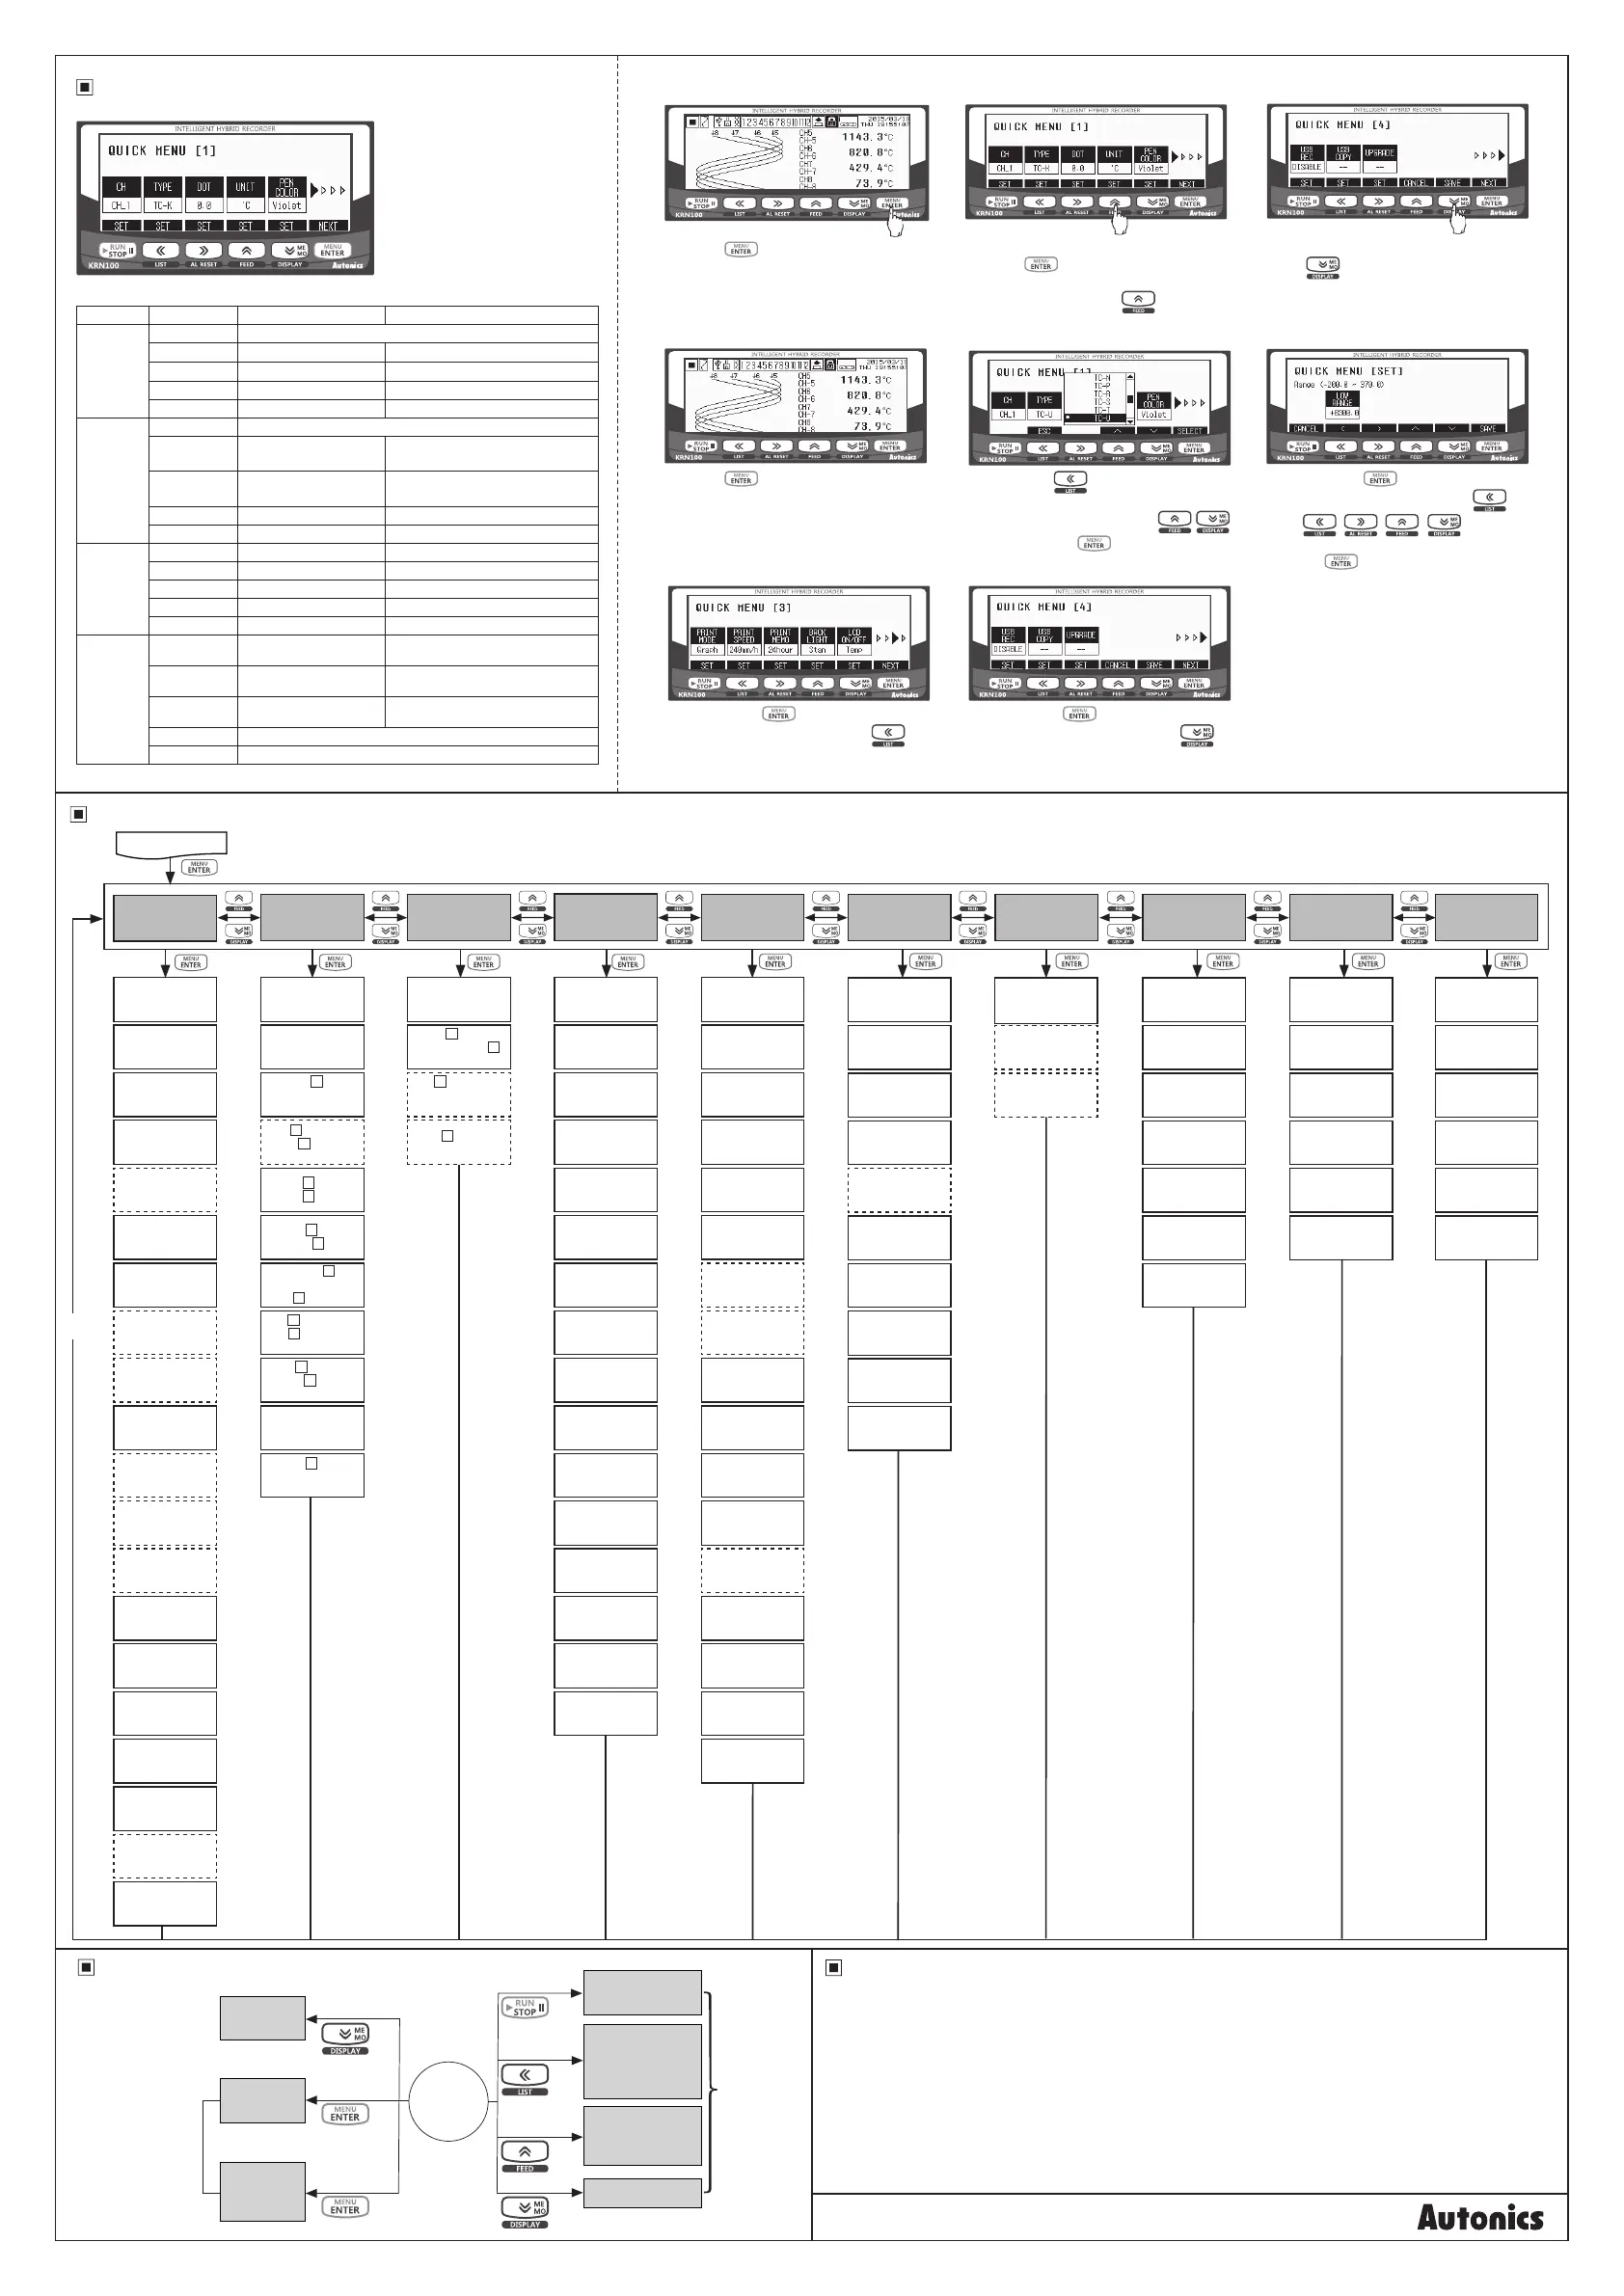
QUICK MENU consists of usually used parameters for quickly parameter setting.
QUICK MENU
1) Parameters of QUICK MENU
※
Refer to “KRN100 user manual”.
Page Parameter Description Linked parameters
QUICK
MENU [1]
CH Select channel for the QUICK MENU[1] setting.
TYPE Input type [INPUT SETUP]-[Input Type]
DOT Decimal point [INPUT SETUP]-[Range/Scale Point]
UNIT Display/Temperature unit [INPUT SETUP]-[Display/Temp Unit]
PEN COLOR Pen color [INPUT SETUP]-[Pen Color]
QUICK
MENU [2]
CH Select channel for the QUICK MENU[2] setting.
LOW RANGE
Low-limit input value or
graph scale value
[INPUT SETUP]-[Low Range] or
[INPUT SETUP]-[Low Graph Scale]
HIGH RANGE
High-limit input value or
graph scale value
[INPUT SETUP]-[High Range] or
[INPUT SETUP]-[High Graph Scale]
LOW SCALE Low-limit scale value [INPUT SETUP]-[Low Scale]
HIGH SCALE High-limit scale value [INPUT SETUP]-[High Scale]
QUICK
MENU [3]
PRINT MODE Record mode [RECORD SETUP]-[Record Mode]
PRINT SPEED Standard record speed [RECORD SETUP]-[Standard Speed]
PRINT MEMO Digital memo period [RECORD SETUP]-[Memo Period]
BACK LIGHT LCD backlight [SYSTEM SETUP]-[Backlight]
LCD ON/OFF
LCD backlight On/O
[SYSTEM SETUP]-[Backlight On/O]
QUICK
MENU [4]
USB REC Memory save
[FILE/MEMORY SETUP]-
[USB LogData Save]
USB COPY Call USB COPY window
[FILE/MEMORY SETUP]-
[USB Memory Copy/Move]
UPGRADE Call upgrade window
[USER/INFORMATION SETUP]-
[Firmware Upgrade]
CANCEL Cancel the settings
SAVE Save the setting of QUICK MENU[1] to [4].
Operation
Special
function for
record
Trend graph
→ Bar graph
→ Digital number
Usually used
parameters of
parameter setting group
are reorganize as
QUICK MENU.
Each parameter setting
is linked.
Start/Stop
recording
Parameter
setting
information
output
Manual feed
(when stop
recording)
Digital memo
Screen
display
QUICK
MENU
Parameter
setting
group
3 sec.
3 sec.
3 sec.
3 sec.
RUN mode
2) QUICK MENU Setting
ᆞE.g.) In case of CH1, recording as input type=TC-U, low-limit input value=300, standrad record speed= 240mm/h
① ② ③
Press the key once in RUN mode and it
enters to QUICK MENU.
QUICK MENU consists of usually used
parameters for quickly parameter setting.
Set the keys following the each parameter. Press
the NEXT(
) key and it moves to next page.
E.g ) When changing the temperature unit (
℃
→
℉
)
of CH1, press the SET(
) key.
After completing the set ing, press the
SAVE(
) key at QUICK MENU[4] and save
the settings. It returns to RUN mode.
① ② ③
Press the key in RUN mode to enter
QUICK MENU.
Press the SET(
) key at QUICK MENU [1]
and below screen is displayed. Set input type
[TYPE] as TC-U by pressing SET(
,
)
keys and press the
key.
Press he NEXT(
) key once and it moves
to QUICK MENU [2]. Press the SET(
) key
using
, ,
,
keys to set
low-limit input range [LOW RANGE] as 300 and
press the
key.
④ ⑤
Press the NEXT( ) key once and it moves
to QUICK MENU [3]. Press the SET(
) key
and set standard record speed [PRINT SPEED]
as 240mm/h.
Press the NEXT(
) key once and it moves
to QUICK MENU [4]. Press the SAVE(
)
key to save the set ings of QUICK MENU [1] to
[4] and it returns to RUN mode.
Parameters
3 sec.
OK,
Cancel
RUN mode
※
Dot parameters may or may not appear, depending on the other parameter setting.
DIGITAL INPUT
SETUP
(digital input setting)
ALARM SETUP
(alarm setting)
COMMUNICATION
SETUP
(com. setting)
INPUT SETUP
(input setting)
SYSTEM SETUP
(system setting)
RESERVATION
SETUP
(reservation setting)
Reservation
Type
(reservation record)
FILE/MEMORY
SETUP
(le/memory setting)
USER/INFORMATION
SETUP
(user/info. setting)
RECORD BACKUP
DATA
backup data record setting
RECORD SETUP
(record setting)
Select UI Card
(universal input
card select )
Input Set Copy
(input parameter
copy)
LCD/Paper Record
(display and record
measuring value)
Pen Color
(record color)
Record Zone
(record zone)
Tag Name
(channel name)
Input Type
(input
specications)
Range/Scale Point
(decimal point)
Display/Temp Unit
(display/temp.
unit)
High/Low Range
& Graph Scale
(high/low input value
and graph scale)
Low Scale/
High Scale
(high/low scale value)
Special Func
(special function)
Two Unit
(display vacuum,
static pressure)
Ref Channel
(reference
channel)
Input Bias
(error correction)
Span
(gradient
adjustment)
Record Method
(data storage
method)
Filter Type
(input digital lter)
Filter Counter
(number of digital
lters)
Burnout Action
(display setting
for break)
Select UI Channel
(universal input
select)
Alarm Set Copy
(copy alarm
parameter)
Alarm type
(alarm operation
mode)
Alarm Ref Channel
(alarm reference
channel)
Alarm Option
(alarm
option)
Alarm Value
(alarm
SV)
Alarm
Hysteresis
(alarm hysteresis)
Alarm ON/OFF Delay
(alarm output ON/OFF
delay time)
Alarm Alarm No
(alarm
output
alarm number)
Selection Alarm Card
(Alarm output card
select)
Alarm- Status
(relay and transistor
output method
Select DI Card
(digital input card
select )
DI- Type
(digital input
select)
DI- Reset No
(reset alarm
number)
DI- Status
(operation status)
Modbus Address
(com. address)
RS485 Port
(RS485 com. use)
Baud Rate
(com. speed)
Parity Bit
(com. parity bit)
Stop Bit
(com. stop bit)
Termination Set
(terminating
resistance)
Response Wait Time
(com. response
waiting time)
Protocol
(com. protocol)
RS485 Com/Write
(RS485 com.
write)
Ethernet Port
(Ethernet com.
use)
IP Address
(IP address)
Subnet Mask
(subnet mask)
Default Gateway
(default gateway)
Ethernet Com
Write
(Ethernet com. write)
USB Device Port
(USB com. use )
USB Com Write
(USB com. write)
Record Mode
(record mode)
Digital Print type
(1 line record CH during
numeric recording)
Standard Speed
(standard record
speed)
Option Speed
(option record
speed)
Memo Period
(digital memo
cycle)
Divide Zone
(record zone
division)
Standard Period
(standard record
cycle)
Option Period
(option record
cycle)
Listing Language
(language for list
printing)
Alarm Speed
(alarm record
speed)
Power On Status
(record status
when power ON)
Run Status
(list printing at
start recording)
List Out Option
(list record option
Zone Dot Line
Distance
(dot line for zone division)
CH Print Distance
(record interval for
each channel graph
Start Line Print
(start line when
starting record)
Range Print Time
(input range
record period)
Device Name
(device name)
Date/Time
(date/time)
Date Type
(date type)
Summer Time
(summer time)
Summer Time
Period
(summer time period)
Alarm Sound
(alarm sound)
Sampling Rate
(sampling cycle)
Log Speed
(save cycle)
Backlight
(LCD backlight
brightness)
Baklight On/O
(LCD backlight ON
method)
Load Set File
(parameter setting
le open)
Save Set File
(parameter setting
le save)
Memory Status
(memory capacity)
Memory Clear
(memory delete)
USB LogData
Save
(USB save function)
Memory Save Option
(memory save
option)
USB Memory
Copy/Move
(data move/copy)
Password
(password mode)
Login Admin
(admin. log in)
Change Admin
Password
(password change by admin.)
User Lock
(user authority
change)
Information
(system info.
check)
Firmware Upgrade
(rmware
upgrade)
Record Backup
(backup data
record)
Backup Data List
(backup data list)
Start Date and Time
(start time for data
save)
End Date and
Time
(end time for data save)
Backup Print Mode
(backup data print
mode)
Selection Print Mode
(backup data recording
mode setting)
Reservation Period
(reservation
record period)
Reservation Time
(reservation
record time)
Cautions during Use
1. Follow instructions in 'Cautions during Use'. Otherwise, it may cause unexpected accidents.
2. Install a surge absorber at each end of inductive load coil when controlling high-capacity power relay or inductive
load (e.g. magnet).
3. Check the polarity of the terminals before wiring the temperature sensor.
For RTD temperature sensor, wire it as 3-wire type, using cables in same thickness and length.
For thermocouple (CT) temperature sensor, use the designated compensation wire for extending wire.
4. Keep away from high voltage lines or power lines to prevent inductive noise.
In case installing power line and input signal line closely, use line lter or varistor at power line and shielded wire
at input signal line.
Do not use near the equipment which generates strong magnetic force or high frequency noise.
5. This unit may be used in the following environments.
①Indoors (in the environment condition rated in 'Specications') ②Altitude max. 2,000m
③Pollution degree 2 ④Installation category II
QUI
CK
HENU
[1 l
------------
' '
·------------·
·------------·
' '
' '
' '
I I
·------------·
' '
·------------·
------------
------------
·------------·
I I
I
I
□
□
□
------------
□
□
□
□
□
□
□
□
□
□
□
I
·------------·
·------------·
□
I I
2015
/
03/1
=~
•
=====•-~9=-THU
19:5510
3
°C
201'5/03/1
~cc,c
=
~=
=-"ce
~~-•~~TI-IU
19
:
'5
'5:0
43.
3
°C
INTELLIGENT
HYBRID
RECORDER.
UU
I CK HENU
[3]
!!!!!~1
~!~~~
~
~
►~
------
► :
y~~
..
.
«
■
» • A
■
~=~
• E~i"EUR
"
I
r:a;;;i[1
~
------------
------------
I
CD
-
------------
I
00
I
INTELLIGENT HYBRID RECORDER
UU
I
CK
HENU
[1
l
~~~~~~~l
e
~
I
►
~~
~
------
►
:~":-
11
■
«
■
»•~
·
~~
-
Eri
':flu
R
TC-P
T
C-N
~
TC-R
TC-S
--
►
>
> >
TC-T
~
CD
-
OU
I
CK
HENU
[41
·------------·
·------------·
I I
OU
I
CK
HENU
[4]
OU
I
CK
HENU
[SETJ
Range
(-200. 0 N
37
0.
0)
~t'!
«
MENU
ENTER
»
CD
-
l'--------r-----1
l'-------r-----'
Autonics
 Loading...