Do you have a question about the Autopot AQUAvalve5 and is the answer not in the manual?
Check silicone seal alignment for proper flood and drain function, repeating if needed.
Clean the AQUAvalve5 with soapy water, disassemble, and clear the nozzle to prevent blockages.
Allow plants to establish for 7-10 days before turning the system on for healthier root development.
Prepare pots by adding discs and connecting the AQUAvalve to the tray T-section.
Position the tray level and cut the 9mm/16mm pipe to the appropriate length for connection.
Connect system piping to fittings/tank and place the pot cleanly into the tray.
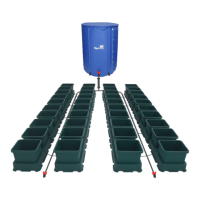
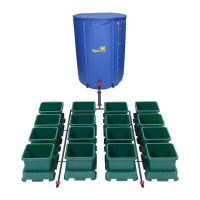
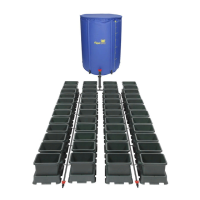
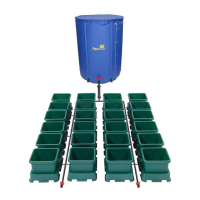
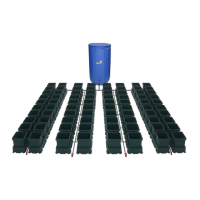
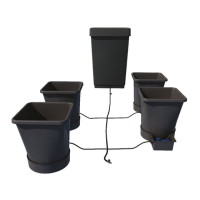
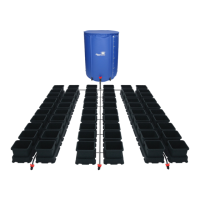
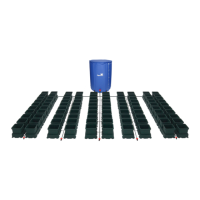
The AutoPot 60Pot System is a gravity-fed, self-watering system designed for cultivating plants. It operates without the need for electricity, pumps, or timers, making it a sustainable and efficient solution for growers. The core of the system is the AQUAvalve5, a patented float valve that controls the flow of nutrient solution to the plants.
The 60Pot system utilizes a unique bottom-feeding approach, where plants absorb nutrient solution from below as needed. This method encourages a strong and healthy root system by allowing the growing medium to dry out between watering cycles, mimicking natural wet and dry conditions.
The AQUAvalve5 is the central component responsible for regulating the water supply. When the plants have consumed the nutrient solution in the tray, the AQUAvalve5 opens, allowing fresh solution to flow in from the reservoir. Once the desired level is reached, the valve closes, preventing overwatering and ensuring that the plants have access to a consistent supply of nutrients without being constantly submerged. This "wet and dry" cycle is crucial for preventing root rot and promoting optimal plant growth.
The system is designed to be modular, allowing for easy expansion and customization. Each plant sits in its own pot within a tray, and multiple trays can be connected to a single reservoir. The gravity-fed design means that the reservoir needs to be elevated above the highest AQUAvalve to maintain sufficient pressure for the system to operate effectively.
Establishment Period: Before activating the system, it is crucial to allow plants to establish themselves in their pots for 7-10 days. During this period, plants should be watered manually through the pot, allowing excess water to drain outside the tray. This encourages a robust root system before the automated watering begins.
Reservoir Management: The system requires a FlexiTank reservoir, which should be kept at a minimum of 150mm above the highest AQUAvalve to ensure proper gravity pressure. It is recommended to refill the reservoir when approximately one-third of the solution remains, rather than allowing it to run completely empty. This prevents the system from drying out and ensures a continuous supply of nutrients.
Substrate Choice: The system performs best with free-draining substrates such as soil/perlite, coco/perlite, soil/clay pebbles, coco/clay pebbles, or rockwool/clay pebbles. These mediums allow for proper aeration and drainage, which are essential for the "wet and dry" cycle to function effectively.
Fertilizer Compatibility: The AQUAvalve5 system is compatible with both mineral and organic fertilizers. When using mineral fertilizers, they can be fed directly via the reservoir and pipework. For organic fertilizers, a water pump in the reservoir is recommended to run for 15 minutes every two hours. This helps to keep the organic solution well-mixed and prevents clogging.
System Setup:
Silicone Alignment: Proper alignment of the silicone on the top float of the AQUAvalve5 is critical for correct flooding and draining. Hold the AQUAvalve5 at eye level to ensure the silicone sits parallel on the hole below it, creating a tight seal. If misaligned, gently lift the top float, apply pressure to one side of the silicone, drop the float, and recheck.
End-of-Season Cleaning: At the end of each growing season, the AQUAvalve5 should be cleaned thoroughly using warm soapy water and an old toothbrush.
Disassembly: The AQUAvalve5 is designed for easy disassembly. The top float slides across, and the bottom float can be unclipped from its pivoting position. The circular discs on the top float can be removed using pliers to grip the raised point. It is advisable to remove the silicones during disassembly to prevent them from getting lost.
Nozzle Clearing: A paper clip or pipe cleaner can be used to clear any lime scale buildup from the AQUAvalve5 nozzle. Blowing through the nozzle can also help remove buildup. Crucially, never use a drill or drill bit to clear the AQUAvalve5 nozzle, as this will permanently damage the valve.
Pipework Flushing: When using organic fertilizers, it is essential to flush the pipework with plain water every time the reservoir empties. This prevents buildup and ensures consistent nutrient delivery.
Reservoir and Pump Cleaning: For organic fertilizer users, the reservoir, pump, and filter should be cleaned each time the reservoir empties to prevent blockages and maintain system hygiene.
Substrate Removal: Before placing pots in trays, ensure all substrate is removed from the bottom and sides of the pots. This prevents any debris from interfering with the AQUAvalve5's functionality.
By following these guidelines, users can ensure the longevity and optimal performance of their AutoPot 60Pot System, leading to healthy and productive plants.
| Valve Type | Float valve |
|---|---|
| Water Source | Reservoir |
| Flow Rate | Variable based on plant demand |
| Operating Pressure | 0 psi (gravity-fed) |
| Material | Plastic |
| Compatibility | Compatible with Autopot systems |
| Operation | Automatic |
| Valve Mechanism | Float valve |
| Water Level Control | Maintains a set water level |
| Usage | Irrigation |
| Suitable for | Pots and containers |