Do you have a question about the Autopot easy2grow 48 and is the answer not in the manual?
Verify the AQUAvalve floods and drains correctly by holding it at eye level to check silicon seal alignment. Adjust if necessary.
Clean the AQUAvalve with soapy water and a brush. Disassemble for thorough cleaning. Use a paper clip to clear the nozzle of lime scale.
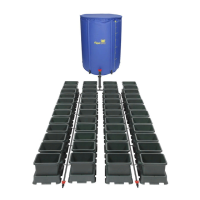
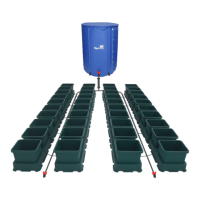
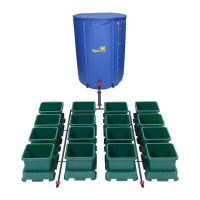
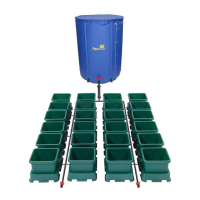
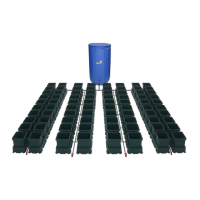
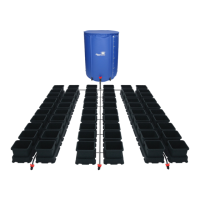
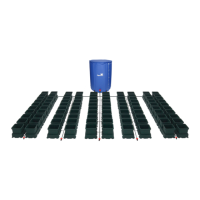
Lists all components included in the easy2grow 48 system and provides a visual representation of the suggested layout.
Details the physical dimensions of the easy2grow 48 system components and provides plan views for setup.
Provides a step-by-step guide for setting up the easy2grow 48 system, from preparing pots to connecting pipes.
Offers crucial advice on plant establishment, tank maintenance, fertiliser choice, and substrate preparation for optimal system performance.
The AQUAvalve™ is a crucial component of an automated plant watering system, designed to ensure plants receive the optimal amount of water and nutrients without the need for constant manual intervention. Its primary function is to flood and drain a tray at specific intervals, creating a wet/dry cycle that promotes healthy root development and prevents waterlogging. This innovative design allows plants to draw water as needed, mimicking natural conditions and reducing the risk of over or under-watering.
The core mechanism of the AQUAvalve™ relies on a simple yet effective float system. When the water level in the tray drops, a float within the AQUAvalve™ lowers, opening a valve that allows water from a reservoir to flow into the tray. As the water level rises and reaches a predetermined height, the float lifts, closing the valve and stopping the water flow. This cycle ensures that the plants are never left in standing water for too long, which is vital for preventing root rot and encouraging strong, fibrous root systems. The system is entirely gravity-fed, meaning it does not require electricity or pumps to operate, making it an energy-efficient and reliable solution for plant cultivation. The design allows for a consistent wet/dry cycle, which is known to be beneficial for plant health, as it encourages roots to seek out moisture and oxygen, leading to more vigorous growth. The AQUAvalve™ is designed to work with various growing media, including soil, coco coir, and rockwool, making it versatile for different cultivation preferences.
Setting up and using the AQUAvalve™ system is designed to be straightforward. Before turning the system on, it is recommended to allow plants to establish in their pots for 7-10 days, watering them manually during this period. This helps to encourage a stronger and healthier root system before the automated watering begins.
A critical aspect of proper usage is ensuring the AQUAvalve™ floods and drains correctly. This involves checking the silicon seal on the top float. The silicon must sit parallel on the hole below it, creating a tight seal when touching the hole. To verify this, hold the AQUAvalve™ at eye level and observe the silicon's position. If it's not parallel, gently lift the top float, apply pressure to one side of the silicon, drop the float, and re-check. Repeat this process until the silicon creates a proper seal. This simple check ensures the valve operates efficiently and prevents leaks or continuous flooding.
The system requires a reservoir, such as a FlexiTank, which should always be raised to a minimum of 150mm above the highest AQUAvalve™. This elevation ensures sufficient water pressure for the gravity-fed system to function correctly. It is also crucial to refill the tank when approximately one-third of the solution remains, as the tank should never be allowed to run completely empty.
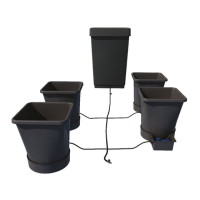
When setting up the pots, it's important to place black Marix discs at the bottom of each pot before filling with growing medium and potting up plants. After potting, water the plants manually and allow the excess water to drain outside the tray. PotSock Squares should then be fitted over the bases of the pots. When connecting the AQUAvalve™ to the tray, ensure the "half moon" section is aligned with the T section in the tray, and position the tray so it is level. The 6mm pipe is pushed through a collar and attached to the AQUAvalve™ nozzle, with the collar then re-screwed until it grips, but not overtightened.
For optimal results, mineral fertilizers are recommended, as organic fertilizers can sometimes block the small pipework. It is also essential to use free-draining substrates like soil/perlite, coco/perlite, soil/clay pebbles, coco/clay pebbles, or rockwool/clay pebbles. Before placing pots in the trays, all substrate should be cleaned from the bottom and sides of the pots to ensure the system remains clean and free from blockages.
Regular care and maintenance are vital to ensure the longevity and efficient operation of the AQUAvalve™. At the end of each growing season, the AQUAvalve™ should be thoroughly cleaned using warm soapy water and an old toothbrush. The AQUAvalve™ is designed for easy disassembly, allowing for comprehensive cleaning. The top float can slide across, and the bottom float can be unclipped from its pivoting position. The circular discs on the top float can also be removed by gripping the raised point with pliers. During disassembly, it is advisable to remove the silicones to prevent them from being lost.
To prevent blockages caused by lime scale or other build-up, it is handy to have a paper clip or pipe cleaner on hand. These can be used to push through the AQUAvalve™ nozzle, clearing any obstructions that may have accumulated during the growing season. Blowing through the nozzle can also help dislodge any build-up. However, it is crucial never to use a drill or drill bit to clear the AQUAvalve™ nozzle, as this can permanently damage the component and render it unusable. Proper maintenance ensures that the AQUAvalve™ continues to function effectively, providing consistent and reliable watering for your plants season after season.
| Number of Pots | 48 |
|---|---|
| System Capacity | 48 plants |
| Valve Type | AQUAvalve |
| Material | Durable plastic |
| Growing Medium | Soil, coco, or other inert mediums |
| Watering Method | Automatic watering through capillary action |
| Dimensions | Varies based on setup |
| Water Source | Gravity-fed from a reservoir |
| Compatibility | Compatible with various growing media |