Do you have a question about the Autopot easy2grow 24 and is the answer not in the manual?
Guide to checking and adjusting the AQUAvalve for a tight seal to ensure proper flooding and draining.
Instructions for cleaning the AQUAvalve seasonally and clearing the nozzle to prevent blockages.
Steps for preparing pots with discs, filling with medium, potting plants, and initial watering.
Instructions on connecting the AQUAvalve to the pipework and positioning the tray correctly.
Details on cutting pipe, fitting PotSock Squares, connecting pipes, and completing the tray setup.
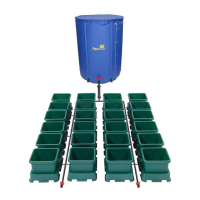
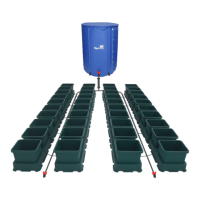
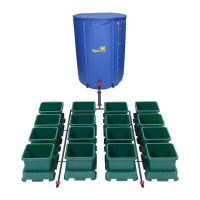
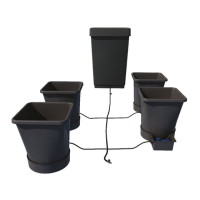
The AQUAvalve is a key component in an easy2grow watering system, designed to provide plants with a consistent and controlled supply of water and nutrients without the need for electricity or pumps. It operates on a simple gravity-fed principle, ensuring that plants receive water only when they need it, promoting healthier growth and preventing overwatering or underwatering.
The core function of the AQUAvalve is to regulate the water level within a plant tray. It works by allowing water to flow into the tray until a predetermined level is reached, at which point a float mechanism rises and seals the water inlet, stopping the flow. As the plants consume water from the tray, the water level drops, causing the float to descend and unseal the inlet, allowing more water to flow in. This cycle ensures that the plants always have access to a fresh supply of water and nutrients, creating a wet/dry cycle that mimics natural watering conditions and encourages robust root development. The system is designed to be completely automated once set up, requiring minimal intervention from the user. It is particularly effective for extended periods, such as holidays, as it eliminates the need for daily manual watering. The AQUAvalve's design promotes efficient water usage, reducing waste and ensuring that nutrients are delivered effectively to the plants.
Setting up and using the AQUAvalve system is straightforward. The first step involves preparing the plants and pots. Plants should be potted in a free-draining medium such as soil/perlite, coco/perlite, or rockwool/clay pebbles. It is crucial to clean all substrate from the bottom and sides of the pots before placing them in the trays to prevent blockages in the system. Marix discs and PotSock Squares are used at the bottom of the pots to prevent growing medium from escaping and potentially clogging the AQUAvalve.
Once the plants are potted, they should be watered thoroughly and allowed to establish for 7-10 days before the automatic watering system is turned on. This initial establishment period encourages a strong and healthy root system.
The AQUAvalve itself needs to be correctly assembled and positioned. The 6mm pipe, which carries water from the reservoir, is pushed through a collar and attached to the AQUAvalve nozzle. The collar is then screwed back on, but it's important not to overtighten it; stop when you feel it grip. The AQUAvalve is then connected to the tray, ensuring the "half moon" section is on the T section in the tray, and the tray is positioned level.
The water reservoir, typically a FlexiTank, should be raised to a minimum of 150mm above the highest AQUAvalve to ensure sufficient water pressure for the gravity-fed system. It is also advised to refill the tank when approximately one-third of the solution remains, never allowing the tank to run empty. For optimal results, mineral fertilizers are recommended, as organic fertilizers can tend to block the small pipework.
A critical aspect of usage is ensuring the silicon seal within the AQUAvalve is correctly seated. This silicon piece is vital for creating a tight seal when the float rises to stop water flow. To check its position, hold the AQUAvalve at eye level and observe the silicon on the top float resting on the hole below it. It should sit parallel to the hole, creating a tight seal. If it appears misaligned, gently lift the top float, apply pressure to one side of the silicon, drop the float, and recheck. This ensures the valve floods and drains correctly.
Regular maintenance of the AQUAvalve is essential to ensure its longevity and continued efficient operation. At the end of each growing season, the AQUAvalve should be thoroughly cleaned using warm soapy water and an old toothbrush.
The AQUAvalve is designed for easy disassembly, which aids in cleaning. The top float can slide across, and the bottom float can be unclipped from its pivoting position. The circular discs on the top float can also be removed using pliers. It is advisable to remove the silicones during disassembly to prevent them from getting lost.
During cleaning, it's helpful to have a paper clip or pipe cleaner on hand. These tools can be used to push through the AQUAvalve nozzle, effectively removing any lime scale buildup that may have occurred during the growing season. Blowing through the AQUAvalve nozzle can also help dislodge any buildup.
Crucially, under no circumstances should a drill or drill bit be used to clear the AQUAvalve nozzle. This can cause irreparable damage to the valve. Proper cleaning methods, as described, are sufficient to maintain the AQUAvalve's functionality. Adhering to these maintenance guidelines will ensure that the AQUAvalve continues to operate effectively, providing a reliable and automated watering solution for your plants season after season.
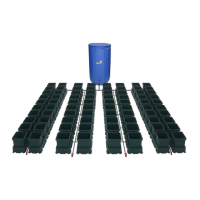
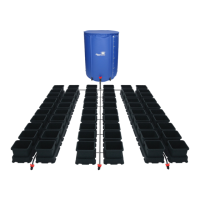
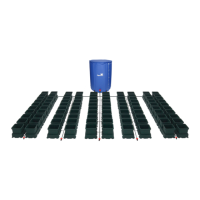
| Number of Pots | 24 |
|---|---|
| Material | Plastic |
| Valve Type | Float valve |
| Automatic | Yes |
| Passive | Yes |
| System Type | Hydroponic |
| Water Reservoir Capacity | 47 liters |
| Water Source | Gravity-fed |
| Suitable For | hydroponics |
| Watering Method | Bottom watering |