Do you have a question about the Axis AX1804BT and is the answer not in the manual?
Details for installing the unit and front-mount procedures.
Specific instructions for mounting the unit in a DIN slot.
Steps for removing the unit and the wiring diagram overview.
Controls for turning the unit on/off and muting audio playback.
Adjusting bass, treble, balance, fade, EQ, and loudness.
Setting the clock, time format, and RDS synchronization.
Playing music via the 3.5mm AUX IN jack.
Instructions for receiving radio stations, auto-store, and manual presets.
Operations for USB/SD card playback, file selection, and playback modes.
Pairing mobile devices, answering/rejecting calls, and call transfer.
Procedure to disconnect or re-connect the Bluetooth connection.
Details about the unit's physical characteristics and general capabilities.
Supported formats, inputs, and playback features.
Radio tuner specifications and audio output power/connections.
Bluetooth version, hands-free, and audio streaming support.
Solutions for no power, no sound, and volume problems.
Fixes for unresponsive keys, radio malfunctions, and antenna issues.
Details on warranty coverage, duration, and claim procedures.
Warranty for commercial use and consumer rights under Australian law.
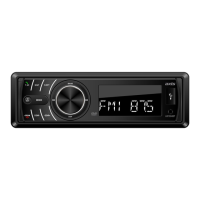
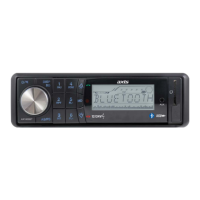
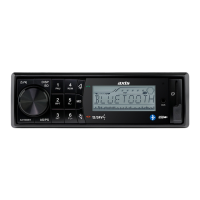
The AX1804BT is a versatile 12/24V Bluetooth DVD/CD Multimedia Player designed for in-car entertainment, offering a range of audio and video playback options, along with Bluetooth connectivity for hands-free communication and audio streaming.
Installation of the AX1804BT should ideally be performed by a professional technician to ensure proper setup and avoid damage. Before installation, it is crucial to read the instruction and operation manual carefully. All wires should be connected correctly and securely, with exposed wires insulated to prevent short circuits. The unit is designed for DIN front-mount installation. To install, first insert the mounting sleeve into the car's dashboard opening. The claws on the mounting sleeve should be bent outward to ensure a tight and secure fit. Next, the outer trim frame is inserted. Finally, the unit is combined with the dashboard using mounting bolts, metal straps, spring washers, hex nuts, and M5X21 screws with plain washers. Before connecting the battery terminal, ensure all other wires are properly connected. The yellow wire must be connected to the positive terminal of the battery. When replacing the fuse, ensure the new fuse matches the specified rating. For optimal sound quality, use speakers with a 4-8 ohm impedance.
To turn the unit on or off, press and hold the MUTE button. A short press of the MUTE button will toggle the mute function on or off. The unit features a front panel with various controls, including a volume knob, mode button, band selection, and track navigation buttons. The LCD screen displays information such as the current radio frequency or track number.
The AX1804BT allows for comprehensive sound adjustments. A short press of the SEL button accesses the audio menu, where you can adjust Bass, Treble, Balance, Fader, and EQ settings (Class, Rock, Pop, Flat, Off). You can also toggle the Loudness function on or off. Rotating the VOL knob adjusts these settings.
Pressing and holding the SEL button accesses the system settings menu. Here, you can set the clock (hour and minute), choose between independent or synchronized clock modes (CT INDEP/SYNC), and select the 24H or 12H clock format. The CT INDEP mode allows manual clock setting, while CT SYNC synchronizes the clock with the received RDS station's time. If the clock is set manually, it will revert to INDEP mode automatically. The BEEP (ON/OFF) setting controls the unit's beep sound. P-VOL (Preset VOL) allows you to set the power-on volume. If the volume at shutdown is lower than the P-VOL, the unit will power on at the shutdown volume. If it's higher, it will power on at the P-VOL value. The AREA (AUS/USA) setting allows you to select between Australia or USA radio frequencies. DX/LOC (Distance/Local) controls tuner sensitivity: LOC receives only strong signals, while DX receives both strong and weak signals. STEREO/MONO allows you to choose between FM stereo signal reception or monochrome, which can reduce noise in weak signal areas.
To listen to the radio, press the MODE button to select FM or AM source, then press the BAND button to select a band. Use the track navigation buttons to seek desired radio stations. Pressing and holding these buttons allows for manual tuning. To auto-store stations, press and hold the BAND button for 2 seconds; this will save stations to numeric buttons 1-6 across bands 1-3. To manually store a station, tune to the desired frequency, then press and hold one of the 1-6 preset buttons for 2 seconds. A short press of a preset button will recall the saved station.
When a USB drive is inserted, the unit automatically begins playing MP3/WMA files. If a USB drive is already inserted, press the MODE button until the USB mode display appears. To navigate files, use the track navigation buttons to skip to the next or previous file. Holding these buttons enables fast forward or fast reverse. The play/pause button controls playback. The INT function plays the first 10 seconds of each file; press it again to cancel. The RPT function (accessed via the 3/RPT button) offers repeat modes: RPT FOLD (repeat all files in the folder), RPT ONE (repeat the current file), and RPT ALL (repeat all files, default). The RDM button enables random playback of all files; press it again to cancel.
To select a directory, use the DIR+/DIR- buttons to navigate up or down. Alternatively, press the BAND button once to enter DIR SCH mode, then rotate the VOL knob to select the desired directory. The +10/-10 file function allows you to skip 10 files forward or backward by pressing and holding the DIR+/DIR- buttons for 2 seconds. To search for specific files, press the BAND button twice to enter "NUM ****" mode. Enter the desired numbers (0-9) using the corresponding buttons (1-6, MODE=7, 8, 9, DISP=0, SEL=confirm, VOL=0-9), then press SEL to confirm and play the selected song.
The AX1804BT features Bluetooth connectivity for hands-free calls and audio streaming. To pair a mobile phone, search for "AX1801 BT" in the phone's Bluetooth settings. If prompted, enter the password "0000". A successful pairing will display the BT mark on the LCD. For incoming calls, press the phone button to answer or reject/hang up. In BT source mode, pressing the "2" key accesses the Bluetooth menu, allowing you to download the phone book and view other Bluetooth options. The BT VOL setting controls the conversation volume independently of other source volumes. The default is 28, and any changes made during a conversation will be retained for future calls. The ANS (manual/auto) setting determines how calls are answered: ANS=manual requires pressing the phone button to answer, while ANS=auto automatically answers after 3 rings. During a call, pressing the phone button transfers the call between the mobile phone and the unit. To disconnect or reconnect Bluetooth, press and hold the MODE key. Note that for the first-time pairing, you may need to initiate the pairing process from your mobile phone.
To reset the unit to factory settings, press the RESET button. Be aware that all stored memories will be lost. If the unit experiences issues, consult the troubleshooting guide. Common problems include no power (check ignition switch, fuse), no sound (check volume, wiring), unresponsive keys (reset unit), or radio issues (check antenna connection, signal strength, or amplified antenna system). If problems persist after checking the wiring and following the troubleshooting steps, consult a service dealer.
| Bluetooth | Yes |
|---|---|
| USB port | Yes |
| Supported Formats | MP3, WMA |
| Frequency Response | 20 - 20000 Hz |
| Signal-to-Noise Ratio | 85 dB |
| Input Voltage | 12 V |