EasyManua.ls Logo

Baby Lock Sashiko User Manual

Baby Lock Sashiko
3 pages
To Next Page IconTo Next Page
Page #1 background imageLoading...
Page #1 background image
Needle stops in the UP position. A space
and stitch will be formed when the foot
control is pressed (Blue LED is on).
Positioning
Button
Stitch
Formation
LED
Lights
Needle/Loading
Positions
Needle stops in the DOWN position
and the next stitch will be an actual
stitch (Green LED is on).
Needle stops in the DOWN position
and the next stitch will be a stitch
space (Orange LED is on).
Loading position
(press and hold the positioning button
for approximately 2 seconds, Yellow
LED is on).
1. Insert or remove the bobbin case
2. Replace latch wire
3. Replace needle
Bobbin winder is
engaged
(All LED lights are off)
Bobbin winding completed
(Blue LED flashes on and off)
Warning
LED Lights
Orange LED light flashes on and off
1. Safety System is activated:
Side cover is open
Presser foot is raised
Latch wire is engaged in the release position
Foot control is pressed and presser foot is down when power is turned "ON"
2. Needle is in the down position and the presser foot is in the raised position.
3. Motor overload. When this occurs machine has to be turned off then turned back on
before using.
1. The Baby Lock Sashiko stitching will not unravel,so it is not necessary to make
tacking stitch.
2. Always stitch with fabric under the presser foot when machine is threaded.
3. Do not stitch over previous stitching or stitch down the same row of stitching.
4. Avoid stitching over pins.
5. Before removing bobbin case, changing needle, or replacing latch wire, place needle
in up position, remove fabric, and cut thread.
Important Notice
Question and Answer IconNeed help?

Do you have a question about the Baby Lock Sashiko and is the answer not in the manual?

Baby Lock Sashiko Specifications

General IconGeneral
TypeSashiko Sewing Machine
Stitch TypeSashiko
Stitch LengthAdjustable
Needle TypeSashiko Needle
Thread TensionManual
Feed SystemDrop Feed
Presser FootSashiko Foot
Maximum Stitch Length5 mm
Maximum Stitches per Minute800
Needle PositionsSingle
Dimensions18.5" x 12.25" x 11.5"

Summary

LED Indicator Guide

Needle UP Position (Blue LED)

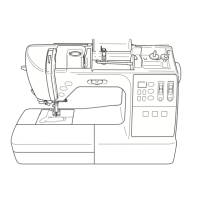
Needle stops in UP position, space/stitch formed when foot control is pressed.

Needle DOWN Position (Green LED)

Needle stops in DOWN position, actual stitch formed next.

Needle DOWN Position (Orange LED)

Needle stops in DOWN position, stitch space formed next.

Loading Position (Yellow LED)

Press and hold positioning button for 2 seconds for loading position.

Bobbin Winder Engaged (No LEDs)

Bobbin winder is engaged when all LED lights are off.

Bobbin Winding Complete (Blue LED Flashing)

Blue LED flashes on/off indicating bobbin winding is complete.

Machine Warnings

Safety System Activation Warning

Warning for safety system activation (e.g., side cover open, presser foot raised).

Needle Down, Presser Foot Raised Warning

Warning when needle is in the down position and presser foot is raised.

Motor Overload Warning

Warning for motor overload, requires power cycle before use.

Loading Position Details

Blue and Yellow LED Conditions

Conditions for Blue and Yellow LEDs to be lit during loading position.

Yellow and Orange LED Conditions

Conditions for Yellow LED flashing with Orange LED when in loading position.

Specialty Stitch Mode

Activating Specialty Stitch Mode

Double click positioning button to enter specialty stitch mode.

Specialty Stitch Mode Operation

How the needle cycles and stops in specialty stitch mode.

Returning to Normal Mode

Press positioning button once to return to normal mode.
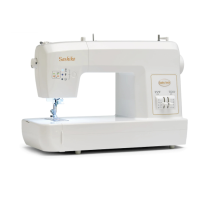
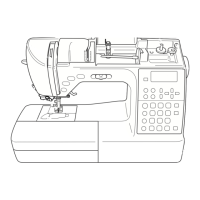
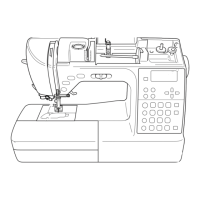
Inserting the Bobbin

Pulling Up Bobbin Thread

Removing the Bobbin

Related product manuals