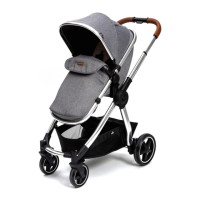
The Panorama XT Travel System is a versatile and comprehensive solution for transporting infants and toddlers, designed to adapt to a child's growth from birth up to 15kg. This travel system includes a chassis, a convertible seat unit (pram body/pushchair), a car seat, and various accessories, offering multiple modes of use and features for convenience, safety, and comfort.
Function Description:
The core of the Panorama XT Travel System is its ability to transform between different modes to suit the child's age and developmental stage.
- Pram Mode: Suitable from birth up to a maximum weight of 9kg or until the child can sit up unaided, roll over, or push themselves up on their hands and knees. In this mode, the seat unit converts into a lie-flat pram body, providing a comfortable and secure environment for newborns. The pram body is designed to face the parent.
- Pushchair Mode: Not suitable for children under 6 months. In this mode, the seat unit functions as a pushchair, accommodating children up to 15kg. The pushchair seat is reversible, allowing the child to face either forward or rearward, offering flexibility based on preference and interaction needs. The backrest is adjustable, providing multiple recline positions for the child's comfort.
- Travel System Mode: This mode integrates the included infant car seat with the chassis, creating a convenient system for moving a sleeping baby from the car to the pram without disturbance. The car seat attaches to the chassis via adaptors, and it is crucial to ensure the car seat is always rearward-facing when attached to the chassis.
Usage Features:
The Panorama XT Travel System incorporates numerous features to enhance ease of use for parents and comfort for the child.
- Chassis Assembly and Folding: The chassis is designed for straightforward assembly and folding. To open, the frame release levers are pulled back, and the handle is lifted until a "click" indicates it's locked into place. Folding involves lifting a carry strap, with an automatic locking catch. It's important to keep the child away during unfolding and folding to prevent injury.
- Wheels and Suspension: The system includes front and rear wheels. The rear wheels attach to an axle and lock into place with a "click." The front wheels also insert into sockets and securely attach. The front wheels feature a swivel lock mechanism, allowing them to be locked for straight-line travel on uneven terrain or unlocked for 360° swivel maneuverability. The rear wheel axle includes a lever for adjusting suspension hardness – towards the back for softer suspension and towards the front for harder suspension. Both sides should be adjusted to the same position.
- Brakes: A parking brake is located on the rear axle. Pressing down on the pedal engages the brake, indicated by a "click," and pushing it upwards disengages it. The brake should always be applied when the pram is stationary, especially when placing or removing the child, or when making adjustments.
- Handle Adjustment: The handle bar is adjustable to three different height positions, catering to caregivers of varying heights. A central button on the handle allows for easy adjustment, with a "click" confirming it's locked into the desired position.
- Seat Unit (Pram Body/Pushchair):
- Attachment and Removal: The seat unit attaches to the chassis by aligning connectors and pressing downwards until a "click" is heard. To remove, levers on both sides of the seat connectors are lifted.
- Pram Mode Conversion: To convert to pram mode, the footrest buttons are pressed, and the footrest is pulled up to align with the frame. Velcro panels on the rear of the seat unit are then fastened, ensuring the fabric covers the metal bracket.
- Pushchair Recline: The backrest in pushchair mode is adjustable. A clip on the reclining harness at the rear of the seat unit is squeezed to adjust the backrest. A lever at the back of the seat unit is lifted to adjust the seat unit recline, with a "click" confirming engagement.
- Footrest Adjustment: The footrest can be adjusted to different positions by simultaneously pressing buttons on both sides, with a "click" indicating it's locked.
- Harness System: A 5-point harness system is included for child safety. It involves sliding shoulder strap buckles onto waist strap buckle housings, then inserting the completed buckles into the central buckle housing until they "click" securely. A central button releases the child from the harness. The shoulder straps are adjustable in height (three positions) and fit, ensuring a snug and safe fit for the child. It is crucial to always adjust the harness to fit the child correctly.
- Canopy: The canopy can be opened and closed by pulling its rim forward or backward. It features an extension panel for maximum sun protection and a viewing window, allowing the caregiver to keep an eye on the child in forward-facing mode.
- Accessories:
- Seat Liner: A seat liner is included for added comfort. It is installed by threading the harness straps through designated slots.
- Bumper Bar: The bumper bar inserts into slots on the seat unit and locks with a "click." Release buttons on either side allow for removal.
- Apron: The apron fastens around the seat unit with a zip and attaches with Velcro over the bumper bar, providing warmth and protection.
- Raincover: The raincover fits over the pram, starting from the canopy and pulling down towards the footrest. It is compatible with both pushchair and pram modes.
- Car Seat Adaptors: These are used to attach the infant car seat to the chassis. They align with the chassis housing and press downwards until a "click" is heard.
Maintenance Features:
Regular maintenance is essential to ensure the product's correct and safe performance, as well as to extend its lifespan.
- Regular Inspection: Regularly inspect all components, including wheels, locks, brakes, harness, catches, seat adjusters, joints, and fixings. Ensure they are clean, operating correctly, and in full working order. Replace excessively worn tires.
- Parts and Replacements: Do not use the product if any part is broken, torn, or missing. Only use spare parts provided by the manufacturer.
- Lubrication: If parts become stiff or difficult to operate, first check for dirt. If dirt is not the cause, apply a light application of a silicon lubricant, ensuring it penetrates between components. Regular lubrication helps extend the product's life and makes opening and folding easier.
- Servicing: It is recommended that the pram be serviced and reconditioned before using it for a second child, or within 18 months, whichever comes sooner.
- Drying and Storage: After exposure to damp conditions, dry the product thoroughly with a soft cloth and leave it fully open in a warm environment. Storing it damp can lead to mildew. Always store the product in a dry place to prevent mold or mildew. Avoid prolonged exposure to sunlight, as some fabrics may fade.
- Cleaning:
- Fabrics: Spot or sponge clean fabrics with mild detergent, mild soap, or upholstery shampoo. Wash separately. NEVER use bleach. Dry thoroughly in the shade before reuse and avoid direct heat and sunlight. Do not iron or dry clean.
- Plastics and Metals: Wipe clean with a damp cloth.
- Avoid Harsh Cleaners: Never clean any part of the product with abrasive, ammonia-based, bleach-based, or spirit-type cleaners.
- Ensure Dryness: Ensure the product is fully dry before use or storage.