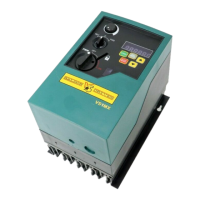
VS1SP
Analog I/O
Jumper Settings
Control Circuit Board
Relay outputs
Type
Function
Internal
supply
Active
high
JP6
JP1
J1 J2 J3
P3
JP3
JP3
JP2
ENP
ENP
EPN
EPN
EPN
EPN
EPN
DFT
DFT
DFT
DFT
DFT
INP
INP
INP
INP
INP
ENP
ENP
ENP
JP6
120 ohm
termination
No
termination
JP5
JP5
JP5
JP5
JP5
JP6 JP6
JP6
Factory
settings as
shown
Note:
Relay outputs are
rated at 10-30 VDC or
240 VAC @ 5 A resistive
(non-inductive).
Digital input connections
shown when using factory
default jumper settings
1
1
1
1 2 3 4 5 6
7 8 9 10 11 12 13 14 15 16 17 18 19 20 21 22
Load
Load
Load
P1503 P1504
Load
Relay Out 1 N.C.
Enable
0-10 VDC
Dig. Input 1
Analog GND
Analog input 1
Pot. reference
Analog input +2
Analog output 1*
Analog output 2*
*Referenced to J1-1
Analog input -2
P1408
P1510, P1511, P1512
P1513, P1514, P1515
Dig. Input 2
Dig. Input 3
Dig. Input 4
Dig. Input 5
Dig. Input 6
Dig. Input 7
Dig. Input 8
Relay Out 1 COM
Relay Out 2 COM
Relay Out 1 N.O.
Relay Out 2 N.O.
Relay Out 1 N.C.
2324 25 26 27 28 29 30
P1
Fault
USB
USB port
1
1
1
1
RS485
S G A B S
1
1
Active
low
External
supply
ANAIN2
JP1
ANAOUT1
JP2
Voltage
Current
Communications
Termination jumper
Digital Outputs
Control Board
Control Board
Sourcing Current Connections
Sinking Current Connections
Note: Digital outputs are rated at 24 VDC @ 60 mA resistive (non-inductive).
J2
J2
P1501
Out 1
P1501
Out 1
P1502
Out 2
P1502
Out 2
J3
J3
Digital output 1+ (Collector)
Digital output 1+ (Collector)
Digital output 2+ (Collector)
Digital output 2+ (Collector)
Digital output 1- (Emitter)
Digital output 1- (Emitter)
Digital output 2- (Emitter)
Digital output 2- (Emitter)
External User Return
External User Return
External User +24 V
External User +24 V
Internal +24 V
Internal +24 V
Internal 24 V Return
Internal 24 V Return
17
17
18
18
19
19
20
20
21
21
22
22
23
23
24
24
Note: Optional equipment such as
input/output reactors/filters are not
shown. See instruction manual MN764
Note: See instruction manual MN764
for important information regarding AC
power wiring and fusing.
Note: See
instruction
manual MN764
for important
information
regarding motor
and output reactors.
Thermostat and
control leads must
be in separate
conduits.
Frame Size AA 1-Phase Input Drives
Frame Size AA 3-Phase Input Drives
Frame Size E Drives
Frame Size F Drives
Frame Size B and C Drives
Frame Size D Drives
L1 L2 N GND
R1/B+
R2 B- T1 T2 T3 TH1 TH2 GND L1 L2 L3 GND
R1/B+
R2 B- T1 T2 T3 TH1 TH2 GND
L1 L2 L3
B+/R1
R2 B- T1 T2 T3 TH1 TH2 GND
TH1 TH2 GND
L1 L2 L3 T1 T2 T3B+/R1 R2 B-
L1 L2 L3 B+/R1 R2 B- D1 D2 GND T1 T2 T3
Motor
Chassis
Ground
Motor
Chassis
Ground
TH1 TH2 GND
TH1 TH2 GND D1 D2 GND
L1 L2 L3
B+ B-
T1 T2 T3
TH1 TH2 GND
L1 L2 L3
Fuses
R1/B+
R2 B- T1 T2 T3
AC Input power
PE
Star
Point
Optional regen
resistor
(Dynamic Brake)
See instruction
manual MN764
AC Input
Dynamic Brake
Motor Power
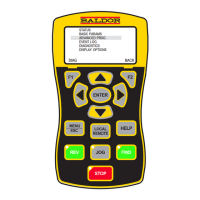
Keypad Components
The keypad is used to
program the control
parameters, to operate
the motor and to monitor
the status and outputs of
the control by accessing
the display options, the
diagnostic menus and the
fault log. Additionally, drive
parameters can be stored
in the keypad for future
retrieval.
Display Features
Speed Reference
Defines action of F2 keyDefines action of F1 key
Local RemotePresent Menu Selection
Stop – Forward – Reverse
Indicator Lights:
(On when indicated Key is active)
FWD & REV: Green light indicator.
STOP: Red light indicator
JOG: Jog Speed Selected Green light indicator
Display Diagnostics –
I/O Status
I/O Function configuration
Modified Parameters
Control Operation Data
Custom Units
Fault Display – 10 Faults with Time Stamp
F2 – Clears faults or undo parameter edit changes or function
indicated by text displayed directly above key.
Up Arrow Left Arrow
Down Arrow Right Arrow
Moves cursor to select menu choices.
LOCAL/REMOTE – Switches between local and remote
modes.
HELP – Provides help at each display screen, setup parameter
and fault. Press to view/close help information.
JOG – Initiates Jog mode. Press FWD or REV for motion. Only
in local mode.
FWD –
When pressed, initiates a forward direction run command.
Indicator Lights – (on indicated key)
STOP key with red light indicator.
FWD key with green light indicator.
REV key with green light indicator.
JOG key with green light indicator.
Keypad Display – Displays status Information during Local or
Remote operation. It also displays information during parameter
setup and fault or Diagnostic information.
F1 – Alternates or "toggles" between the last two menu choices
or function indicated by text displayed directly above key.
ENTER – Press ENTER to save parameter value changes. In
the display mode the ENTER key is used to directly set the local
speed reference. It is also used to select other operations when
prompted by the keypad display.
MENU/ESC – Selects the menu display when viewing status.
The following menu items are shown: Status, Basic Params,
Advanced Prog, Event Log, Diagnostics and Display Options.
Backs up one level for other screens.
REV – When pressed, initiates a reverse direction run com-
mand.
STOP – Initates a stop command. Note: Pressing the stop key
twice in succession will immediately disable the drive placing
the motor in a coast stop condition.
STATUS FWD LOCAL
159.5V 600RPM
6.2A20.0HZ
DIAG 600R MAIN
Digital Input Jumper Settings
Please consult the VS1SP Installation and Operation Manual, MN764, before operating the drive.
Also, please read the precautionary and warning statements in the Safety Notice, Paragraph 1.2, in MN764.