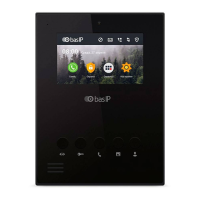
The AU-04LA is an IP indoor video entry phone designed to connect to an additional SP-AU handset, offering enhanced privacy in conversations. This device serves as a central hub for communication and control within a smart home or office environment.
Function Description
The AU-04LA operates as a comprehensive intercom system, allowing for communication with visitors at the door, internal calls between monitors, and calls to additional monitors. It integrates security features, home automation, and various settings to customize its operation.
Main Screen and Security Menu
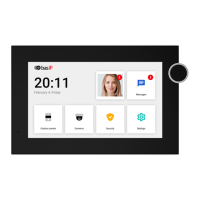
The main screen displays essential information such as time, weather, and news. It provides quick access to several key functions:
- Security: Manages security settings, including arming/disarming zones and configuring IP cameras.
- Automation: Controls home automation devices like lights, air conditioning, curtains, and elevators.
- Intercom: Handles calls, monitoring, and records.
- Service: Accesses SMS messages and a web browser.
- Settings: Configures device parameters, network settings, and passwords.
The security menu allows users to turn on or off the alarm, make settings for loops, scripts, and view IP camera feeds. The main security display shows the current status (Out, Home, Sleep, OFF).
Zone Settings
The device supports up to 8 zones, each with configurable type, mode, delay, and sensor.
- Type: Defines the sensor type (3C, NC, NO).
- 3C: Activation is performed when switching position.
- NC: Normally closed sensor, activation is performed when the contacts are opened.
- NO: Normally open sensor, activation is performed when the contacts are open.
- Mode: Determines how the sensor operates.
- Normal mode: The sensor is activated only when the system is armed and if this sensor is selected in the paragraph above. This type is used for door and window sensors.
- Emergency and 24 hours: Active constantly. These types can be selected for smoke, gas, volume, and heating sensors connected to the loops.
- Delay: Configures a delay before activating a specific sensor.
- Sensor: Selects the display type of the sensor for additional informativity when triggered.
- Bell: Doorbell connection mode. When the contacts are closed, the monitor will start playing the incoming call melody.
Users can display an alarm by setting the required value for the connected sensor. The sensor number and its name will be displayed on the monitor when the alarm is triggered. To disable an alarm, a password (default: 1234) is required.
IP Camera Settings
The AU-04LA supports up to 8 IP cameras for display. Users can select a camera from a list by scrolling through and clicking on the camera name. The interface includes "Play button" and "Stop button" for camera control.
Scene Settings
The device allows for the creation of up to 3 scenarios: Out, Home, and Sleep. Each scenario can be customized to trigger various loops based on specific activation times. The activation time is the time after which a particular scenario is activated.
Settings
The settings menu allows users to manage passwords and other device configurations.
- Password: Users can change the old password (default: 1234) and set a new password with confirmation.
The home automation menu provides control over various smart home elements, organized into five submenus:
- Lights: Allows control of different groups of lights (up to 8 lights per group) in separate rooms using module SH-62.
- Air Conditioning: Enables control of air conditioners in separate rooms.
- Curtains: Manages curtains in separate rooms.
- Elevator: In this menu, users can call the elevator (when using the elevator control module EVRC IP).
- Scenes: Users can choose from predefined and written automation modules through software in advance.
The intercom menu is the core communication interface.
- Main Screen: Displays options for Call, Monitor, Records, Room, VOIP, and Settings.
- Call:
- Calls between intercoms: To call between internal monitors in different apartments, users need to enter 1 to 4 digits of the house number and press the "Building" button, then enter 2 digits of the front room number and press the "Door" button, then enter 1 to 4 digits of the apartment number and press the "Center" button. To delete an incorrectly entered digit, use the "Delete" button.
- Calls between additional monitors: To call additional intercoms or the main intercom, users must select the desired one from the list (Main, Alt. 1 - Alt.9) and press the call button.
- Answer the incoming call: During an incoming call, the following interface will appear: Decline call, Make a snapshot, Send lock release command.
Monitoring
The monitoring feature allows switching between viewing of individual and multi-apartment panels. Users can also switch between Left and Right arrow buttons. This menu enables monitoring of outdoor panels connected in the same LAN. During monitoring, communication takes place in one-way mode, meaning users will hear what is happening at the panel, but the panel will not hear them.
Records
The records section displays a list of incoming, outgoing, and missed calls with details such as number, date, and length.
- Number: Number of dialer.
- Date: Date and time of the call.
- Length: Conversation length.
To highlight the desired call, users need to press it once. By pressing the buttons below, users can call back to the selected number, scroll through the list, or delete the entry.
Services Menu and Settings
- SMS: This menu displays messages that were sent from LINK software.
- Browser: In this menu, a pre-set web page appears. Users can set up a desired page through the web interface.
Settings
- Password:
- Old password: Current password input field. (Default: 1234)
- New password: New password input field.
- Confirm: New password confirmation field.
- Communication:
- Camera: Activates/deactivates the camera when it is called (the current model is not installed).
- Answering Machine: Activates/deactivates the answering machine. To record messages in the intercom, an SD card must be installed.
- Auto Answer: Activates/deactivates the automatic reception of an incoming call in 10 seconds.
- Volume: Adjusts the volume of the speaker.
- Network Settings:
- DHCP: Enable/disable mode to get network settings automatically.
- IP: Internal monitor IP address. (By default, internal monitor can have a static IP address 192.168.1.90 or 192.168.1.91)
- Mask: Subnet mask.
- Gateway: The main gateway.
- DNS: DNS server address.
- Version: This menu displays the current firmware version, the IP address, and the MAC address of the device.
- Device Settings:
- Building number: 0001-9999
- Unit: 00-99
- Floor number: 00-99
- Room number: 01-99
- Device: The sequence number of the monitor in the system. (If the monitor is one, it is necessary to set «0» in this line. If there are several monitors, then the numbering should begin with «0» and end with «8»).
- Sync code: Synchronization code between monitors and panels for intercom.
- System:
- Volume: The volume of the system sounds.
- Communication: Speaker volume during a call.
- Language: System Language.
- Time Zone: Select Time Zone.
- Auto Answer: Automatically receive all incoming calls.
Important Technical Specifications
- Display: 4.3" Display
- Microphone: Integrated
- Loudspeaker: Integrated
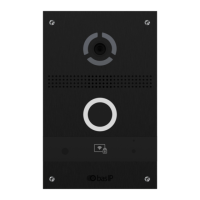
- Connectivity: IP network, allows connection of additional SP-AU handset.
- Camera Support: Up to 8 IP cameras.
- Security Zones: Up to 8 configurable zones.
- Storage: Requires SD card for answering machine messages.
- Default Password: 1234 for various settings.
- Default IP Address: 192.168.1.90 or 192.168.1.91 (static IP).
Usage Features
- User-Friendly Interface: The device features a touch screen interface with clear icons for easy navigation.
- Customizable Security: Users can define security zones, modes, and delays to suit their specific needs.
- Home Automation Control: Centralized control for lighting, climate, curtains, and elevators enhances convenience.
- Intercom Functionality: Supports internal calls, calls to additional monitors, and communication with door panels.
- Monitoring Capabilities: Allows real-time viewing of outdoor panels.
- Call Records: Keeps a log of all incoming, outgoing, and missed calls for easy reference.
- SMS and Browser Access: Provides additional utility through messaging and web browsing.
- Multi-Language Support: System language can be selected.
- Time Zone Setting: Allows for accurate time display based on location.
Maintenance Features
- Password Management: Users can easily change and secure their device password.
- Firmware Updates: The device displays its current firmware version, suggesting that updates may be available to improve functionality and security.
- Network Configuration: DHCP and static IP settings allow for flexible network integration and troubleshooting.
- Volume Control: Adjustable volume for speaker and system sounds.
- SD Card for Answering Machine: Requires an SD card for recording messages, which implies easy replacement or upgrade of storage.
- Device Numbering: Clear guidelines for numbering monitors in a multi-monitor system.