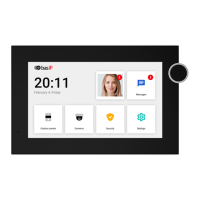
The BAS-IP AT-10 is a 10-inch IP indoor video entry phone designed for residential and commercial use. It features an IPS screen with a resolution of 1280x800 and supports Wi-Fi connectivity. The device runs on the Android 6.0 operating system, offering a versatile platform for various applications. It is available in three color variations: White, Gold, and Black, and can be installed using either a wall mount or a flush mount with a special bracket.
Key Features and Usage:
Physical Components:
The AT-10 includes a camera, a loudspeaker for audio output, and a 10-inch IPS screen for video and interface display. For communication, it has a microphone. Data storage is facilitated by a MicroSD slot, and connectivity for data transfer or power is provided by a MicroUSB port.
Main Screen and Navigation:
The home screen is highly customizable, consisting of a main desktop and two additional desktops by default. Users can add an unlimited number of custom desktops and configure them with up to 8 application icons each.
- First Screen: Displays the current date and time.
- Second Screen: Shows date, time, a weather widget, and main sections of the monitor menu, including Calls, Messages, Outdoor panels view menu, and IP cameras view menu.
- Third Screen: Features additional system menus and applications such as Quad splitter, Security alarms, and Smart home menu.
The navigation bar, accessed by swiping down from the top of the screen or pressing any empty space, provides quick access to:
- Concierge Quick Call: Allows calling a specified concierge number, another monitor, or any SIP device. This feature can be enabled in monitor settings or via the web interface.
- Call Elevator: Requires an EVRC IP controller for functionality.
- Sound Modes: Users can adjust sound modes:
- Normal: All sounds are on.
- Mute: All sounds except alarms are off. The duration of mute mode can be set.
- Do Not Disturb: All sounds except alarms are off, and incoming calls are not displayed. Access to system settings for this feature requires an admin password.
Call Management:
The Call Menu allows users to check the number of missed calls from the main desktop. When motion detection is enabled, missed calls and notifications of recorded videos (triggered by motion sensors) are displayed.
- Call History: Pressing the call icon displays call history, categorized as missed, outgoing, or incoming calls.
- Call Entry Information: Each call entry includes date, time, subscriber number, and conversation duration.
- Additional Call Options: Tapping an entry reveals options to call the selected number, view photos/videos taken during the call, save media to an SD card, or delete the entry.
- Keypad: A keypad for dialing numbers can be accessed from the lower right corner of the screen. The call history can be cleared by pressing this button for a few seconds.
Call Display:
During an incoming call, the screen displays options to answer, decline/end a conversation, open the keyboard, open locks, mute/unmute the microphone, record video, or take a screenshot. If an EVRC-IP is installed, users can call the elevator during a conversation by holding lock Key 1/Key 2.
The device supports up to 10,000 contacts, including inner numbers of panels, concierges, other monitors, or SIP numbers. Contacts can be added via the monitor menu or web interface.
- Adding Contacts: Open the Call menu, go to the Contacts tab, press the plus icon, enter the contact name, specify number type (inner or SIP), select device type (multi-apartment panel, individual panel, or regular device), enter the number in the correct format, and press "Add contact."
- Number Formats:
- Multi-apartment panel: Building No.-Unit No.-Device No. (e.g., 0001-01-1).
- Individual panel: Building No.-Unit No.-Floor No.-Apartment No.-Device No. (e.g., 0001-01-02-04-1).
- Regular device (monitor): Building No.-Unit No.-Floor No.-Apartment No. (e.g., 0001-01-00-01).
- SIP number: sip:callee SIP number@address of the SIP server or device IP address (e.g., sip:3925@us.sip.bas-ip.com).
- Additional Contact Options: Add to favorites, add to blacklist (to block notifications but still show missed calls), autoanswer, and "Use as default" for multi-apartment and individual panels.
- Contacts Search: Quickly find contacts by entering their name in the search bar.
Devices:
This menu displays additional monitors with the same logical address but different device numbers. Users can edit device names and restore default names.
Motion Detections:
This tab appears when motion detection is enabled and configured. It allows viewing recorded videos triggered by motion sensors, showing date, time, duration, and camera name. Videos can be deleted individually or all at once.
Displays messages from the concierge or management company. A notification sound and counter change on the application icon indicate new messages. Messages can be filtered by "All," "New," or "Read."
- Message Types:
- Info: Informational messages not requiring feedback.
- Poll: Allows users to provide feedback by choosing options or entering a reply.
Allows monitoring cameras of entrance panels. If an entrance panel is saved to contacts with "Use as default camera" enabled, its image will be displayed first.
- Icons Meaning: Open lock, stop/start panel monitoring, turn on/off microphone, search for other panels.
- Switching Panels: Users can switch between panels and between individual and multi-panel monitoring modes. If an incoming call occurs during monitoring, it will be displayed as a missed call.
View streams from IP cameras. Adding or changing IP camera settings is done via the web interface or monitor settings. Icons allow starting or pausing stream display. Users can select different cameras from a list.
Enable/disable pre-configured alarm scenes: Out, Home, and Sleep. Sensors can be enabled for each scene, triggering an alarm when activated.
Displays icons that open links in the built-in browser. Links can be configured in monitor settings or the web interface.
Allows configuration of various device settings.
- General Settings:
- Screen Brightness: Adjust display brightness.
- Ringtone Volume: Adjust ringtone volume.
- Talk Volume: Adjust conversation volume.
- Language: Select interface language.
- Mode: Configure "Do not disturb" and "Silence" modes, including start and end times.
- Intercom Settings:
- Camera: Enable/disable monitor camera.
- Auto Hung Up: Enable/disable automatic hang-up after 3 seconds when the "Open" button is pressed during a call.
- Answerphone: Enable/disable automatic call acceptance. If no answer within 30 seconds, the monitor records a message from the visitor. (Requires SD card and main monitor status).
- Autoanswer: Enable/disable all incoming calls autoanswer.
- Lock Protection: Enable/disable user password requirement for lock opening during a call.
- Automatic Conversation Recording: Enable/disable automatic recording of conversations. (Requires SD card and main monitor status).
- Address Settings:
- Logical Address: Enter Building No., Unit No., Floor No., Apartment No., Device No., and Sync code for correct device functioning and network synchronization.
- SIP Settings:
- SIP Registration: Enable device SIP registration.
- SIP Server Proxy: Enter IP address or domain name (e.g., sip:us.sip.bas-ip.com).
- SIP Server Address: Enter IP address or domain name (e.g., us.sip.bas-ip.com).
- Server STUN IP Address: Enter STUN server IP (e.g., stun.l.google.com).
- Port of the STUN Server: Default 19302 for Google STUN server.
- User SIP Number: Enter user's SIP number.
- Password for SIP Number: Enter password for SIP number.
- DTMF Settings:
- DTMF Code: Change DTMF code (up to 4 characters) for lock opening.
- Lock #1 Name: Displayed during a call.
- Default Value: Enable/disable default value for internal protocol command to open the door.
- DTMF Code for Lock #1: Set DTMF code (if default value is disabled).
- Second Lock: Support for two locks (with SH-42 module).
- Lock #2 Name: Displayed during a call.
- DTMF Code for Lock #2: Set DTMF code.
- Network Settings:
- Wi-Fi: Enable/disable Wi-Fi, search for networks, connect, and view network status.
- Ethernet: Enable/disable DHCP, manually enter IP address, subnet mask, gateway, and DNS server address. View current IP and MAC address.
- NTP: Enable/disable NTP server for automatic time/date synchronization. Use custom NTP server for local network synchronization.
- Link Settings:
- BAS-IP Link Server: Enable/disable and configure for access control, management, and monitoring.
- Protocol: Select HTTP or MQTT (recommended).
- Data Entry: Enter required data and save settings. MQTT is recommended for its simplicity, effectiveness, data security, and efficient message delivery.
- Security Settings:
- Alarm Scenes Setting: Configure sensors for "Out," "Home," and "Sleep" scenes.
- Activation Time: Set delay (0-300 seconds) before monitor switches to security mode.
- Triggered Sensors: Alarm signal sent to main and synchronized monitors when a sensor is triggered. Additional notifications (message or SIP call) can be set.
- Alarm Zones Setting: Connect up to 8 alarm sensors (up to 16 with SH-16 module). Configure each sensor's operation:
- Sensor No.: Identifier.
- Sensor Type:
- Normal: Activated only when scene is on (for door/window sensors).
- Emergency: Always active, trigger notification sent to Management Software.
- 24 Hour: Always active, regardless of scene (for flood, gas, smoke, heating sensors).
- NO: Normally open, activated when contacts are closed.
- NC: Normally closed, activated when contacts are opened.
- 3C: Activated by any contact position change.
- Bell: Functions as doorbell, plays incoming call ringtone when contacts are closed.
- Activation Delay Time: 0-60 seconds delay before sensor triggers (for normal sensor type).
- Sensor Name: Additional info when triggered (smoke, gas, PIR, door, window, panic, flood, pull cord, bed mat).
*   **Motion Detection:** Record video from specified camera when motion sensor is triggered. Requires connected motion sensors (up to 4) and an SD card.
    *   **Configuration:** Open Security menu, go to Motion detection, enable, set recording time, set time interval for sensor operation (around the clock if start/end times coincide), select cameras for recording (number of cameras must match connected sensors).
*   **User Password:** Change user password.
- IP Camera Settings Menu:
- Add IP Camera: Add up to 32 IP cameras for stream monitoring. Open Settings, IP cameras tab, press plus icon, enter camera name and RTSP URL.
- Default IP Camera View: Select camera to be displayed first when opening IP cameras viewing menu.
- Smart Settings:
- Rooms: Configure rooms for home automation control (only available on main monitor with Device No. 0).
- Lights: Set names for each room or button.
- Advanced Settings:
- Concierge Call: Configure concierge call number or any other device for quick call via SIP or P2P.
- Call Ringtone: Select ringtone from list, file system, or SD card.
- Theme: Select display theme (default or custom image from list, file system, or SD card). Custom themes allow selecting weather widget, clock, and date colors.
- Standby Mode: Set timeout for monitor to enter standby mode.
- Announcement: Enable/disable announcements/ads in standby mode. Enter announcement URL (RTSP stream or web page) and timeout.
- Screensaver: Set screensavers for standby mode (clock, photo frame, IP cameras).
- Clock: Set time after which it turns off.
- Photo Frame: Enable/disable clock display, select photo folder, set turn-off time.
- IP Camera Mode: Display one or several RTSP streams.
- Single Camera: Select one IP camera, set turn-off time.
- Tour Mode: Display selected IP cameras one by one, set interval for switching and turn-off time.
- Quad Splitter Mode: Display streams from 4 cameras simultaneously, select 4 cameras and set turn-off time. RTSP links must have 1280x720 resolution.
- Service References: Enter links for buttons in the Services menu.
- Weather: Configure weather widget settings: wind speed units (km/h or m/h), temperature units (°C or °F), automatic city detection by IP, or manual city entry.
- Custom Widget: Enable custom widget feature and select widgets from a list for display on the main screen.
Maintenance Features:
- Firmware Updates:
- Automatic: Enable/disable update notifications, use custom update server (for closed intercom networks), check for and install updates.
- Manual (SD Card): Download firmware to SD card, press 3 dots in updates checking page, select "Install from SD card," choose file, and click OK. The device will reboot several times during the process.
- Custom Server: Requires
version.json file with firmware version, name, build date, device type, description of changes, and link to firmware file.
Security and Passwords:
- Admin Password: Used to access web interface and monitor settings. Default is 123456.
- User Password: Can be changed in the Security menu. Default is 1234 for disabling alarms.