Page 10 <&(%$*4.8"4,7%H'*#$"&8#I%/7*,#*%4,77%JKLLLKLMMKNOPO1 Item 64146
?@<6AQ RS6;@ACRE D@CEA6E@ET6?6AFS
R/*(,$"83%C8#$('4$"&8#
% ;*,9%$.*%6EAC;6%CDSR;A@EA%?@<6AQ%CE<R;D@ACRE%#*4$"&8%,$%$.*%+*3"88"83%&2%$."#%
5,8',7%"847'9"83%,77%$*\$%'89*(%#'+.*,9"83#%$.*(*"8%+*2&(*%#*$%'/%&(%'#*%&2%$."#%/(&9'4$1
A&&7%?*$%F/
AR%S;6!6EA%?6;CRF?%CEiF;Q%<;RD%@TTCX6EA@G%RS6;@ACRE-%
D,Z*%#'(*%$.,$%$.*%S&)*(%?)"$4.%"#%"8%$.*%&22K/&#"$"&8%,89%'8/7'3%$.*%$&&7%2(&5%
"$#%*7*4$("4,7%&'$7*$%+*2&(*%/*(2&(5"83%,8>%/(&4*9'(*%"8%$."#%#*4$"&81
@$$,4."83%?,89/,/*(%$&%$.*%W,4Z"83%S,9
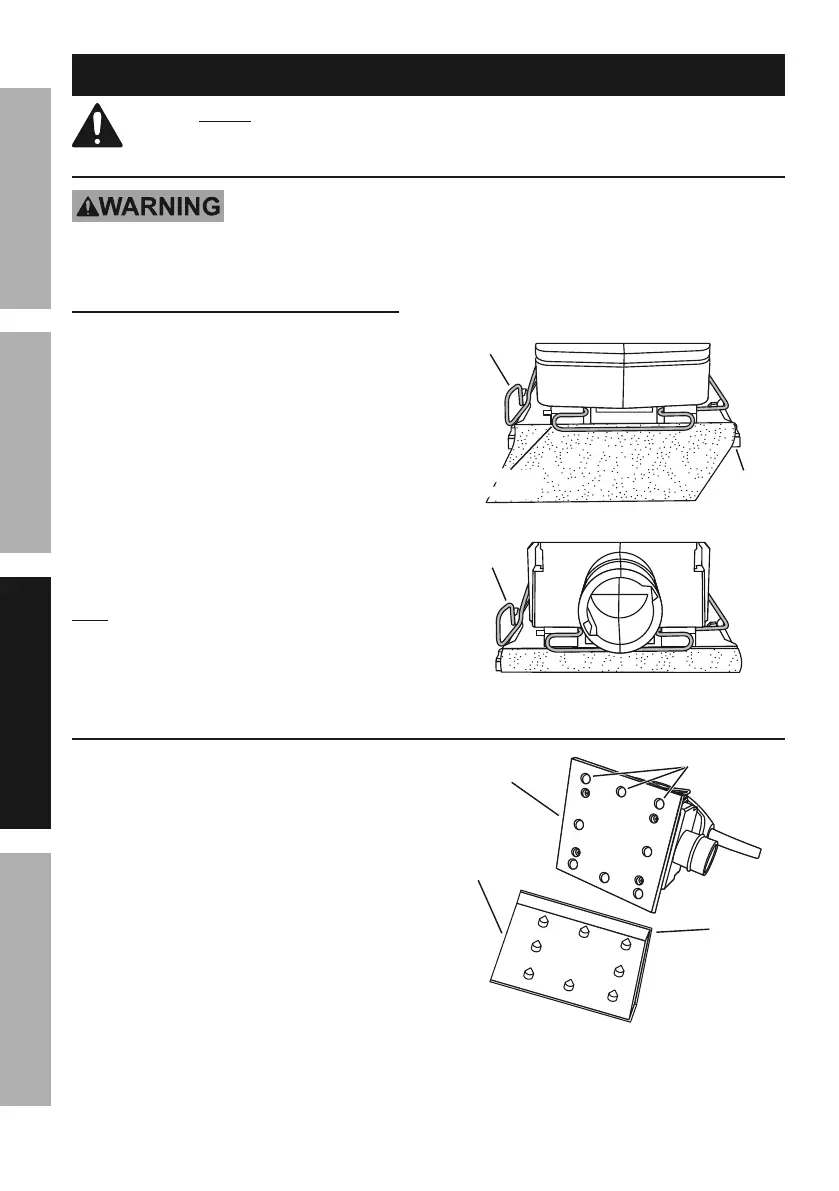
1. On both sides of the unit, press the loops
on the Sandpaper Clamps inward and
swing the Clamps on both sides up, out,
and down to loosen the Clamps.
2. Cut the sandpaper to fit the Backing Pad,
with enough extra to overlap at the
front and rear and fit under the Clamps.
X&%8&$%'#*%$&(8%&(%2(,>*9%#,89/,/*(1
3. After wrapping the front and rear edges
of sandpaper around the Backing Pad
edges and under the Clamps, snap
the Clamps%back into place.
E&$*- Make sure the sandpaper is pulled
tight over the Backing Pad and aligned
with the Pad for proper operation.
?,89/,/*(%
T7,5/%
W,4Z"83%
S,9
?,89/,/*(%
3&*#%.*(*
<(&8$%!"*)
?,89/,/*(%
T7,5/%
;*,(%!"*)
F#"83%$.*%?,89/,/*(%B&7*%S'84.
Dust collection will only work if the sandpaper
has holes that line up with the 8 dust collection
holes in the Backing Pad. Use the Sandpaper
Hole Punch supplied with the tool to pierce
the sandpaper in the correct locations.
1. Mount the Sandpaper Hole Punch to a work bench
using two countersinking screws (not included).
2. Use the corner guides on the Hole
Punch to ensure that it lines up with the
holes in the Sander’s Backing Pad.
3. Press the Sander (with the sandpaper attached to
it), straight down onto the Sandpaper Hole Punch.
?,89/,/*(%
B&7*%S'84.
T&(8*(%&2%
B&7*%S'84.
W,4Z"83%
S,9
X'#$%T&77*4$"&8%
B&7*#
 Loading...