Page 9?&(%$*4.8"4,7%I'*#$"&8#J%/7*,#*%4,77%KLMMMLMNNLOPQP1Item 63630
=A?6BRST6>ABDSFEADFB6FAFU6 =6BGT
S/*(,$"83%D8#$('4$"&8#
% >*,9%$.*%6FBD>6%DETS>BAFB%=A?6BR%DF?S>EABDSF%#*4$"&8%,$%$.*%+*3"88"83%&2%$."#%
5,8',7%"847'9"83%,77%$*\$%'89*(%#'+.*,9"83#%$.*(*"8%+*2&(*%#*$%'/%&(%'#*%&2%$."#%/(&9'4$1
B&&7%=*$%G/
BS%T>6!6FB%=6>DSG=%DFgG>R%?>SE%AUUDX6FBAH%ST6>ABDSF-%
E,Z*%#'(*%$.,$%$.*%B("33*(%"#%"8%$.*%&22L/&#"$"&8%,89%(*5&Y*%"$#%;,$$*(<%
T,4Z%+*2&(*%/*(2&(5"83%,8<%/(&4*9'(*%"8%$."#%#*4$"&81
;,$$*(<%U.,(3"83
Charge battery after unpacking and before using this
tool. Follow instructions included with battery charger.
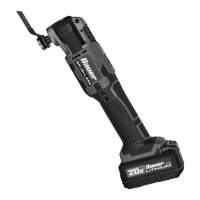
D8#$,77"83%;7,9*%
UAGBDSFd To prevent injury, if replacing Blade,
make sure Blade is cool before touching it.
1. Turn Saw upside-down. Open Chuck by
turning clockwise. Chuck will move to
the left, creating space for the Blade.
U.'4Z
2. Install Blade with teeth pointing toward front of Saw.
3. Release Chuck to close it.
4. Check that Blade is firmly locked in place.
UAGBDSFd To prevent injury: Before attaching Battery
Pack for each use, wearing work gloves, pull on the
Blade to make sure it is securely locked in the Chuck.
D8#$,77"83%?*84*
1. Loosen Fence Knobs.
2. Install Fence on either side as needed.
3. Adjust Fence as needed.
4. Tighten Fence Knobs.
?*84*
?*84*
[8&+#