EasyManua.ls Logo

Bauer B-Timer User Manual

Bauer B-Timer
4 pages
To Next Page IconTo Next Page
Page #1 background imageLoading...
Page #1 background image
Filter cartridge lifetime computer for
BAUER filter systems - P21 P31 P41
Operating Instruction Manual
B-TIMER
11/2012
1
Introduction
Read these operating instructions carefully before using the
B-TIMER. (Valid for devices from version 300.301.811 onwards).
The settings in the setup menu are critically
important in terms of the ability to display the
filter capacity correctly. Without these
settings, the B-TIMER can only be used as an operating
hours counter!
Ensure that the compressor’s pressure
retention valve is set to 150 bar (factory
setting) and that it is functioning correctly,
otherwise the filter capacity may be displayed incorrectly
and the operation may not, under certain circumstances,
be detected correctly.
Before delivery, ensure that all the
maintenance counters (a+b+c) have been
reset. (Otherwise, the B-TIMER signalises
incorrect maintenance intervals, since the storage times
are not taken into consideration.) If the items in question
have not been reset, it must be done without delay. Refer
to the ‘Reset’ sectiononpage4.
DESCRIPTION
The B-TIMER (Figure 1) is a self-activating mini-computer that
keeps track of the compressor’s operating hours and calculates
the filter cartridges’ lifetime with the help of the time, the
temperature, the type of cartridge and the delivery quantity of
the compressor. It displays the operating hours, the c artridge’s
service life and the compressor’s upcoming
maintenance-related tasks. The B-TIMER needs neither an
external power supply nor a connection to the compressed air
system. It is mounted on the enclosure of the filter to be
monitored with the help of a fastener and is thus the ideal
monitoring device for all mobile BAUER compressors. It is
particularly well-suited for sport-diving devices that are
powered by either gasoline or diesel fuel. Every system of
BAUER-KOMPRESSOREN can easily be retrofitted with the
B-TIMER.
Intended usage
This device serves solely as an appliance that can be used to
display the operational statusand does not release the user from
the additional responsibility to monitor and measure the
breathing air quality of the filter system in accordance with
national norms (e.g. EN 12021). This cannot be done with the
B-TIMER.
The B-TIMER may only be used with BAUER compressors,
BAUER processing plants and original BAUER filter cartridges. It
has only been designed and approved for the aforementioned
BAUER filter systems, not for the Verticus and Mini-Verticus
plants. The respective cartridge numbers are contained in the
software. Every other type of utilisation counts as utilisation that
is not in accordance with the regulations. Damages resulting
from such utilisation are subject to the manufacturer’s/supplier’s
risk exclusion, warranty exclusion and liability exclusion policies.
In case of external filter cartridges, even those of similar
dimensions, the service life can deviate significantly from the
intended service life on account of, e.g. different filling materials
and fill quantities. Secure and correct functionality cannot be
guaranteed for compressors and filter systems produced by
other manufacturers, as the compressed air in these items may
be at different temperatures and the efficiency of the upstream
final interceptor may be different. The B-TIMER has only been
tailored to the interaction between BAUER compressors, BAUER
filter systems and original filter cartridges.
Be mindful of the application limits of the device:
Working temperature: 0 C to +50 C
Storage temperature: -20 C to +70 C
Protection class: IP65 (protection against contact, dust-proof,
protection against hose water)
Vibration, ±3 g when in operation
Max. humidity: 95%; non-condensing
Figure 1 B-TIMER
Installation
Use the enclosed fastener to mount the B-TIMER at the centre
of the gold-coloured filter’s enclosure. In case of the P41, mount
it on the grey micro-filter’s enclosure. Both its legs must lie on
the container. Ensure that it does not come into contact w ith
the filter’s fastening clamps. If the B-TIMER needs to be
remounted, e.g. during the replacement of the filter’s
enclosure, ensure that the underside of the heat conduction pad
has not been damaged.

Other manuals for Bauer B-Timer

Question and Answer IconNeed help?

Do you have a question about the Bauer B-Timer and is the answer not in the manual?

Bauer B-Timer Specifications

General IconGeneral
BrandBauer
ModelB-Timer
CategoryAir Compressor
LanguageEnglish

Summary

Introduction

Setup Menu Importance

Setup menu settings are critical for correct filter capacity display; otherwise, B-TIMER acts only as an operating hours counter.

Pressure Retention Valve Setting

Ensure compressor's pressure retention valve is set to 150 bar for accurate filter capacity display.

Pre-Delivery Counter Reset

Reset all maintenance counters (a+b+c) before delivery to avoid incorrect maintenance interval signals.

Device Description

B-TIMER Functionality

Self-activating mini-computer tracks operating hours and calculates filter cartridge lifetime using time, temp, and quantity.

Intended Usage and Limitations

Device displays operational status only; does not replace breathing air quality monitoring per national norms.

Application Limits

Adhere to limits: working temp 0-50°C, storage -20-70°C, IP65 protection, ±3g vibration, 95% non-condensing humidity.

Installation

Mounting Instructions

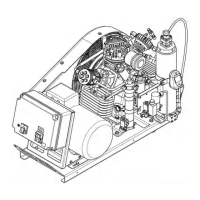
Mount B-TIMER on filter enclosure center using fastener; on P41, use grey micro-filter enclosure. Ensure legs contact container.

Remounting Precautions

If remounting, ensure the heat conduction pad underside is not damaged during the process.

Method of Functioning

B-TIMER Display Functions

Displays operating hours (blinking 'h' indicates operation), cartridge life in %, maintenance tasks (A, B, C), and battery status.

Maintenance Intervals Explained

A=500 hrs/1 yr, B=1000 hrs/2 yrs, C=2000 hrs/4 yrs. Display shows upcoming tasks with alphabets/figures.

Low Battery Indicator

A battery symbol indicates a weak lithium battery requiring replacement. Data is saved during replacement.

Basic Operation

Operated via entry and selection keys. Blinking 'h' symbol indicates compressor operation.

Error and Battery Information

Error Display Codes

Malfunctioning temperature sensor triggers 'Error 1' or 'Error 2'. Discontinue use and send for repair.

Battery Replacement Procedure

Withdraw plug and pull out battery. Use same type (BAUER order number 82743). Ensure correct battery type.

Operation and Display Navigation

Automatic Activation and Status

B-TIMER activates with compressor; blinking 'h' indicates operation. Can be switched on via buttons without compressor.

Display Timeout and Shutdown

Display reverts to main menu after 1 minute of inactivity. Device switches off if no compressor operation detected in 2 mins.

Viewing Filter Capacity

Press ↑ button to display remaining filter capacity in % via 4 segments (Figure 6).

Viewing Operating Hours (Intervals)

Press ↑ button sequentially to view hours remaining before service intervals A, B, and C (Figure 7, 8, 9).

Viewing Cartridge Number

Press ↑ button to display filter-cartridge number; filter icon blinks (Figure 10).

Returning to Main Menu

Press ↑ button to revert the display to the main menu after viewing functions.

Reset and Setup Procedures

Resetting Filter Capacity and Intervals

Reset filter capacity or A, B, C intervals by holding ↓ button > 5 secs when display is active (Figure 11).

Entering Setup Mode

Hold ↑ and ↓ buttons > 5 secs when cartridge number is displayed. Filter icon blinks, indicating setup mode (Figure 10, 12).

Setup A: Article Number Configuration

Set filter-cartridge number. Hold ↓ for 3 secs, use ↑ to set number, use ↓ to accept.

Setup B: Delivery Quantity

Set delivery quantity (l/min). Hold ↓ for 3 secs, use ↑ to set digits, use ↓ to accept each digit.

Setup C: Operating Pressure

Set operating pressure (200, 300, or 200/300 bar). Hold ↓ for 3 secs, use ↑ to enter, use ↓ to confirm.

Setup: Operating Hours

Set operating hours. Press ↓ for 2 secs, use ↑ to set digits, use ↓ to accept each digit.

Setup Procedure Repetition

Pressing ↑ and ↓ buttons together (2 secs) repeats the setup procedure.

Related product manuals