14 Baumer_KTD3A4-KTD3B10-KTD3-Kombinationen_OI_DE-EN_1606.indd
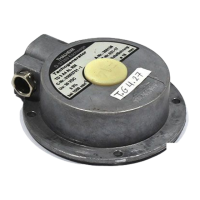
5.2.2. Hollowshaftdesigns:KTD3-...A4Y9
• Observe the dimensional drawing in chapter 8.
• Radial runout error of the drive shaft must not exceed 0.05 mm.
• The drive shaft should be lightly greased respectively protected against corrosion.
• Prior to installation, fully loosen the set screws at the tachogenerator.
1. Attach mounting kit (torque arm) to the tachogenerator using the mounting
screws.
2. Slidethetachogeneratorontothedriveshaft.
Note: slide tachogenerator smoothly onto drive shaft, do not apply force.
Where required, verify the drive shaft diameter.
3. Attach mounting kit (torque arm) at motor (B-side) without applying mechanical
strain.
4. Securetachogeneratorontodriveshaftusingthesetscrews.Makesurethe
torque arm is not under preload.
• Note: Observe the tightening torques of the mounting screws..
• Important!Allscrewsneedtobesecured!
• Riskofdestructionduetomechanicaloverstrain
A rigid connection may cause overload by constraint force.
5.2.3. Hollowshaftdesigns:KTD3-...A4Y11
• Observe the dimensional drawing in chapter 8.
• Radial runout error of the drive shaft must not exceed 0.05 mm.
• The drive shaft should be lightly greased respectively protected against corrosion.
• Prior to installation, loose the cylinder screw at the tachogenerator. For doing so,
remove the closure cap.
1. Attach mounting kit (torque arm) to the tachogenerator using the mounting
screws.
2. Slidethetachogeneratorontothedriveshaft.
Note: slide tachogenerator smoothly onto drive shaft, do not apply force.
Where required, verify the drive shaft diameter.
3. Attach mounting kit (torque arm) at motor (B-side) without applying mechanical
strain.
4. Securetachogeneratorontodriveshaftusingthecylinderscrew.Makesure
the torque arm is not under preload.
5. Put on again the protective cap.
• Note: Observe the tightening torques of the mounting screws.
• Important!Allscrewsneedtobesecured!
• Riskofdestructionduetomechanicaloverstrain
A rigid connection may cause overload by constraint force.
 Loading...