Do you have a question about the BE QUIET! PURE ROCK and is the answer not in the manual?
Screw Intel spacer nuts onto socket frame, attach mounting brackets with fastening screws.
Position Intel backplate screws in notches, align with motherboard holes for socket.
Screw Intel nuts onto backplate, position brackets, affix with fastening screws.
Remove protective covering, place cooler on CPU, screw mounting bridge fastening screws.
Fasten 120mm fan to cooler unit using clips, connect to motherboard PWM signal.
Remove plastic retainers, use factory-fitted backplate, apply AM3 washers for AM3 motherboards.
Place cooler mounting bridge centrally, then cooler unit onto CPU, secure with mounting bridge screws.
Fasten the 120mm fan onto the cooler unit using fan clips and connect to PWM signal.
Non-transferable warranty for newly purchased, unopened products; proof of purchase required.
Warrants parts and labor for the applicable period from date of purchase.
Excludes wear and tear, unauthorized modifications, misuse, or damage from external causes.
Limits liability to repair/replacement; excludes incidental, indirect, or consequential damages.
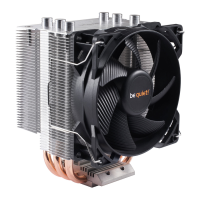
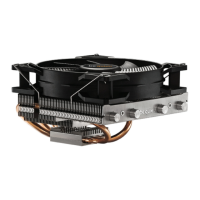
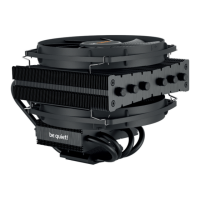
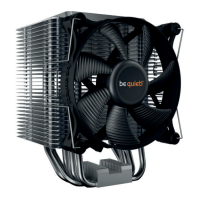
The be quiet! Pure Rock CPU Cooler is a high-performance cooling solution designed to maintain optimal operating temperatures for your computer's central processing unit. It is engineered for quiet operation and efficient heat dissipation, ensuring stable system performance even under heavy loads. The cooler is compatible with a wide range of Intel and AMD sockets, making it a versatile choice for various PC builds.
The primary function of the Pure Rock CPU Cooler is to draw heat away from the CPU and dissipate it into the surrounding air, preventing overheating and potential damage to the processor. This is achieved through a combination of a heatsink, heat pipes, and a fan. The heatsink, typically made of aluminum fins, provides a large surface area for heat exchange. Integrated heat pipes, usually made of copper, efficiently transfer heat from the CPU's integrated heat spreader (IHS) to the heatsink fins. A 120mm fan then moves air across these fins, accelerating the cooling process.
The cooler utilizes a direct contact heat pipe design, where the heat pipes directly touch the CPU's surface, maximizing heat transfer efficiency. The included 120mm fan is designed for quiet operation, often featuring a rifle bearing or similar technology to reduce noise and increase lifespan. It connects to the motherboard's PWM (Pulse Width Modulation) signal, allowing for dynamic fan speed control based on CPU temperature, which further contributes to both cooling performance and acoustic optimization.
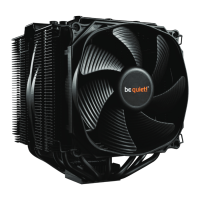
The Pure Rock CPU Cooler is designed for straightforward installation, though preparatory mounting outside the PC case is recommended for ease of assembly. The manual provides detailed, step-by-step instructions for installation on various Intel and AMD platforms, including LGA 2011(-3) square ILM/LGA 2066, LGA 1150/1151/1155/1156/1366, and AMD AM2(+)/AM3(+)/AM4/FM1/FM2(+).
For Intel LGA 2011(-3) square ILM/LGA 2066 sockets, the installation involves screwing Intel spacer nuts onto the socket frame threads, placing Intel mounting brackets over these nuts, and securing them with mounting bracket fastening screws. The cooler mounting bridge is then positioned centrally on the cooler, and the entire unit is placed onto the CPU. Intel/AMD mounting bridge fastening screws are inserted from above into the cooler mounting bridge and alternately tightened.
For Intel LGA 1150/1151/1155/1156/1366 sockets, the process begins with positioning Intel backplate screws in the notches of the Intel backplate, ensuring alignment with motherboard holes. O-rings are used to fix the backplate screws. The assembled backplate is then positioned under the motherboard. Intel 115X/1366 nuts are screwed onto the backplate bolts, followed by positioning Intel mounting brackets over these nuts and securing them with mounting bracket fastening screws. The cooler mounting bridge is then placed on the cooler, and the unit is mounted onto the CPU, securing it with Intel/AMD mounting bridge fastening screws.
For AMD AM2(+)/AM3(+)/AM4/FM1/FM2(+) sockets, the existing plastic retainers of the AMD retention module must be removed, as the factory-fitted backplate is utilized. For AM3 motherboards, AM3 washers are placed below the backplate bolts. AMD spacer nuts are placed onto the backplate bolts, and long AMD mounting brackets are affixed with AMD backplate screws. The cooler mounting bridge is then positioned on the cooler, and the unit is placed onto the CPU, secured with Intel/AMD mounting bridge fastening screws.
In all installations, the 120mm fan is fastened to the cooler unit using fan clips and connected to the motherboard's PWM signal. A crucial step before mounting the cooler is to remove the protective covering from the underneath of the cooler, which exposes the pre-applied thermal paste or the bare contact surface.
The be quiet! Pure Rock CPU Cooler is designed for minimal maintenance, primarily focusing on the fan. The 120mm fan can be easily detached from the heatsink for cleaning or replacement. To dismantle the fan, the notches of the fan clips are pushed away from the fan, allowing it to be removed. This feature facilitates periodic cleaning of dust accumulation on the fan blades and heatsink fins, which is essential for maintaining optimal cooling performance. Dust buildup can impede airflow and reduce the cooler's efficiency, so regular cleaning is recommended.
The thermal paste, which is crucial for efficient heat transfer between the CPU and the cooler, is pre-applied to the cooler's base. While the manual does not explicitly detail reapplication, it is a standard maintenance practice for CPU coolers to reapply thermal paste when the cooler is removed and reinstalled, or after a long period of use, to ensure continued optimal performance. The manual includes a caution regarding the thermal paste, stating it is not suitable for human consumption and advising immediate medical attention if swallowed, along with keeping it out of reach of children and avoiding skin and eye contact.
The cooler is backed by a 3-year manufacturer guarantee for consumers, provided the original purchase was made from authorized be quiet! dealers. Guarantee work requires a copy of the purchase receipt. The warranty is voided by manipulation, structural changes, or any damage caused by external mechanical force. This highlights the importance of careful handling and proper installation to ensure the longevity and warranty coverage of the device. The design, with its robust heatsink and easily detachable fan, allows for straightforward cleaning and inspection, contributing to its overall maintainability.
| Type | Cooler |
|---|---|
| Airflow | 87 m³/h |
| Bearing type | Sleeve bearing |
| Fan diameter | 120 mm |
| Maximum airflow | 51.4 cfm |
| Suitable location | Processor |
| Maximum air pressure | 1.25 mmH2O |
| Rotational speed (max) | 1400 RPM |
| Rotational speed (min) | 600 RPM |
| Noise level (low speed) | 19.1 dB |
| Noise level (high speed) | 26.8 dB |
| Compatible processor series | - |
| Supported processor sockets | LGA 1150 (Socket H3), LGA 1155 (Socket H2), LGA 1156 (Socket H), LGA 1366 (Socket B), LGA 775 (Socket T), Socket AM2+, Socket AM3+, Socket AM4, Socket FM1, Socket FM2+ |
| Mean time between failures (MTBF) | 80000 h |
| Pulse-width modulation (PWM) support | Yes |
| Material | Aluminium, Copper |
| Fan connector | 4-pin |
| Fins material | Aluminum |
| Product color | Black, Copper colour, Silver |
| Number of fans | 1 fan(s) |
| Number of fins | 48 |
| Number of fan blades | 9 |
| Number of heat pipes | 4 |
| Voltage | 12 V |
| Power supply | 1.44 W |
| Thermal Design Power (TDP) | 150 W |
| Heatsink dimensions (W x D x H) | 121 x 62.5 x 155 mm |
| Depth | 87.5 mm |
|---|---|
| Width | 121 mm |
| Height | 155 mm |
| Weight | 660 g |
| Cable length | 0.22 m |
| Heat pipes diameter | 6 mm |
| Fan dimensions (W x D x H) | 120 x 120 x 25 mm |