This document provides a quick start guide for setting the IP address, Subnet Mask, and Gateway for the Beijer Electronics G-series I/O module, specifically the GN-9372.
Function Description
The GN-9372 is a programmable I/O module designed to be integrated into industrial control systems. It allows for network communication and control of various I/O points. The module supports setting its IP address, Subnet Mask, and Gateway, which are crucial for network connectivity and communication within an industrial network. The device can be configured via its built-in Web Server or through BOOTP server functionality.
Important Technical Specifications
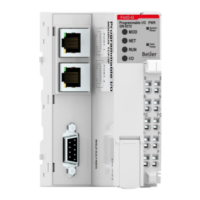
The GN-9372 module has several indicators and controls:
- PWR (Power) LED: Indicates the power status.
- RUN LED: Indicates the operational status of the PLC program.
- NET LED: Indicates network activity.
- IO LED: Indicates I/O status.
- Toggle Switch: Used for various functions, including PLC Run (UP position) and PLC Stop (DOWN position).
- Push Button: A multi-functional button used for resetting the PLC and other configurations.
Default Network Settings:
- IP Address: 192.168.1.50
- Subnet Mask: 255.255.255.0
- Gateway: 0.0.0.0
The module supports communication protocols such as MODBUS/TCP, MODBUS/UDP, MODBUS/RTU (RS485), and PROFINET IO. It also features an Ethernet interface for network connectivity.
Firmware Revision: 1.000 (11/21/2018)
MAC Address: 00:50:4C:0C:C3:44
I/O Size (Input): 1 byte(s)
I/O Size (Output): 1 byte(s)
Usage Features
The GN-9372 can be configured in several ways:
1. Setting Network Address in PIO (GN-9372):
- Power ON: The PIO and push the Reset button in front of PIO.
- Switch Position: The switch should be pushed for a minimum of 20 seconds. All LEDs should flash Green/Red.
- PIO will be set into the factory default mode:
- PLC program will be erased.
- PLC Parameters will be erased.
- Restart the PIO.
Push Button Functions:
- Press and Release: Resets the PLC and then stops.
- Push for 5 sec and Release: Erases PLC user program and retains common.
- Push for 20 sec and Release: Erases PLC user program and PLC parameter reset.
- Hold down and reset: Available for firmware download using FireFox.
2. Setting the IP address (network) to default setting:
- Follow the steps above to reset the PIO to factory default mode, which includes the default IP address, Subnet Mask, and Gateway.
3. Setting the IP address (network) using the built-in Web Server:
- Accessing the Web Server: Open a web browser and type the default IP address (192.168.1.50) into the address bar.
- Network Settings: Navigate to the "Network Setting" section in the Web Server interface.
- Change Network Parameters: Modify the IP address, Subnet Mask, and Gateway as required.
- Reset Power: Press the "Reset Power" button to apply the new settings.
- Test New IP: Log in to the new IP address to confirm the changes.
4. BOOTP Server Configuration:
- Connect the PC: Connect the PC with the GL-9089/GN-9289 over Ethernet.
- Set a fixed IP address on the PC: The IP address for the PC should not be assigned automatically (DHCP). Refer to Section 4.2, part 1 for details.
- Use the latest version of Beijer BOOTP server: Ensure the Beijer BOOTP server (included in IOGuidePro or extracted tool) is installed.
- Run IOGuidePro and select menu Tools > Bootp Server, or start the BOOTP tool from folder.
- Alternative: Run the Bootp server separately (BootpSvr.exe).
- Launch and show M-series device: When the Bootp Server is launched and to allow M-series device in present version of IOGuidePro, make sure that "Show Beijer device only" is unchecked.
- Press "Start Bootp".
- Add New Device: Push the "Add New Device" button and enter the MAC address and desired IP address, subnet, and gateway. Select the network interface that the GL-9089/GN-9289 is connected to.
- Dip Switch Configuration:
- The GL-9089/GN-9289 device will get the new IP address from the BootP server.
- Set DIP switch 9 to ON (BOOTP).
- DIP switch 10 is used to enable/disable the use of the lowest IP address with DIP_IP value.
- The device will show in the BootP server window with the new IP address.
- Stop Bootp and Reset DIP switch 9 to OFF: Reboot the GL-9089/GN-9289 device.
- Set a different subnet: If the IP is set to a different subnet, then change the IP address of your computer accordingly.
- Ping the device: Try to ping the device with the new IP address to verify connectivity.
- Close the BOOTP Server.
Security Features:
- Firewall Configuration: It is recommended to disable or configure the Windows Defender Firewall to allow communication with the device. In some cases, the firewall might block network connections, requiring it to be turned off or specific rules to be added.
- Antivirus Programs: Be aware that security software (like antivirus programs) might need to be temporarily disabled during configuration to prevent interference.
- BOOTP Application: The BOOTP application will loose its reference to the ethernet port if the best and recommended way is to use a switch between the PC and the device.
Maintenance Features
- Firmware Updates: The document mentions a firmware revision, implying that firmware updates might be available. These updates can improve functionality, fix bugs, or enhance security.
- Troubleshooting: The guide provides steps for resetting the device to factory defaults, which can be useful for troubleshooting network connectivity issues or misconfigurations.
- Documentation: Beijer Electronics provides comprehensive documentation, including manuals (e.g., GN-9372 Manual Link) and a knowledge database (Beijer Electronics knowledge database_HelpOnline), which are valuable resources for maintenance and support.
- Contact Support: For further assistance, customers can contact Beijer Electronics support via email (support.europe@beijerelectronics.com) or through their website (www.beijergroup.com).