13
Bellfires
English
Instructions for use and installation instructions
Programming the timer: P1 and P2
l Select the desired mode of operation by pressing the SET button
briefly.
l Press the SET button until P1 (heating period 1) flashes.
l Set the time for the beginning of the first heating period by pressing for hour and
for minute’setting.
l Press the SET button briefly; P1 appears on the display. Set the time
for the end of the first heating period.
l Press SET again to set the second heating period P2 (heat ON) and
P2 (heat OFF).
l If all 4 times are set, pressing the OFF button or waiting will complete
the programming.
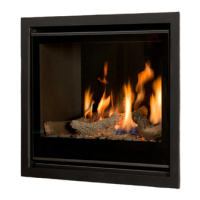
Changing the signal code:
l 15 different codes can be set by changing the position of one or more “DIP switches”
in the hand-held transmitter.
l The “DIP switches” are concealed behind the battery holder in the hand-held
transmitter.
l Press the reset button on the receiver until a signal is heard.
l Then hold down button
on the hand-held transmitter for 20 seconds.
l The receiver will then read the new code.
Figure 3: “DIP-switches” in battery compartment hand-held transmitter
2.5.3 Operation (Remote Control)
Igniting the fire
l Open the gas supply valve in the gas pipe to the fire.
l Press the “O I” switch on the gas control block to the “I” position.
l Turn the operating knob on the gas control block to the ON position.
l On the hand-held transmitter, press the
««
««
«- OFF and buttons simultaneously. A
short tone will signal the start. Short beeps (0.2 secs, 1Hz.) will then follow until the
pilot light and main burner are ignited. Once the main burner has been ignited, the
flame height will automatically rise to the maximum position.