In any case, check compliance with regulations in force.
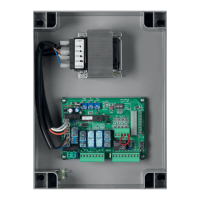
Functions of Trimmers
TCA The automatic closure time can be adjusted with this trimmer. Check Dip-switch N°2= On.
This function can be adjusted between 1 s minimum and 125 s maximum
TL The maximum time of the opening and closing phases can be adjusted with this trimmer.
Time should be preset approx. 4 sec. longer than the actual stroke time of the automatic system.
Adjustment ranges from 5 s minimum to 130 s maximum
Note: In the event of partial opening/closing, the control unit calculates the remaining time to
complete the operation in order to avert useless overheating of the motor.
TRAC It allows to adjust the delay time with which motor 1 starts closing with respect to motor 2.
Adjustment range from 3 s minimum to 30 s maximum. During opening, the out of phase time of the
motors is 2 seconds.
Dip-Switch functions
DIP 1 “P.P. Mod” The operating mode of ”Pulsante P.P.” (Step-by-step push button) and of the transmitter
is selected.
Off: operation : APRE > STOP > CHIUDE > STOP >
On: operation: APRE > CHIUDE > APRE >
DIP 2 “C.A.” Automatic closure is enabled or disabled.
Off: disabled automatic closure
On: enabled automatic closure
DIP 3 “Cond.” The multi-at function is enabled or disabled.
Off: disabled multi-at function.
On: enabled multi-at function. The P.P. (Step-by-step) impulse or the impulse of the
transmitter have no effect in the opening phase.
DIP 4 “Prelam.” Forewarning ashing light enabled or disabled
Off: disabled forewarning ashing light
On: enabled forewarning ashing light. The ashing light is activated 3 s before the motor
starts.
Note: After modifying the setting of trimmers and Dip-Switches, switch off and power the unit again.
Conguration of the built-in receiver
The control unit is complete with an incorporated radio receiver for both xed-code and variable code radio
controls, at 433.92MHz frequency.
To use a radio control, its code should be copied rst. The memorization procedure is shown here under. The
device is able to store up to 14 different codes in memory.
Memorization of a new transmitter with activation of the P.P. (step-by-step) function
- Press PGM button once for 2 seconds, the D4 LED starts ashing rapidly.
- Within 10s, press the transmitter push-button which should be stored in memory with P.P. function.
Memorization of a new transmitter with activation of 2nd radio channel output (Terminals 16-17)
- Press button PGM twice, each time for at least 2 seconds, the D4 LED switches on with xed light.
- Within 10s, press the transmitter push-button which should be stored in memory with 2nd radio channel
function.
To exit the programming mode, wait for 10s or press the PGM button for 2 seconds, the D4 LED ashes regularly
again.
To delete the control unit codes from memory
- Cut-off power supply to the control unit
- Reset power supply by keeping the PGM button pressed for 5 seconds; the D4 LED switches on with xed
light and then off when deletion is completed.
- Release the PGM button, memory is deleted and the D4 LED starts ashing r
egularly again.
NOTE: If the D4 LED switches on with two
long ashes and then switches off, when entering the transmitter
codes memorization mode, this means that the receiver is full and no other transmitter code can be stored in
memory.