Do you have a question about the Bernina Quilting Frame and is the answer not in the manual?
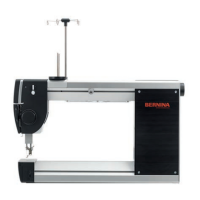
Step 1: Assembling the height-adjustable legs for the quilting frame.
Step 2: Assembling the track support structures for the quilting frame.
Step 3: Attaching the table braces to the frame structure.
Step 4: Installing the table supports onto the frame.
Step 5: Placing and securing the table surfaces onto the frame.
Step 6: Assembling the track runners that guide the carriage.
Step 7: Installing the main tracks onto the frame supports.
Step 8: Assembling the frame ends and attaching them to the legs.
Step 9: Preparing the rails by assembling the end components.
Step 10: Connecting rail segments to form complete rails.
Step 11: Connecting the assembled rails to the main frame structure.
Step 12: Assembling the top plate and carriage components.
Steps for cutting leaders, determining placement, and applying fabric to leaders.
Steps for installing quilt backing, top, and batting onto the frame rails.
Attaching batting, rolling fabric, bungee clamp installation, and general sewing tips.
Description and features of the Gracie Laser accessory for pattern tracing.
Details on the Plastic Pattern Perfect system for creating patterns.
Information on the automated quilting system using QuiltMotion software.
| Brand | Bernina |
|---|---|
| Model | Quilting Frame |
| Category | Sewing Machine |
| Language | English |