The Menus Are Shown Below
Main menu Submenu Detail
001 - 512
DMX512
AUTO
SOUND
Slave
Master
Auto
Pan
Pan Fine
Tilt
Tilt Fine
PT Spd
Strobe
Dimmer
Color
Gobo
Prism
Frost
default001
default
default
0-255
0-255
0-255
0-255
0-255
0-255
0-255
0-255
0-255
0-255
0-255
Remarks
Address
Run Mode
M/S Choose
Manual Control
— 3 —
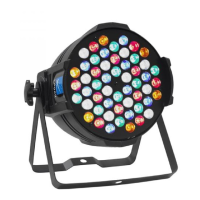
Effect Wheels and Lamp
— 2 —
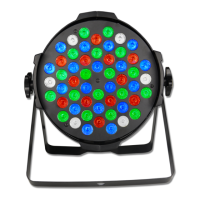
Photometric Diagram
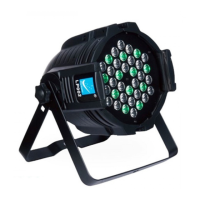
Control Panel Overview
Distance (m)
Intensity (Lux)
Diameter (m)
8
261160
10
168418
15
76372
20
42040
0.385 0.495 0.74 0.985
2.8°
CLB260:
Distance (m)
Intensity (Lux)
Diameter (m)
8
275600
10
178985
15
80303
20
46131
0.385 0.495 0.74 0.985
2.8°
CLB260-O:
DMX IN DMX OUT POWER IN
FUSE
AC250V 10A
① ② ③ ④ ⑤ ⑥ ⑦
①
②
③
④
Signal indicator:Green color shows DMX signal is connected.
Error indicator:Red color shows there is ERROR message , check it from the “Information”menu
LCD Display
LEFT:To enter the main menu and leave the menu RIGHT:To go forward to the next level menu
UP:To move upper in the menu DOWN:To move down in the menu
OK:To perform CONFIRM function
⑤
DMX IN & DMX OUT:For DMX512 operation, use 3-pin XLR cable to link the unit and DMX controller (5-pin XLR is optional)
⑥
FUSE(T 10A):Protect the unit from damage of over current or short-circuit
⑦
POWER IN:Use to connect to supply power
Osram Sirius Hri 251W
Because of its high internal pressure, there might be a risk that the Discharge lamp would explode
during operation. The lamp emits intense UV radiation which is harmful to the eyes and skin. The
high luminance of the arc can cause severe damage to the retina if you take a close look at the
lamp.
To protect the lamp, always turn off the lamp first (via control panel or DMX controller) and let the
unit run at least five minutes to cool down before switching off the mains supply. Never handle the
lamp or luminary when it is hot.
Do not touch the bulb with bare hands. If this happens, clean the lamp with denatured alcohol and
wipe it with a lint free cloth before installation.
The lamp generates UV radiation. Never operate the lamp without appropriate shielding.
When lighting up, the lamp operates at high pressure and there is a slight risk of arc tube rupture.
The risk increases with age, temperature and improper handling of the lamp. Do not use the lamp
longer than its lifespan.
Make sure the lamp is located in the center of the reflector for the best projection.
The lamp life is 1500 hours; Should check the Lamp Use Hour regularly. When the lamp replace-
ment warning appears, we strongly recommend that you replace the lamp. After replacing the lamp,
the use hours of the lamp must be cleared and reset.
To Replace The Lamp
1. Ensure that the fixture is detached from power and has cooled down completely. It is a good idea
to allow the fixture to run for 10 minutes after the lamp has been turned off, so that the cooling fans
have time to works.
2. Loosen the screws on the head of the fixture and open the fixture head covers.
3. the screw that holds the lamp in place. Unplug the leads of the lamp and lift the lamp out of its
recess, disconnect the lamp and connect a new lamp that must be the same type with the old one.
And then place the new lamp into the lamp recess.
The installing direction of lamp:
Finally reinstall the head cover, fastening it securely before reapplying power.
Lamp Replacement Warning
When the lamp reaches 300 hours before its service time, the display will flash the message
“Replace Lamp Soon” for up to 5 minutes. During this period, the fixture will still work normally.
When the lamp reaches its service time, the display will flash the message “Replace Lamp Now” for
up to 10 minutes. After 10 minutes, the fixture will return to normal operation.
When the lamp is continuously used overtime, the display will flash the message “Lamp Timeout
Use, Replace Lamp Now” for up to 10 minutes. After 10 minutes, the fixture will return to normal
operation.
Attention: Damages caused by the failure to replace the bulb in time are not subject to warranty.
How To Set The Fixture
After resetting the fixture , press the Left button into menu mode, and press the UP/DOWN button
until the required function is shown on the monitor. Select the function by pressing the UP/DOWN
button.
Use the Right button to choose the submenu, press the Centre button to store and automatically
return to the last menu. Press the Left button or let the unit idle 30 seconds to exit menu mode.
Color Wheel: Static Gobo Wheel:

 Loading...