EN EN
FR FR
CS CS
HU HU
PL PL
RU RU
SK SK
SR SR
BG BG
HR HR
DE DE
IT IT
RO RO
UA UA
AR AR
4 5
Using medolight
Medolight is used for light therapy with light emitted by electro-
luminescent diodes (LED) in red and infrared wavelengths range.
General safety information
During use all the safety precautions which apply to electrical
devices must be followed; specically:
• Please read the manual carefully before operating and follow the
instructions therein. It is recommended to complete training with
a seller.
• Note: Use of control elements, settings or execution of other proce-
dures than those specified in this manual may result in uncontrolled
exposure to light.
• Do not direct light towards your eyes. In case of face exposure close
your eyes.
• Treatment area should be exposed from a distance of 5mm.
• Handle the device with care: protect from mechanical damage, fall,
moisture and high temperature.
• Do not submerge the device and the charger in water or other
liquids.
• The device should not be exposed to direct sunlight.
• Do not use the device or the charger if their casings have been
damaged.
• Use only YS10MB charger provided with medolight package. The
use of other charger may damage the device. YS10MB charger
should be used only with medolight device. The use for other
purposes may damage the charger.
• When using the device with the charger exercise particular caution
– keep away from children.
• If necessary use an approved extension cord.
• Do not open the casings and do not make repairs yourself. In case
of the improper work of the device, repair should be conducted
only by an authorized service provider.
WARNING:
• The device is a source of heat.
• The device contains a battery, which may be harmful for the
environment – dispose only into a used battery storage con-
tainer.
• Packaging, the device and the charger casings and manual are
recyclable.
Turning the device on and off
Before starting up the device for the first time there should be
carried out 3 hours battery charging process - see page 7 - battery
status signaling.
The device is turned on and off with the
ON/OFF
button.
After turning on a testing programme is run – control diodes 1–5
and the
Batt
. diode consecutively lit up.
The device automatically sets the first exposure programme and
exposure duration to 5 minutes
(control diode 1 is lit up)
.
At the same time the
Batt
. diode is lit up for 5 seconds, indicating
the battery level. (see chapter “Battery level indicator”).
If within 1 minute since turning the device on no control button is
pressed, the device will switch into the stand-by mode – no control
diode is lit up, the device “remembers” the last setting. The device
can be switched back into the active mode by pressing one of the
three buttons:
TIME, MODE or START.
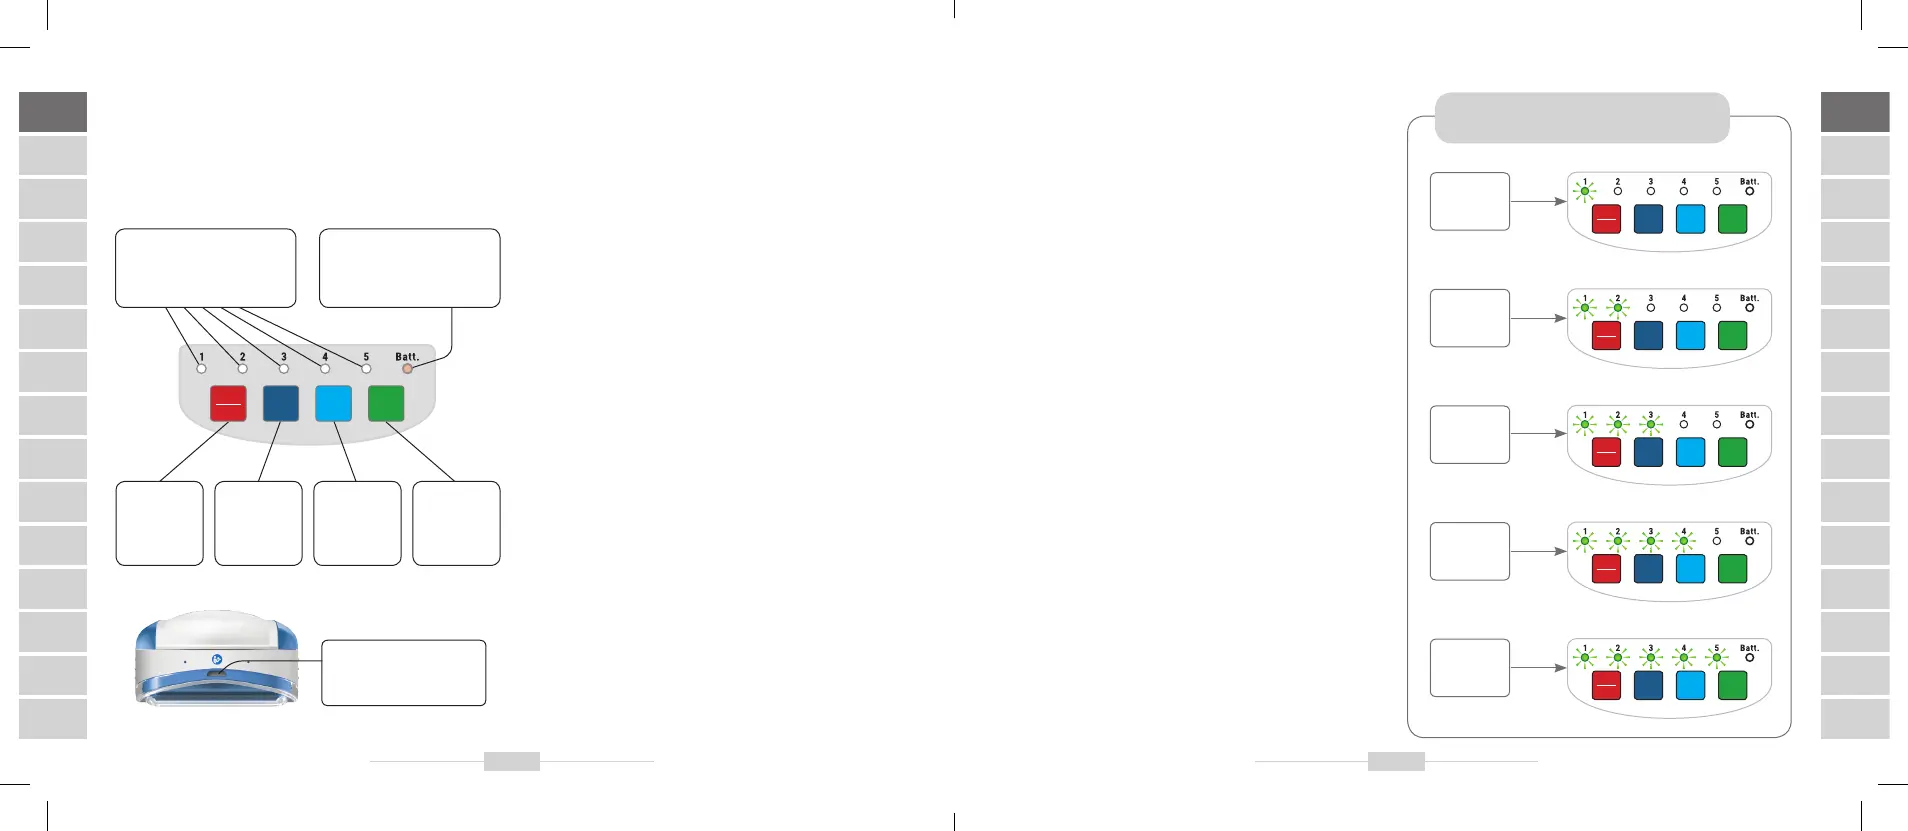
Exposure duration selector
Use
TIME
button to select one of five exposure durations:
5, 10, 15,
20, 25 minutes
.
After turning the device on with ON/OFF button, the 5 minute
exposure duration is selected automatically. Each depression of TIME
button increases the duration by 5 minutes, causing another control
diode to light up for 5 seconds.
After 5 seconds or after pressing the MODE button, the device auto-
matically reverts to the selected exposure programme.
Exposure duration selector
TIME MODE
START
ON
OFF
5 mins.
TIME MODE
START
ON
OFF
10 mins.
TIME MODE
START
ON
OFF
15 mins.
TIME MODE
START
ON
OFF
20 mins.
TIME MODE
START
ON
OFF
25 mins.
TIME MODE
START
ON
OFF
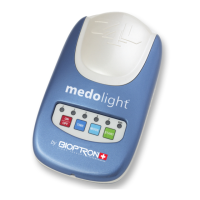
ON/OFF
turns the
power
on and off
TIME
sets
exposure
duration
MODE
changes the
exposure
programme
START
starts the
session
control diodes
• exposure time (1–5)
• programme number (1–5)
control diode
battery level (Batt. diode)
socket to connect
YS10MB power supply
adaptor-charger