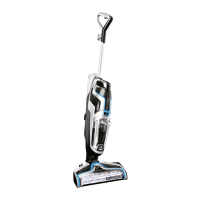
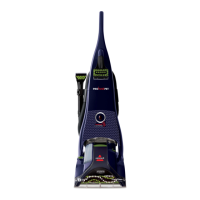
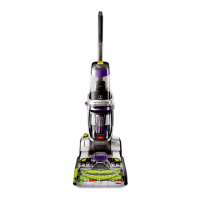
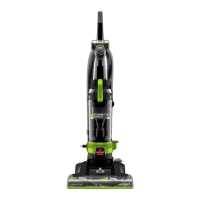
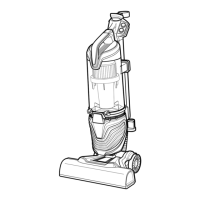
The BISSELL PET 3 is a deep carpet cleaner designed for household use, offering a comprehensive cleaning system that combines hot tap water, BISSELL cleaning formula, brush agitation, and suction to safely clean carpets. This model is specifically engineered to address pet-related messes and maintain a clean home environment.
Function Description:
The primary function of the BISSELL PET 3 is to deep clean carpets and upholstery. It operates by spraying a cleaning solution onto the carpet, agitating the fibers with a rotating brush, and then suctioning up the dirty water. This process effectively removes embedded dirt, stains, and allergens, contributing to a healthier home. The machine is versatile, capable of cleaning entire rooms or targeting specific areas like stairs, upholstery, and high-traffic zones. Its "Ready Tools" dial allows users to switch between floor cleaning and using attachments for above-floor cleaning tasks.
Important Technical Specifications:
- Power Supply: 220-240 VOLT A.C. 50-60 HZ. This indicates it is designed for regions with this electrical standard.
- Cleaning Formula: Requires BISSELL deep cleaning formula specifically for full-size machines. The use of formulas containing lemon or pine oil, chemical spot cleaners, or solvent-based soil removers is cautioned against, as they may damage the appliance and void the guarantee.
- Water Temperature: Uses hand hot tap water, up to 60°C/140°F MAX. Boiling or microwaved water should not be used as it can damage the solution tank.
- Brush System: Features a "DirtLifter™ PowerBrush" with a bristle pattern designed to lift out dirt and gently groom carpet fibers. The brush has a floating suspension that self-adjusts to different carpet heights. When the machine is in the upright position and power is ON, the brush is lifted off the carpet to protect it.
- Tanks: Equipped with a solution tank for clean water and formula, and a collection tank for dirty water. The collection tank has a "full line" indicator to signal when it needs emptying.
- Nozzle: Features a removable nozzle for easy cleaning after use.
- Cord: Includes a Quick Release Cord Wrap for convenient storage.
- Fuse: If fitted with a non-rewireable BS 1363 plug, it must have a 13 amp (ASTA approved to BS 1362) fuse.
Usage Features:
- Assembly: The deep cleaner is designed for quick and easy assembly, requiring only a Phillips head screwdriver. Instructions include sliding the upper body onto the lower body, securing with screws, attaching the hose wrap, sliding the upper handle into the upper body, placing the solution tank, wrapping the power cord and flex hose, securing the flex hose with a latch, and attaching a tool to the hose.
- Operation Modes:
- Floor Cleaning: Set the "ReadyTools" dial to "FLOOR CLEANING." Users press a red recline lever with their foot to engage cleaning strokes. Cleaning involves one slow forward wet pass while pressing the spray trigger, followed by one slow backward wet pass. This is repeated, then one slow forward and backward pass without spraying to suction up remaining solution.
- Tool Cleaning (Attachments): Set the "ReadyTools" dial to "TOOLS." Attach the desired cleaning tool to the hose. Cleaning involves pressing the spray trigger to apply solution and moving the tool over the soiled surface, then releasing the trigger to suction up dirty water.
- Solution Tank Filling: The solution tank is removed by lifting it up. The black cap is unscrewed, and the tank is filled with hand hot tap water to the "WATER" line, then BISSELL 2X Formula to the "FORMULA" line. The cap is then replaced and tightened.
- Collection Tank Emptying: The collection tank is removed by releasing latches and lifting the top of the tank by its handle. Contents are poured out from the opening at the back of the tank. The tank should be rinsed thoroughly before being replaced.
- Pretreatment (Optional): For stubborn stains and highly soiled areas, BISSELL Stain Pretreat can be generously sprayed over the area and allowed to sit for 3-5 minutes before deep cleaning. Caution is advised not to overwet the carpet.
- Upholstery Cleaning: Important checks are required before cleaning upholstery, including checking manufacturer's tags for "W" or "WS" codes (indicating suitability) and avoiding "X," "S," or "Dry Clean Only" tags. Colorfastness should be checked in an inconspicuous place. Upholstery stuffing should also be checked for potential color bleeding when wet.
- Safety Features: Includes a warning against plugging in the deep cleaner before complete assembly. It also warns against overwetting carpets during cleaning. The machine should not be left running in the same spot with the handle fully upright if it has a motorized brushroll.
Maintenance Features:
- Collection Tank Cleaning: After each use, the collection tank should be emptied and rinsed thoroughly.
- Nozzle Cleaning: The removable nozzle should be cleaned after each use for best results. This involves lifting a latch, removing the nozzle from the machine, rinsing it under running water, and then replacing and securing it with the latch.
- Tank Vent & Foam Filter Cleaning: The tank vent and foam filter, located on top of the collection tank, should be removed and rinsed.
- Lint Screen Cleaning: The red lint screen located under the collection tank should be cleaned to prevent clogging.
- Hose Rinsing: After using attachments, it is recommended to suction clean water from a bowl or tap to rinse out the hose. The end of the hose should be lifted and stretched to clear all water.
- Hose Storage: The flex hose should be wrapped around the hose wrap for storage.
- Gasket Cleaning: Lint and hair should be removed from the red gasket in the base of the unit (the gasket itself should not be removed).
- Machine Storage: After cleaning, the power cord should be wrapped around the Quick Release Cord Wrap. All surfaces should be wiped with a soft cloth. The cleaner should be stored upright in a protected, dry area. It is acceptable to store the machine with cleaning solution remaining in the solution tank for the next task, but dirty water should never be kept in the collection tank.
- Freezing Prevention: A caution is issued against storing the unit where freezing may occur, as this can damage internal components.
- Troubleshooting Guide: The manual provides a troubleshooting section to address common issues such as reduced or no spray, the machine not picking up cleaning solution, and the brush not turning, offering possible causes and remedies.
The BISSELL PET 3 is designed to be a user-friendly and effective solution for maintaining clean carpets and upholstery, particularly in homes with pets, with clear instructions for operation and maintenance to ensure its longevity and performance.