23
CHAPTER 6: Installation
6.2.2 A
TTACHING A
KVM S
WITCH TO THE
L
OCAL
U
NIT
’
S
CPU P
ORTS
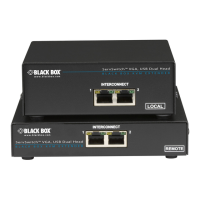
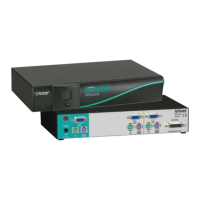
Making sure that the KVM switch is powered OFF, attach a Sun/VGA type User
Cable (see Section 4.2.2 for product codes) to one of the switch’s user ports. Run
the extension cables included with the extender from the User Cable’s video and
keyboard/mouse connectors to the matching ports on the Local Unit, as shown in
Figure 6-2. On the Dual-Access model, make sure you don’t connect the switch’s
user port to the ports on the Local Unit that the local user station plugs into.
Figure 6-2. Attaching a KVM switch to the Local Unit’s CPU ports
(Single-Access model shown).
6.2.3 A
TTACHING A
M
ONITOR
, K
EYBOARD
,
AND
M
OUSEORA
KVM S
WITCH TO THE
D
UAL
-
A
CCESS
L
OCAL
U
NIT
’
S
U
SER
P
ORTS
Follow the directions in Section 6.2.4 for a keyboard, monitor, and mouse, or the
directions in Section 6.2.5 for a KVM switch. Just make sure you don’t connect the
equipment to the Local Unit’s CPU ports instead of its user-station ports.
6.2.4 A
TTACHING A
M
ONITOR
, K
EYBOARD
,
AND
M
OUSE TO THE
R
EMOTE
U
NIT
Making sure that the monitor is powered OFF, plug the mouse into the keyboard,
then plug the monitor and keyboard into the matching ports on the Remote Unit,
as shown in Figure 6-3.
User Cable
(EHN225)
ServSwitch Ultra
(KV5016FA-R2)
Extender’s
video-
extension
cable
Extender’s
keyboard/
mouse
extension
cable
 Loading...