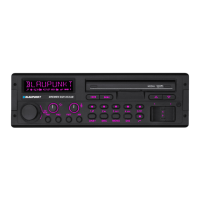
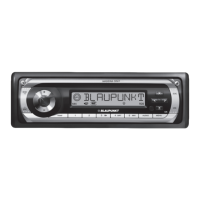
This document describes the Blaupunkt Madeira CD27 and Porto CD27 car sound systems, identified by model numbers 7 647 492 310 and 7 647 482 310 respectively. These devices are designed for installation and operation in vehicles with a 12V system voltage and fit into a DIN slot. The manual provides comprehensive instructions for installation, operation, and maintenance, emphasizing safety and proper usage.
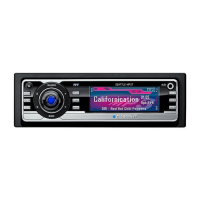
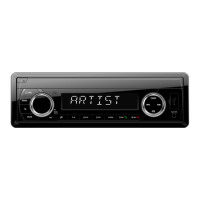
Device Overview and Controls
The device features a detachable control panel for theft protection. Key controls include:
- Release Panel Button (1): Used to remove the control panel.
- On/Off and Mute Button (2): Switches the device on/off and activates/deactivates the volume mute feature.
- Volume Control (3): Adjusts the volume from 0 (off) to 66 (maximum).
- CD Tray (4): For inserting CDs.
- LCD Display (5): Shows various information such as station names, track numbers, time, and menu settings.
- Arrow Buttons (6): Used for navigation within menus, station seek tuning, track selection, and fast searching.
- Eject Button (7): Ejects a CD from the device.
- ESC Button (8): Confirms menu items and returns to the main display level (MENU or AUDIO).
- DIS Button (9): Briefly displays alternative display contents (e.g., time) with a short press, and changes display contents with a long press.
- MENU Button (OK) (10): Calls up the settings menu, confirms menu selections, and starts the Scan function with a long press.
- AUDIO Button (11): Sets bass, treble, balance, and fader; selects equalizer presets; and switches X-BASS on/off and adjusts it.
- Keys 1-5 (12): Used for various functions, including station presets and track selection.
- TRAF Button (13): Short press switches traffic information standby on/off; long press switches convenient RDS function on/off.
- SRC/ Button (14): Short press switches between audio sources (CD, CD changer, AUX); long press briefly displays the time.
- BND/TS Button (15): Short press selects FM memory banks and MW/LW wavebands; long press starts the Travelstore function.
Usage Features
Switching On/Off:
The device can be switched on/off in several ways:
- Vehicle Ignition: If correctly connected, the device switches on/off with the ignition, unless manually switched off previously.
- Button (2): A short press switches it on; a long press (over two seconds) switches it off.
- CD Draw-in: If off and no CD is in the drive, gently inserting a CD with the printed side up will automatically switch on the device and start CD playback.
- Detachable Control Panel: Detaching the panel switches the device off; reattaching it switches it on, reactivating the last active setting (radio, CD, CD changer, or AUX).
- Battery Protection: The device automatically switches off after one hour if the ignition is off, to protect the vehicle battery.
Volume Adjustment:
Volume can be adjusted from 0 to 66 using the volume control (3). The power-on volume can be set via the MENU (10) button, navigating to "ON VOLUME" with arrow buttons (6), and adjusting. The "LAST VOL" option re-enables the volume set before the device was switched off.
Mute Function:
- Quick Mute: Briefly pressing button (2) reduces volume to a preset mute level, displaying "MUTE".
- Cancelling Mute: Briefly pressing button (2) again returns to the previously set volume.
- Adjusting Mute Level: The mute level can be adjusted via the MENU (10) button, navigating to "MUTE LVL" with arrow buttons (6).
- Telephone Mute: If connected to a cell phone, the car sound system mutes when a call is picked up, displaying "PHONE".
Radio Mode:
- Tuner Region: The tuner can be set for different regions (Europe, America, South America, Thailand) to ensure proper reception. This is done by holding buttons (1) and (5) (12) while switching on with button (2), then selecting the region with arrow buttons (6).
- Switching to Radio: From CD, CD changer, or AUX mode, press BND/TS (15) or repeatedly press SRC/ (14) until a memory bank (e.g., "FM1") appears.
- RDS Functions: The device supports RDS (Radio Data System) functions like AF (Alternative Frequency) and REGIONAL. AF automatically tunes to the best receivable frequency for the current station. REGIONAL prevents switching to alternative frequencies with different program content. RDS can be activated/deactivated by pressing and holding TRAF (13) for over two seconds. REGIONAL can be switched on/off via the MENU (10) button.
- Waveband/Memory Bank Selection: Briefly press BND/TS (15) to switch between FM memory banks (FM1, FM2, FMT) and MW/LW wavebands. Each bank stores five stations.
- Tuning into Stations:
- Automatic Seek Tuning: Press arrow buttons (6) to tune into the next receivable station.
- Manual Tuning: If RDS is deactivated, press arrow buttons (6) to manually tune.
- Broadcasting Networks (FM only): If RDS is active, use arrow buttons (6) to browse stations within broadcasting networks.
- Station Seek Sensitivity: Adjust "SENS" (HI6 for highest, LO1 for lowest) via the MENU (10) button to control whether the radio tunes into weak or strong signals.
- Storing Stations:
- Manually: Tune to a station, then press and hold one of the station buttons (1-5) (12) for over two seconds.
- Automatically (Travelstore): Press and hold BND/TS (15) for over two seconds to store the five strongest FM stations in the FMT memory bank. Existing stations in this bank are deleted.
- Listening to Stored Stations: Select the memory bank, then press the corresponding station button (1-5) (12).
- Scanning Receivable Stations (SCAN): Press and hold MENU (10) for over two seconds to briefly play all receivable stations. Scanning time (5 to 30 seconds) can be set via the MENU (10) button ("SCAN TIME"). Press MENU (10) again to stop scanning.
- Programme Type (PTY): FM stations may broadcast program types (e.g., CULTURE, SPORT, ROCK). The PTY-EON function allows seeking stations by program type. If a matching station is found, the radio switches to it. If not, a beep sounds and "NO PTY" appears. PTY switching can be disabled via the menu ("PTY off"). PTY language ("DEUTSCH", "ENGLISH", "FRANÇAIS") can also be selected via the MENU (10) button.
- Optimising Radio Reception (HICUT): The HICUT function improves reception in poor FM conditions by automatically reducing interference. "HICUT 0" means no reduction; "HICUT 1" means automatic reduction. This setting is adjusted via the MENU (10) button.
- Traffic Information (TA): The device has an RDS-EON receiver. When a TA is broadcast, the system switches to the appropriate traffic information station. After the report, it switches back to the previous program. Traffic information priority can be activated/deactivated by briefly pressing TRAF (13). The volume for TAs can be adjusted via the MENU (10) button ("TA VOLUME").
CD Mode:
- Supported Discs: Plays standard audio CDs, CD-Rs, and CD-RWs (12 or 8 cm diameter).
- Caution: Avoid labeled or shaped CDs, as they can damage the drive. Only use markers for labeling, as permanent markers can damage CDs. Copy-protected CDs may cause playback issues.
- Switching to CD Mode: Insert a CD, or if a CD is already in the drive, repeatedly press SRC/ (14) until "CD" appears. Playback resumes from the last interrupted point.
- Selecting Tracks: Use arrow buttons (6) to select the next or previous track. Pressing ✓ or <button (6) once restarts the current track.
- Fast Track Selection: Press and hold ㅈצ buttons (6) for fast-reverse/fast-forward track selection.
- Fast Searching (Audible): Press and hold arrow buttons (6) for fast searching backwards/forwards.
- Random Track Play (MIX): Briefly press 5 MIX (12) for "MIX CD" (random tracks on current CD). Press and hold for over two seconds for "MIX ALL" (random tracks on all inserted CDs). Press 5 MIX (12) again to cancel ("MIX OFF").
- Scanning Tracks (SCAN): Press and hold MENU (10) for over two seconds to briefly play all tracks on the CD. Scanning time can be set in the "Radio mode" chapter. Press MENU (10) again to stop scanning.
- Repeating Tracks (REPEAT): Press 4 RPT (12) for "RPT TRCK" (repeat current track). Press and hold for over two seconds for "RPT DISC" (repeat current CD). Press 4 RPT (12) again to cancel ("RPT OFF").
- Interrupting Playback (PAUSE): Press button 3 (12) to pause ("PAUSE"). Press again to resume.
- Configuring Display: Press and hold DIS (9) for over two seconds to switch between display types (e.g., track number and time, track number and playing time).
- Displaying CD Text: If a CD includes CD text (artist, album, tracks), it can be displayed as scrolling text. This function can be switched on/off via the MENU (10) button ("CD TEXT").
- Traffic Announcements in CD Mode: If TRAF (13) is pressed, traffic announcement priority is activated.
- Ejecting a CD: Press button (7) to eject the CD. The drive automatically draws it back in after approx. 10 seconds if not removed. CDs can be ejected even when the device is off or another audio source is active.
CD-Changer Mode:
- Switching to CD-Changer Mode: Repeatedly press SRC/ (14) until "CHANGER" appears. The device plays the first detected CD.
- Selecting CDs: Use arrow buttons (6) to move between CDs. Empty or invalid CD slots are ignored.
- Selecting Tracks: Use arrow buttons (6) to move between tracks on the current CD.
- Fast Searching (Audible): Press and hold arrow buttons (6) for fast searching backwards/forwards.
- Configuring Display: Press and hold DIS (9) for over two seconds to switch between five display options (e.g., track number and playing time, CD number and track number).
- Repeating Tracks/CDs (REPEAT): Briefly press 4 RPT (12) for "RPT TRCK" (repeat current track). Press and hold for over two seconds for "RPT DISC" (repeat current CD). Press 4 RPT (12) again to cancel ("RPT OFF").
- Random Track Play (MIX): Briefly press 5 MIX (12) for "MIX CD" (random tracks on current CD). Press and hold for over two seconds for "MIX ALL" (random tracks on all inserted CDs). Press 5 MIX (12) again to cancel ("MIX OFF").
- Scanning All Tracks on All CDs (SCAN): Press and hold MENU (10) for over two seconds to briefly play all tracks on all inserted CDs. Press MENU (10) again to stop scanning.
- Interrupting Playback (PAUSE): Press button 3 (12) to pause ("PAUSE"). Press again to resume.
CLOCK Time:
- Displaying Time: Press and hold SRC/ (14) until the time appears.
- Setting Time: Via the MENU (10) button, navigate to "CLOCK SET" with arrow buttons (6). Adjust hours and minutes using arrow buttons (6).
- 12/24-Hour Mode: Select "24 H MODE" or "12 H MODE" via the MENU (10) button and switch between them using arrow buttons (6).
- Continuous Time Display: The time can be displayed continuously when the device is off and the ignition is on, by setting "CLOCK ON" via the MENU (10) button.
Sound Settings:
- General Adjustment: Bass and treble can be adjusted separately for each source (radio, CD, CD changer, AUX). Balance (left/right) and fader (front/rear) apply to all audio sources, except for traffic announcements, which can be adjusted during the announcement.
- Adjusting Bass/Treble: Press AUDIO (11). "BASS" appears. Use arrow buttons (6) to adjust. For treble, navigate to "TREBLE" with arrow buttons (6) after pressing AUDIO (11).
- Adjusting Balance/Fader: Press AUDIO (11). "BASS" appears. Navigate to "BAL" (balance) or "FADER" with arrow buttons (6). Use arrow buttons (6) to adjust.
- Equalizer Presets (Presets): Pre-programmed settings for "ROCK", "POP", and "CLASSIC" are available. Select via AUDIO (11), navigating to the desired preset or "EQ OFF" with arrow buttons (6). Note that using a preset restricts the adjustment range for bass and treble.
- X-BASS: Increases bass at low volume, effective for all audio sources. X-BASS boost can be set from 1 to 3, or "XBASS OFF". Adjust via AUDIO (11), navigating to "XBASS" with arrow buttons (6).
External Audio Sources (AUX):
- Connection: An external audio source (e.g., portable CD/MiniDisc/MP3 player) with a line output can be connected using an adapter cable (Blaupunkt no.: 7 607 897 093).
- Switching AUX Input On/Off: If no CD changer is connected, the AUX input must be switched on via the MENU (10) button, navigating to "AUX OFF" or "AUX ON" with arrow buttons (6).
- Selecting AUX: Once enabled, press SRC/ (14) until "AUX INPUT" appears.
Maintenance Features
- Cleaning: Use only a dry or slightly moistened cloth for cleaning. Solvents, cleaning agents, and dashboard sprays can damage the device surface.
- Control Panel Contacts: Regularly clean the electrical contacts of the control panel using a soft cloth moistened with cleaning alcohol.
- Control Panel Handling: Never drop the control panel, expose it to direct sunlight or heat, or touch its electrical contacts directly. Transport it protected against impacts and dirt.
- CD Drive: Avoid inserting labeled or shaped CDs to prevent damage. Do not hinder or assist the drive when it draws in a CD.
- Disposal: Do not dispose of the old unit in household trash. Use available return and collection systems for proper disposal in EU countries.
- Laser Safety: The device contains a Class 1 laser. Do not open the device or perform modifications, as this can cause eye injuries.
- Installation: Only install the device yourself if experienced in car sound systems and familiar with vehicle electrical systems. Observe the installation instructions.
- Operation: Only operate the device when traffic conditions permit. Stop in a suitable location for more extensive operations.
- Volume: Always listen at a moderate volume to hear warning signals and protect hearing. Do not increase volume when switching audio sources or during CD changer operations, as the device briefly mutes.
- Theft Protection: The detachable control panel protects against theft. Always remove it when leaving the vehicle and do not leave it inside, even in a hiding place.