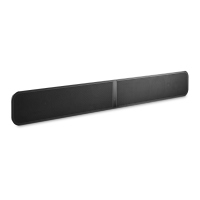
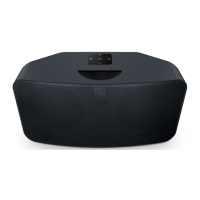
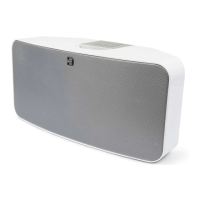
KICKSTAND FEET (REMOVABLE) :źbªźº£q}ªźÇźGX1NźN=X7Jź°ªźÇÁź°ÖªŘźqÇÇq}źÇźÁ̺º£ź
/}¡ÁÇqªźÇź°½źÁ̺º°½Çŝźºªªź°ªźÇźÁºq¡½ź°½ªÇqÇ°ªŘźÜ°Ìź©qÜźªźÇ°źqź/}¡ÁÇqªźÛǪ½Áź
(supplied) to ensure the Kickstand Feet are long enough to support your PULSE SOUNDBAR.
SUBW OUT : The SUBW OUT connection can be used with a subwoofer cable (not provided). This is an optional
connection since the PULSE SOUNDBAR can be connected to a Bluesound PULSE SUB or RT100 wireless adaptor
ǽ°Ìźqź|Ì£ÇŮªźÖ½£ÁÁź}°ªª}Ç°ªŝź°½źÖ½źÁÌ|Ö°°½ÁŘźÌÁźÇźNXbź=XSźº°½Çŝź°ªª}Çź°ªźªź°źqźÁÌ|Ö°°½ź
cable to the SUBW OUT on the PULSE SOUNDBAR and the other end to the corresponding input on the subwoofer.
AUDIO IN R/L :źźXÁªźÇźNǽ°źJźÇ°źJź}q|£źº½°ÕŘź}°ªª}Çź°ªźªźÇ°źÇźÌ°ź%ªźJŤ1ź°źÇź
PULSE SOUNDBAR and the other end to the corresponding RCA output of a television or other audio source.
The source will show as an Analog Input in the Navigation Drawer of the BluOS App.
OPTICAL IN : XÁªźqźÇq£ź=ºÇ}q£źÌ°źq|£źŪª°Çźº½°ÕūŘź}°ªª}Çź°ªźªźÇ°źÇź=ºÇ}q£ź%ªź°źÇź
PULSE SOUNDBAR and the other end to the corresponding digital optical output of a television. The source will
show as an Optical Input in the Navigation Drawer of the BluOS App.
USB (TYPE B) :źXÁźÇźNJa%źº°½Çźªź}°ªÌª}Ç°ªźÖÇźXNźŪSܺźź6ªūźÇ°źªÇq££Üź£°qźç½©Öq½ź°ªźÇźG£qܽŝź
This is not for consumer use. Only Authorized Bluesound Service personnel can access this USB port and
SERVICE control button.
USB (TYPE A) : Connect a USB mass storage device to the USB input. Typical USB mass storage devices compatible
ÖǟǟGX1NźN=X7Jźª}£Ìźº°½Çq|£źèqÁź©©°½ÜźÕ}ÁźqªźÛǽªq£źq½ź½ÕÁźŪSņŅź°½©qÇÇūŝ
LAN PORT : The LAN PORT connection can be used with the Ethernet cable provided. This is an optional
connection since the PULSE SOUNDBAR can be connected to the network through a Wi-Fi connection to your router.
To setup the PULSE SOUNDBAR using the LAN Port a Wired Ethernet connection is required. Using the Ethernet
}q|£źº½°ÕŘź}°ªª}Çź°ªźªź°źÇźÇ½ªÇź}q|£źÇ°źÇź17źº°½Çź°źÜ°Ì½źÖ½źÇ½ªÇź|½°q|qªź½°Ìǽź
and the other end to the PULSE SOUNDBAR’s LAN port.
SERVICE :źXÁźÇźNJa%źº°½Çźªź}°ªÌª}Ç°ªźÖÇźXNźŪSܺźź6ªūźÇ°źªÇq££Üź£°qźç½©Öq½ź°ªźÇźG£qܽŝź
This is not for consumer use. Only Authorized Bluesound Service personnel can access this USB port and
SERVICE control button.
STANDBY : Press and hold the standby button for 5 seconds to place the unit in 0.5W Standby or Vacation Mode
źÇźG£qܽźÖ££źª°Çź|źÌÁź°½źÛǪźº½°Áź°źÇ©ŝź%ªźaq}qÇ°ªź6°Řźq££źªÇÖ°½¡źq}ÇÕÇÜźÖ££źq£Á°ź}qÁź
and the Player will not appear in the App or respond to App commands. Press the Standby Button again to restore
the Player to Ready Mode. Standby can also be used to restore the Player to Factory Settings or manually place
the Player in Upgrade Mode if upgrading using a USB Memory Stick.
AC MAINS INPUT : The PULSE SOUNDBAR comes supplied with two separate AC power cords. Select the AC
º°Ö½ź}°½źqºº½°º½qÇź°½źÜ°Ì½ź½°ªŝź°½ź}°ªª}ǪźÇźº£ÌźÇ°źÇźÖq££ź°ÌÇ£ÇŘź}°ªª}Çźç½©£ÜźÇź°Ç½ź
end of the AC power cord to PULSE SOUNDBAR’s AC Mains input socket. Never force the plug into a wall outlet.
ªźqqºÇ°½ź©qÜź|źª}ÁÁq½Üźªź}½Çqªź½°ªÁŝź£ÖqÜÁźÁ}°ªª}ǟǟº£Ìź½°©źÇźÖq££ź°ÌÇ£Çźç½ÁÇŘź|°½ź
disconnecting the cable from the PULSE SOUNDBAR’s AC Mains input socket.
2
3
4
5
7
6
8
9
11
10
 Loading...