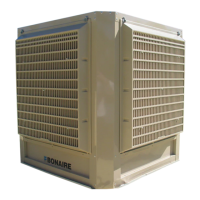
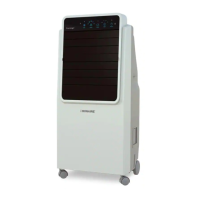
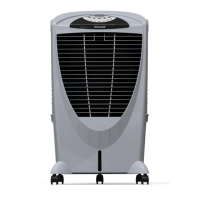
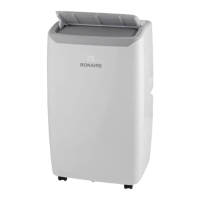
This document describes the Bonaire Portable Room Air Conditioner, an appliance designed to alter room temperature and humidity with functions including cooling, dehumidifying (drying), and fan ventilation. It is easily movable and transportable.
Function Description:
The Bonaire Portable Room Air Conditioner operates in various modes: Automatic, Cool, Dehumidify, and Fan.
- Automatic Mode: The unit automatically selects the desired operation mode (Cool or Fan) based on the indoor temperature. If the room temperature is ≥ 24°C, it automatically selects Cool mode. If the room temperature is < 24°C, it automatically selects Fan mode.
- Cool Mode: The compressor runs when the room temperature is higher than the set temperature and stops when it's lower, operating at the original set speed.
- Dehumidify Mode: The up centrifugal fan runs at a low speed (which cannot be adjusted). The compressor and down centrifugal fan stop after 8 minutes and then restart after 6 minutes. This mode uses constant temperature dehumidifying, and temperature adjustment is not effective.
- Fan Mode: The up centrifugal fan runs at the set speed, and the compressor does not run. Temperature adjustment is not effective in this mode.
- Timer Function: Allows setting an automatic off time when the unit is running, or an automatic on time when the unit is in standby. The time can be adjusted in 1-hour increments, from 1 to 24 hours.
- Sleep Mode: When activated (available in Cool mode), the up centrifugal fan turns to low speed automatically. The set temperature increases by 1°C after one hour and by 2°C after two hours. The unit stops running after six hours.
- Swing Function: Activates the swing blade to move up and down automatically. Pressing the button again stops the swing.
- Memory Function: The main control board has a memory function, allowing the unit to resume the last working mode when turned on from a stop status (except in Dehumidify mode).
Important Technical Specifications:
The Bonaire Portable Room Air Conditioner is available in three models: PRC7000026, PRC7000035, and PRC7000041.
- Power Supply: 220-240V~/50Hz for all models.
- Maximum Input Power:
- PRC7000026: 950 W
- PRC7000035: 1300 W
- PRC7000041: 1500 W
- Dimensions (Net H x W x D): 710 x 440 x 335 mm for all models.
- Dimensions (Packing H x W x D): 880 x 470 x 380 mm for all models.
- Net Weight:
- PRC7000026: 27 kg
- PRC7000035: 29 kg
- PRC7000041: 30.5 kg
- Nominal Cooling Capacity:
- PRC7000026: 2.6 kW
- PRC7000035: 3.5 kW
- PRC7000041: 4.1 kW
- Rated Input Current:
- PRC7000026: 4.3 A
- PRC7000035: 6.0 A
- PRC7000041: 6.9 A
- Rated Energy Efficiency Ratio (EER): 2.6 for all models.
- Refrigerant Type: R290 (Higley Flammable refrigerant) for all models.
- Refrigerant Volume:
- PRC7000026: 160 g
- PRC7000035: 200 g
- PRC7000041: 260 g
- Sound Power Level: 65 dB(A) for all models.
- Operating Temperature Range: The air conditioner can maintain set indoor air temperatures between 15°C and 32°C.
Usage Features:
- Control Panel: Features buttons for On/Off, Speed, Timer/Temperature Up/Down, Mode, Swing, and indicators for low/middle/high fan speed, automatic/fan mode, dehumidify/cool mode, and full water alarm.
- Remote Control: Allows for convenient operation with buttons for ON/OFF, Fan Only, Swing, Timer, Temperature UP/DOWN, Sleep, and Mode. Batteries (AAA) must be installed correctly, observing positive and negative poles.
- WiFi User Guide: The appliance can be controlled via a "Tuya smart life" app.
- Download and register the app.
- Power on the product and ensure it's in standby mode.
- Press and hold the mode button for 5 seconds until the WIFI light flashes quickly to enter configuration state.
- Add the device in the app by selecting "small appliances" then "dehumidifier" and follow the prompts for WIFI pairing.
- Once configured, the app can be used to operate the product.
- The device can be shared with other registered family members.
- Installation:
- Location: Place beside a window, door, or French window, ensuring at least 19.5 inches (60cm) clearance from the return air outlet to walls or other obstacles.
- Air Hose: Fix one end of the air hose to the air outlet underside the appliance. Extend the air hose to ensure clearance between the window, door, or wall hole. The air outlet or intake must not be blocked.
- Exhaust Hose and Adapter: Extend the air exhaust duct, screw it into the connector, screw the window connector into the plastic connector, and then connect the air exhaust duct connector to the unit.
- Safety Information:
- Always comply with precautions to avoid dangerous situations.
- The appliance is fitted with an Australian flexible cord and plug (10 Amp socket outlet).
- Not intended for use by persons (including children) with reduced physical, sensory, or mental capabilities without supervision.
- Do not allow children to sleep directly in front of the appliance or insert articles into louvres.
- Do not use power boards or double adaptors.
- Do not coil or bundle the electric cord.
- Do not cover or place articles on the appliance.
- Do not sit on the appliance.
- Do not use near baths, showers, or swimming pools.
- Do not move while turned on.
- Do not unplug by pulling the flexible cord.
- Do not handle with wet hands.
- Do not immerse in liquid.
- Do not place liquid or wax containers on top.
- Unplug when not in use.
- Do not use in areas where flammable liquids are stored.
- Tampering with electrical connections is dangerous.
- R290 refrigerant is flammable; ensure proper installation and maintenance to prevent ignition risks.
- The appliance should be installed, operated, and stored in a room with a floor area larger than mentioned on the rating label.
Maintenance Features:
- Appliance Maintenance:
- Power Off: Always turn off and disconnect from power supply before cleaning.
- Cleaning: Wipe with a soft, dry cloth. For very dirty surfaces, use lukewarm water (below 40°C/104°F). Do not use volatile substances like gasoline or polishing powder. Do not sprinkle water onto the main unit.
- Air Filter Maintenance:
- Frequency: Clean the air filter after approximately 100 hours of use, or every two weeks in dusty environments.
- Procedure: Stop the appliance, remove the air filter. If dirty, wash with detergent in lukewarm water, dry in a shaded, cool place, then reinstall.
- Drain Water:
- The unit has a condensing water recycling system. When the water level rises, the float switch activates, and the "E4" indicator lights up, signaling that water needs to be drained.
- Cut off power, move the appliance to a suitable place, remove the drain plug, and drain water completely. Reinstall the plug afterward.
- If the appliance is placed where drain water can be admitted, a drain hose can be connected to the drain port.
- Maintenance After Long Periods of Non-Use:
- Drain water by pulling out the primary and secondary rubber plugs of the drain port.
- Run the appliance in fan-only mode for half a day on a sunny day to dry the interior and prevent mold.
- Stop the appliance, unplug, remove remote control batteries, and store properly.
- Clean and reinstall the air filter.
- Remove air hoses, store them properly, and cover the hole tightly.
- Troubleshooting: The manual provides a table of common failures, their causes, and solutions, such as checking power supply, waiting for the protector device to reset, replacing remote control batteries, cleaning air filters, and draining water. For persistent issues, contact qualified service technicians.
- Decommissioning and Recovery:
- Ensure the technician is familiar with the equipment. Recover all refrigerants safely.
- Take oil and refrigerant samples if analysis is required.
- Ensure electrical power is available.
- Isolate the system electrically.
- Use mechanical handling equipment and personal protective equipment if needed.
- The recovery process must be supervised by a competent person, and equipment/cylinders must conform to standards.
- Pump down the refrigerant system if possible.
- If a vacuum is not possible, create a manifold to remove refrigerant from various parts.
- Place the cylinder on scales before recovery.
- Operate the recovery machine according to manufacturer instructions.
- Do not overfill cylinders (max 80% liquid charge).
- Do not exceed maximum working pressure.
- Promptly remove filled cylinders and equipment from the site, closing all isolation valves.
- Recovered refrigerant should not be charged into another system unless cleaned and checked.
- Label equipment as decommissioned, emptied of refrigerant, and containing flammable refrigerant.
- Use appropriate recovery cylinders, ensure correct number of cylinders for total system charge, and ensure cylinders are designated for the recovered refrigerant.
- Recovery equipment must be in good working order with instructions and suitable for flammable refrigerants.
- Calibrated weighing scales and leak-free hoses are required.
- Consult the manufacturer if in doubt. Return recovered refrigerant to the supplier with a Waste Transfer Note.
- Do not mix refrigerants in recovery units or cylinders.
- If compressors or oils are removed, ensure they are evacuated to an acceptable level to prevent flammable refrigerant remaining in the lubricant. Use electric heating to accelerate evacuation. Drain oil safely.