WW
WW
W
ARNINARNIN
ARNINARNIN
ARNIN
GG
GG
G
LP & NLP & N
LP & NLP & N
LP & N
G ARE EXTREMELG ARE EXTREMEL
G ARE EXTREMELG ARE EXTREMEL
G ARE EXTREMEL
Y FLY FL
Y FLY FL
Y FL
AMMABLE SOAMMABLE SO
AMMABLE SOAMMABLE SO
AMMABLE SO
TT
TT
T
AKE EXTRA PRECAAKE EXTRA PRECA
AKE EXTRA PRECAAKE EXTRA PRECA
AKE EXTRA PRECA
UTIONS WHENUTIONS WHEN
UTIONS WHENUTIONS WHEN
UTIONS WHEN
PERFPERF
PERFPERF
PERF
ORMINORMIN
ORMINORMIN
ORMIN
G ANY WG ANY W
G ANY WG ANY W
G ANY W
ORK TORK T
ORK TORK T
ORK T
O THE HEAO THE HEA
O THE HEAO THE HEA
O THE HEA
TERTER
TERTER
TER
CT-21
page 1 of 1
rev 10/06
Bosch Water Heating
340 Mad River Park, Waitsfield, VT 05673
©BBT NORTH AMERICA CORPORATION
Bosch Group
REPLACING HEAT EXCHANGER
MODELS: 1000P, 1600P, 1600H,
260PN, 425PN, 425HN
Removing heat exchanger
1. Remove cover as per installation manual
2. Turn off gas to heater using installer supplied shutoff
valve.
3. Close installer supplied cold water shutoff valve to
heater (if none installed, install before proceeding.)
4. Open lowest hot water faucet to drain lines and relieve
pressure in heater.
5. Position a bucket below water connections to water
heater.
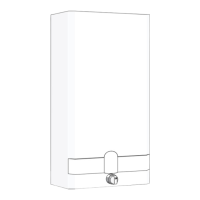
6. Remove the retaining clip (Fig. 1 Num. 1) from the
threaded bushing. Then remove the threaded bushing
(Fig. 1 Num. 2) from the water valve.
7. Contents of heater and water lines will drain to bucket
below.
8. Once all water has drained, reinsert threaded bushing
into water valve and secure with retaining clip
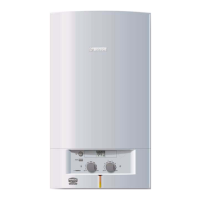
9. Locate and remove clips on both left and right side
connections on lower rear of heat exchanger. (Fig. 2,
Num. 1)
10. Loosen Phillips head screw on temperature limiter
(ECO) and remove from heat exchanger mount. (Fig.2,
Num. 2)
11. Remove covering angle strip which runs horizontally
at top of heat exchanger. (Fig. 2, Num. 3)
12. Remove heat exchanger from heater by pulling top of
heat exchanger forward. When the back edge of the
heat exchanger clears the draft diverter, pull heat ex-
changer up and out.
Installing heat exchanger
1. Install new heat exchanger in heater.
2. Mount covering angle strip across the top of heat ex-
changer. (Fig. 2, pos. 3)
3. Reconnect water pipes to heat exchanger and rein-
stall retaining clips. NOTE: Lubricate o-rings on pipes
before connecting. (Fig. 2, pos. 1)
4. Remount temperature limiter (ECO) on upper right of
heat exchanger. (Fig. 2, pos. 2)
5. Turn water on and check for leaks at connections.
6. Open gas supply, replace cover and return heater to
service.
FIGURE 1
FIGURE 2
 Loading...