11
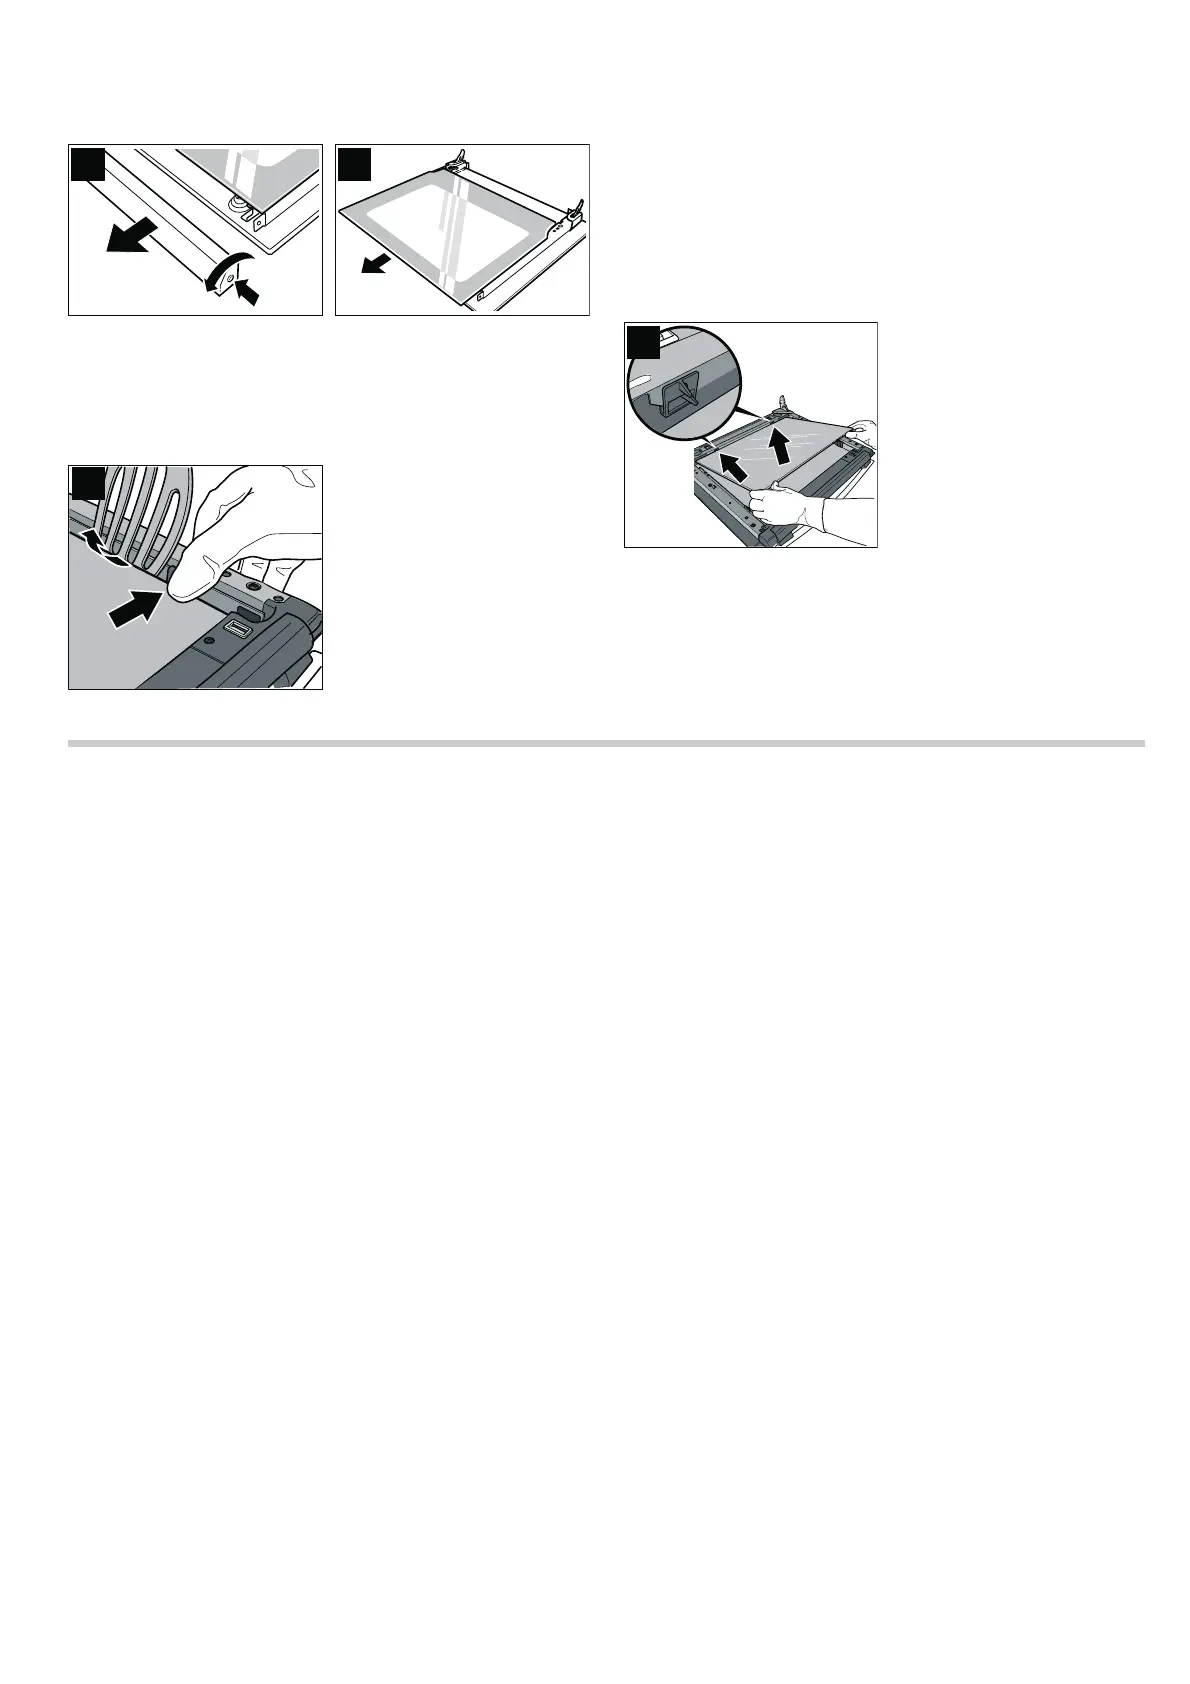
2.Unscrew the cover at the top left and right of the appliance
door and detach it (figure A).
3.Lift the door panel and remove it (figure B).
Removing the intermediate panel
1.Press the holder on the intermediate panel on one side and
unlatch it, using a spatula for instance (fig. C).
2.Unlatch the other side in the same way and remove the
intermediate panel.
Cleaning
Clean the door panel with glass cleaner and a soft cloth.
Caution!
Do not use any sharp or abrasive medium or a glass scraper.
The glass could be damaged.
Fitting the intermediate panel
1.Place the intermediate panel in the supports on the left and
right (figure D).
2.Push the intermediate panel downwards in the retainers.
Fitting the door panel
1.Slide in the door panel all the way.
2.Put the cover back in place and screw it in.
3.Refit the appliance door.
Cleaning system
The cleaning system regenerates the self-cleaning surfaces in
the cooking compartment.
The back wall, ceiling and side walls of the cooking
compartment are coated with a highly porous ceramic layer.
This coating absorbs and disintegrates splashes from baking
and roasting while the oven is in operation. If these self-
cleaning surfaces no longer clean themselves adequately, they
can be regenerated with the cleaning system.
Before cleaning
Remove accessories and cookware from the cooking
compartment.
Cleaning the cooking compartment floor
Before you set the cleaning system, clean the surfaces in the
cooking compartment that are not self-cleaning. Otherwise,
stains will develop that it is not possible to remove.
Use a dish cloth and hot soapy water or a vinegar solution. If
there are heavy deposits of dirt, use a stainless steel scouring
pad or oven cleaner. Only use when the cooking compartment
is cold. Never treat the self-cleaning surfaces with a scouring
pad or oven cleaner.
Making settings
Cleaning takes approximately one hour.
1.Set the function selector to < 3D hot air.
2.Set the temperature selector to s.
3.Press theu button.
The u symbol lights up in the display. The time at which the
cleaning will end appears and the
p symbol is in brackets.
Cleaning will start after a few seconds. You will see the time
counting down and the
r symbol will be in brackets. The p
symbol goes out.
Cleaning is finished
A signal sounds. The oven stops heating. 00:00 is shown in the
display. Press the
0 button twice and turn the function selector
to the off position. The oven switches off.
Cancelling cleaning
Press the
u button and turn the function selector to the off
position. The oven switches off.
Setting a later end time
You can delay the time at which the cleaning programme is due
to finish. For instance, you can set the cleaning programme to
run at night so that you can use your oven during the day.
Make the settings as described in steps 1 to 3. Before cleaning
starts, use the
@ or A button to set a later end time.
The oven switches to standby. The display shows the time at
which the cleaning will finish and the
p symbol is in brackets.
When cleaning starts, you can see the time counting down in
the display and the
r symbol is in brackets. The p symbol
goes out.
After cleaning
When the cooking compartment has cooled down completely,
wipe the salt residues off the self-cleaning surfaces with a
damp cloth.


 To Next Page