Get to knowen
on the device can be excluded up to a
room temperature of 5 °C.
5 getting to know each other
Over-and-under and side-by-
side placement
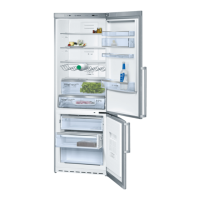
5.1 Device
Here you will find an overview of the
components of your device.
→
fig
1
If you want to set up 2 cooling devices
on top of each other or next to each
other, you must keep a distance of at
least 150 mm between the devices.
Selected devices can be set up without
a minimum distance. Ask your retailer
or kitchen planner about this.
A
cooling compartment →
page 21
Freezer →
page 22
lighting
Bottle rack →
page 16
Variable filing →
page 16
Storage container →
page 17
B
1
2
4.3 Assembling the device
3
▶ Install the device according to the
enclosed installation instructions.
4
5
fruit and vegetable containers
→
page 17
4.4 Prepare device for first
use
6
Nameplate →
page 31
1.Take the information material.
7
frozen food container
→
page 25
2.The protective films and transport
locks, e.g. B. Remove tape and
cardboard.
8th
screw foot
9
butter and cheese compartment
→
page 17
3.Clean the device for the first time.
→
page 24
10
control panel →
page 15
4.5 Connecting the device
electrically
11
Variable door rack
→
page 17
1.Plug the mains plug of the device's
power cord into a socket near the
device.
12
Door rack for large bottles
A notice:Deviations between your
device and the illustrations are
possible in terms of equipment and
size.
The connection data of the
device are on the type plate.
→
fig
/
1
6
2.Check that the mains plug is firmly
seated.
5.2 Control Panel
You can use the control panel to set all
the functions of your device and receive
information about the operating status.
→
fig
aThe device is now ready for operation.
2
15
 Loading...