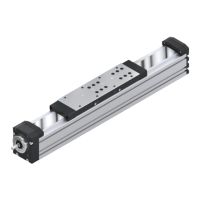
27Bosch Rexroth AGInstructions for Linear Modules MKK/MKR/MLR
6 Montaggio di interruttori
induttivi e meccanici: tutte
le dimensioni
6.1 Avvertenze
i PERICOLO!
Interrompere l’alimentazione elettrica!
f Condizione preliminare per il
montaggio del sistema di commutazione
è il fi ssaggio del profi lato di base del
Linearmodulo ! 3.
f L’intero sistema di commutazione
deve essere montato su un lato del
Linearmodulo.
Interruttori induttivi:
Tutti i Linearmoduli MKK, MKR e MLR
possono essere equipaggiati con
interruttori induttivi.
Sistema di commutazione meccanico:
Ad eccezione dei Linearmoduli
miniaturizzati MKK/MKR 12-40, tutti i
Linearmoduli MKK, MKR e MLR possono
essere equipaggiati con un sistema di
commutazione meccanico.
Spostamento degli interruttori:
f I cavi sono incorporati per fusione
negli interruttori. Sostituire gli interruttori
se è necessario un cavo più lungo.
6.2 Montaggio della camma di
commutazione
• Premontare la camma di
commutazione sulla tavola ! ⌧ 6.2.
6.3 Montaggio degli interruttori
• Agganciare gli interruttori con le relati-
ve piastre nella scanalatura sul profi lato
di base e fi ssare con i grani fi lettati.
• Regolare il punto di commutazione e
le distanze di commutazione tramite la
messa a punto degli interruttori e della
camma di commutazione.
• Serrare le viti e i grani fi lettati sulla cam-
ma di commutazione e sugli interruttori.
c Per il controllo del funzionamento
prestare attenzione a quanto specifi cato
nel capitolo "Messa in funzione"! ! 9
6.4 Smontaggio degli interruttori
• Per lo smontaggio degli interruttori
procedere nella sequenza inversa.
6 Système de commutation
avec interrupteurs
inductifs et mécaniques :
toutes tailles
6.1 Remarques
i DANGER !
Couper l’alimentation électrique !
f Pour le montage du système de
commutation, le corps principal du
module linéaire doit être fi xé ! 3.
f Le système de commutation entier
doit être monté sur un côté du module
linéaire.
Interrupteurs inductifs :
Tous les modules linéaires MKK, MKR et
MLR peuvent être munis d’interrupteurs
inductifs.
Système de commutation mécanique :
A l’exception des modules linéaires
miniatures MKK/MKR 12-40, tous les
modules linéaires MKK, MKR et MLR
peuvent être équipés d’un système de
commutation mécanique.
Déplacement des interrupteurs :
f Les câbles sont moulés dans les
interrupteurs. Remplacer les interrupteurs
si un câble de longueur supérieure est
nécessaire.
6.2 Montage de l’équerre de
commande
• Prémontage de l’équerre de
commande sur le plateau ! ⌧ 6.2.
6.3 Montage des interrupteurs
• Accrocher les interrupteurs avec les
plaques dans la rainure du corps
principal et les fi xer à l’aide de vis
sans tête.
• Régler le point de commutation et
les distances de commutation en
ajustant les interrupteurs et l’équerre
de commande.
• Serrer les vis et les vis sans tête
de l’équerre de commande et des
interrupteurs.
c Observer le chapitre « Mise
en service » pour le contrôle du
fonctionnement ! ! 9
6.4 Démontage des interrupteurs
• Le démontage des interrupteurs se
déroule dans l’ordre inverse.
6 Installing switching
system with inductive and
mechanical switches: All
sizes
6.1 Notes
i DANGER!
Interrupt the power supply!
f Attachment of the linear module
frame is a prerequisite for installation of
the switching system ! 3.
f The entire switching system must
be mounted on one side of the linear
module.
Inductive switches:
All linear modules MKK, MKR and MLR
can be fi tted with inductive switches.
Mechanical switching system:
With the exception of the miniature
linear modules MKK/MKR 12-40, all
linear modules MKK, MKR and MLR can
be fi tted with a mechanical switching
system.
Re-positioning switches:
f The cables are moulded into the
switches. Replace the switch if a longer
cable is required.
6.2 Installing switching cams
• Pre-assemble the switching cams at
the carriage ! ⌧ 6.2.
6.3 Installing switches
• Engage the switches with the
mounting plates in the slot at the
frame and fi x in position with set
screws.
• Set the switching point and switching
intervals by adjusting the switches and
the switching cam.
• Tighten the bolts and set screws at
the switching cam and switches.
c Refer to the "Start-up" Section
for checking operation! ! 9
6.4 Removing switches
• Remove the switches in the reverse
order.
R320103918 (2010.07) • DE+EN+FR+IT
 Loading...