A
G
B
H
C
I
D
F
E
J
WARNING: DO NOT ATTEMPT TO SERVICE OR REPAIR SHARPENER. / ADVERTENCIA: NO INTENTE REPARAR NI
EFECTUAR TAREAS DE SERVICIO TÉCNICO SOBRE EL SACAPUNTAS. / AVERTISSEMENT: NE PAS TENTER DE FAIRE
L'ENTRETIEN OU LA RÉPARATION DU TAILLE-CRAYON.
WARNING: DO NOT CONNECT THIS PRODUCT TO AN ELECTRICAL SUPPLY OR ATTEMPT TO OPERATE THE PRODUCT
UNTIL YOU AND ALL USERS HAVE COMPLETELY READ AND UNDERSTAND THIS INSTRUCTION MANUAL. KEEP THIS
INSTRUCTION MANUAL IN A CONVENIENT LOCATION FOR FURUTER REFERENCE. / ADVERTENCIA: SÓLO CONECTE
ESTE PRODUCTO A UNA FUENTE DE ALIMENTACIÓN O INTENTE OPERARLO CUANDO TODOS LOS USUARIOS HAYAN
LEÍDO Y COMPRENDIDO POR COMPLETO ESTE MANUAL DE INSTRUCCIONES. CONSERVE ESTE MANUAL DE
INSTRUCCIONES EN UN LUGAR CONVENIENTE PARA CONSULTARLO EN EL FUTURO. / AVERTISSEMENT: NE PAS
BRANCHER CE PRODUIT DANS UNE SOURCE D'ALIMENTATION ÉLECTRIQUE OU ESSAYER DE FAIRE FONCTIONNER LE
PRODUIT AVANT QUE TOUTES LES PERSONNES N'AIENT LUES ET COMPRIS LE MANUEL D'INSTRUCTIONS. GARDER CE
MANUEL D'INSTRUCTIONS À PORTÉE DE MAIN POUR CONSULTATION FUTURE.
CAUTION: / PRECAUCIÓN: / ATTENTION :
• DO NOT insert so materials such as chalk, crayons, wax pencils, and other non-wood pencils as they will clog the
cuer and reduce performance. / NO introduzca materiales blandos como zas, crayones, lápices de cera u otros
lápices que no sean de madera ya que obstruirán la cuchilla y reducirán el rendimiento del producto. / NE PAS insérer
de matériaux mous comme de la craie, des fusains, des craies de cire ou tout autre crayon qui ne sont pas en bois, car
ils pourraient encrasser le couteau et diminuer son rendement.
• DO NOT insert hard materials such as pens, mechanical pencils, etc as they will result in cuer damage. /
NO introduzca materiales rígidos como lapiceras o lápices mecánicos, entre otros, ya que dañarán la cuchilla. /
NE PAS insérer de matériaux durs comme des stylos, des portemines, etc., car ils endommageront le couteau.
• DO NOT touch exposed blades in removable cuer cartridge. / NO toque las hojas cortantes expuestas del cartucho
de la cuchilla removible. / NE PAS toucher les lames exposées dans la cartouche du couteau amovible.
• Only plug into a standard 120V AC outlet located near and easily accessible to the unit. / Enchufe el disposivo
únicamente a un tomacorriente de 120 V CA estándar que se encuentre cerca y sea accesible a la unidad. / Brancher
uniquement dans une prise murale classique de 120 V accessible située près de l'appareil.
• ALWAYS unplug power cord to disable power in the event of a malfuncon or when servicing. /
SIEMPRE desconecte el cable de alimentación para interrumpir el suministro eléctrico en caso de averías o cuando
deba efectuar tareas de servicio técnico. / TOUJOURS débrancher le cordon d'alimentaon afin de désacver la mise
en marche lors d'un éventuel défaut de fonconnement ou pendant l'entreen.
• In the event the motor should overheat, the thermal overload protecon will acvate to protect the motor from
damage. If the thermal overload protecon acvates, allow the sharpener to cool for 20-30 minutes. The thermal
overload protecon will then automacally reset and you can resume use. / En caso de que el motor se recaliente,
se acvará la protección contra sobrecarga térmica para proteger al motor. Si se acva la protección contra
sobrecarga térmica, deje enfriar el sacapuntas durante 20 a 30 minutos. La protección contra sobrecarga térmica
restablecerá automácamente la unidad y podrá volver a usarla normalmente. / En cas de surchauffe du moteur, la
protecon contre les surcharges thermiques s'acvera afin de prévenir les dommages au moteur. Si la protecon
contre les surcharges thermiques s'acve, laisser refroidir le taille-crayon pendant 20 à 30 minutes. La protecon
contre les surcharges thermiques se réinialisera automaquement et le taille-crayon sera prêt pour l'ulisaon.
• DO NOT submerge sharpener in water or use in a wet environment. / NO sumerja el sacapuntas en agua ni lo
ulice en un ambiente húmedo. / NE PAS immerger le taille-crayon dans l'eau ou l'uliser dans un environnement
humide.
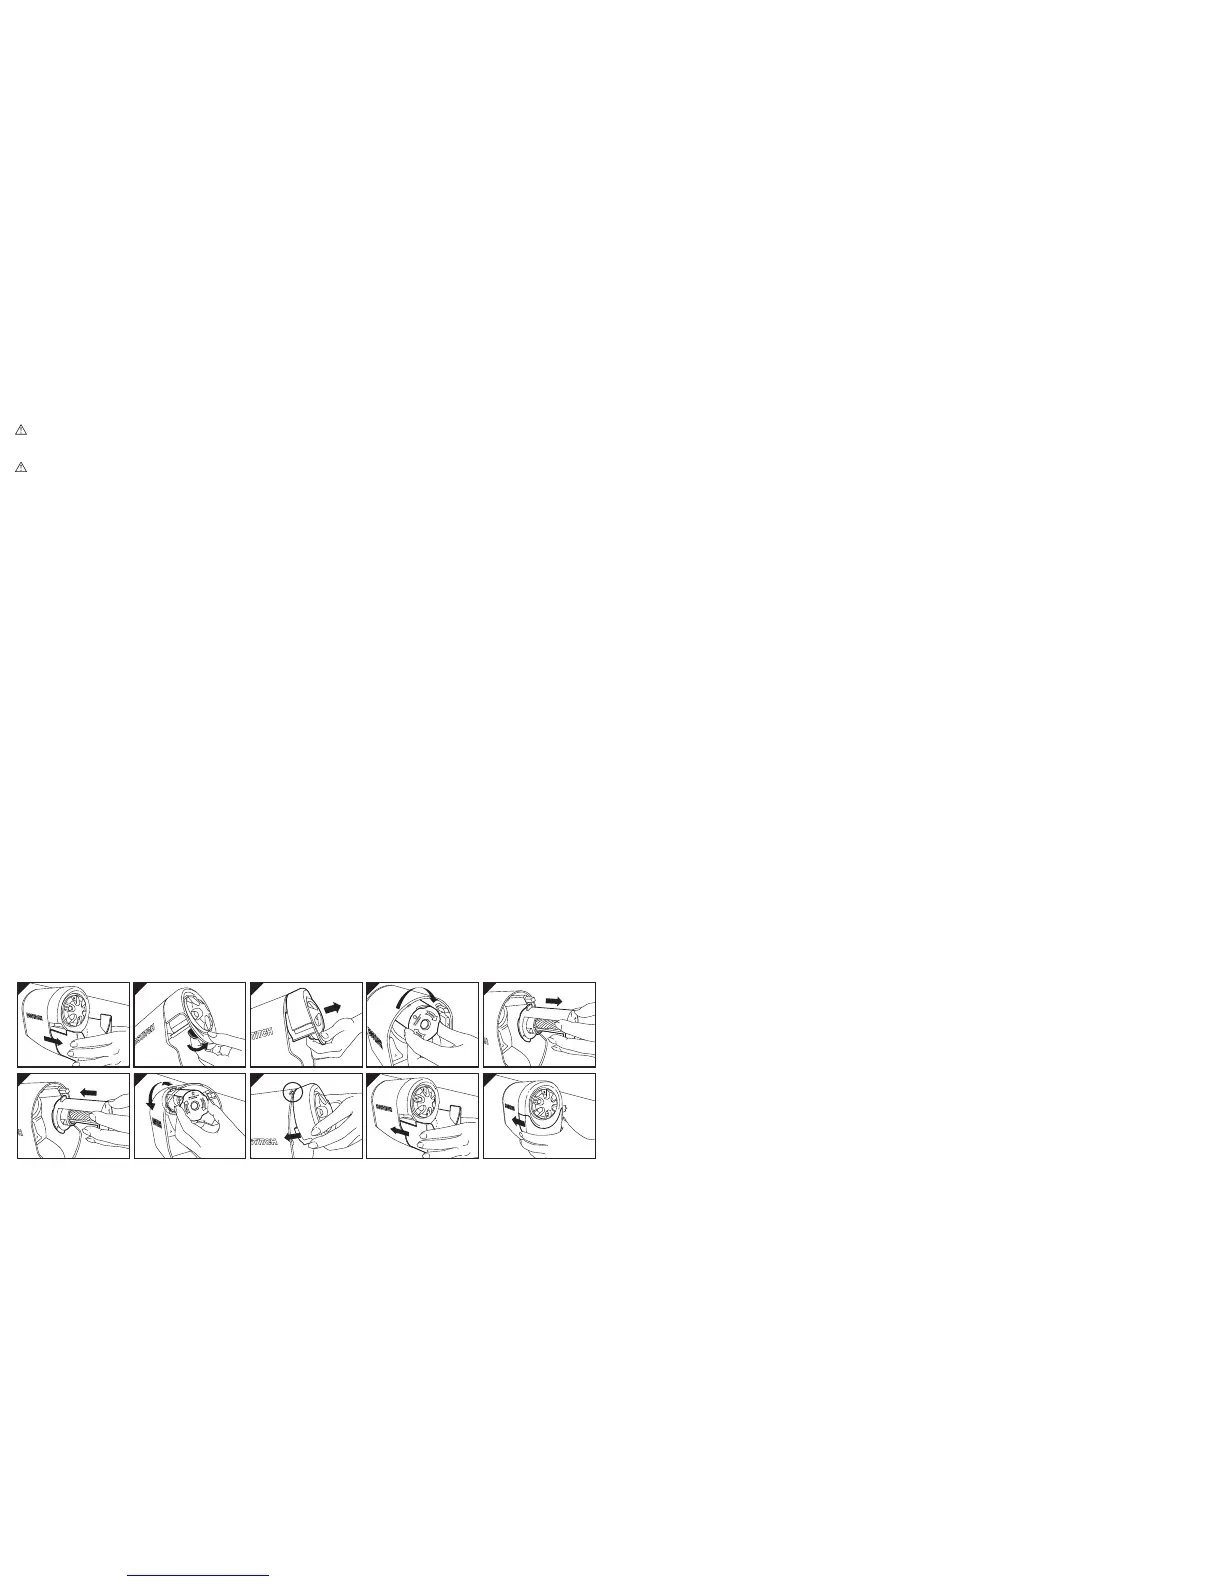
Cleaning/Replacing Cuer Cartridge/Removing Jammed Pencil Tip
Clean the cuer cartridge periodically, especially when sharpening colored pencils. The so colored pencil lead can
clog cuers, and broken lead can become lodged in the cuer.
a) Remove the plug from the outlet.
b) To remove the cuer cartridge, first grasp the sides of the shavings tray and slide it out. (See Illustraon A)
c) Next, reach up and pull the front dial assembly release lever toward the front of the sharpener and remove the
front dial assembly. (See Illustraon B - C)
d) Grasp cuer cartridge on plasc housing, turn clockwise to remove cuer cartridge. DO NOT touch exposed
blades in removable cuer cartridge. (See Illustraon D – E)
e) Inspect cuer cartridge for any broken pieces of lead that may be lodged towards the back end of the cuer
assembly. Remove any jammed pieces using a small jeweler’s type of screwdriver being careful not to damage
blades. DO NOT touch exposed blades in removable cuer cartridge.
f) Use a small brush to remove any lead or wood residue from blades. DO NOT touch exposed blades in
removable cuer cartridge.
g) Reinsert cuer cartridge onto drive sha with alignment arrow poinng up and then turning counter clockwise
unl cuer cartridge locks in place. (See Illustraon F - G)
h) Snap front dial assembly back onto sharpener body by first engaging top snap fits into sharpener housing and
then pushing down on the boom edge to fully engage assembly. (See Illustraon H)
i) Replace the shavings tray by sliding back into the sharpener, making sure that the tray is fully seated.
(See Illustraon I - J)
j) Plug sharpener back into 120V outlet.
Note: The sharpener features a patented tamper proof magnec safety switch that prevents the sharpener
from operang while the shavings tray is removed.
Limpieza y cambio del cartucho de las cuchillas/Cómo rerar la punta de un lápiz atascada
Limpie periódicamente el cartucho de las cuchillas, especialmente cuando saque punta a lápices de colores.
La mina blanda de los lápices de colores puede atascar las cuchillas y las minas quebradas pueden quedar alojadas
en la cuchilla.
a) Desconecte el enchufe del tomacorriente.
b) Cuando deba rerar el cartucho de cuchillas, primero tome los laterales de la bandeja para virutas y deslícela
hacia afuera. (Mire la Ilustración A)
c) Luego, suba la mano y re de la palanca para soltar el conjunto del círculo indicador delantero en dirección a la
parte delantera del sacapuntas y rere el conjunto del círculo indicador delantero. (Mire la Ilustración B – C)
d) Tome el cartucho de cuchillas de la carcasa plásca y gírelo en sendo horario para rerar el cartucho de
cuchillas. NO toque las hojas cortantes expuestas del cartucho de cuchillas removible. (Mire la Ilustración D – E)
e) Inspeccione el cartucho de cuchillas en busca de cualquier fragmento de mina que pudiera haber quedado
alojado cerca del extremo posterior del conjunto de cuchillas. Rere cualquier fragmento atascado con un
destornillador pequeño de joyero; tenga cuidado de no dañar las hojas cortantes. NO toque las hojas cortantes
expuestas del cartucho de cuchillas removible.
f) Ulice un cepillo pequeño para rerar cualquier mina o residuo de madera de las hojas cortantes. NO toque las
hojas cortantes expuestas del cartucho de cuchillas removible.
g) Vuelva a introducir el cartucho de cuchillas en el eje impulsor con la flecha de alineación hacia arriba y luego
gire en sendo anhorario hasta que el cartucho de cuchillas quede insertado en su lugar.
(Mire la Ilustración F – G)
h) Vuelva a insertar el conjunto del círculo indicador sobre el cuerpo del sacapuntas: primero ensamble
laslengüetas de presión en la carcasa del sacapuntas y luego presione hacia abajo el borde inferior para
introducir el conjunto por completo. (Mire la Ilustración H)
i) Vuelva a colocar la bandeja para virutas deslizándola nuevamente hacia el interior del sacapuntas; asegúrese de
que la bandeja quede asentada por completo. (Mire la Ilustración I – J)
j) Vuelva a enchufar el sacapuntas al tomacorriente de 120 V.
NOTA: El sacapuntas ene un interruptor de seguridad magnéco patentado que detecta
manipulaciones y no permite accionar el sacapuntas mientras se rera la bandeja para virutas.
 Loading...