9
PROGRAMMING
1
3
5
2
4
6
12345
or
ok ko
beeeep
bep
bep
bep
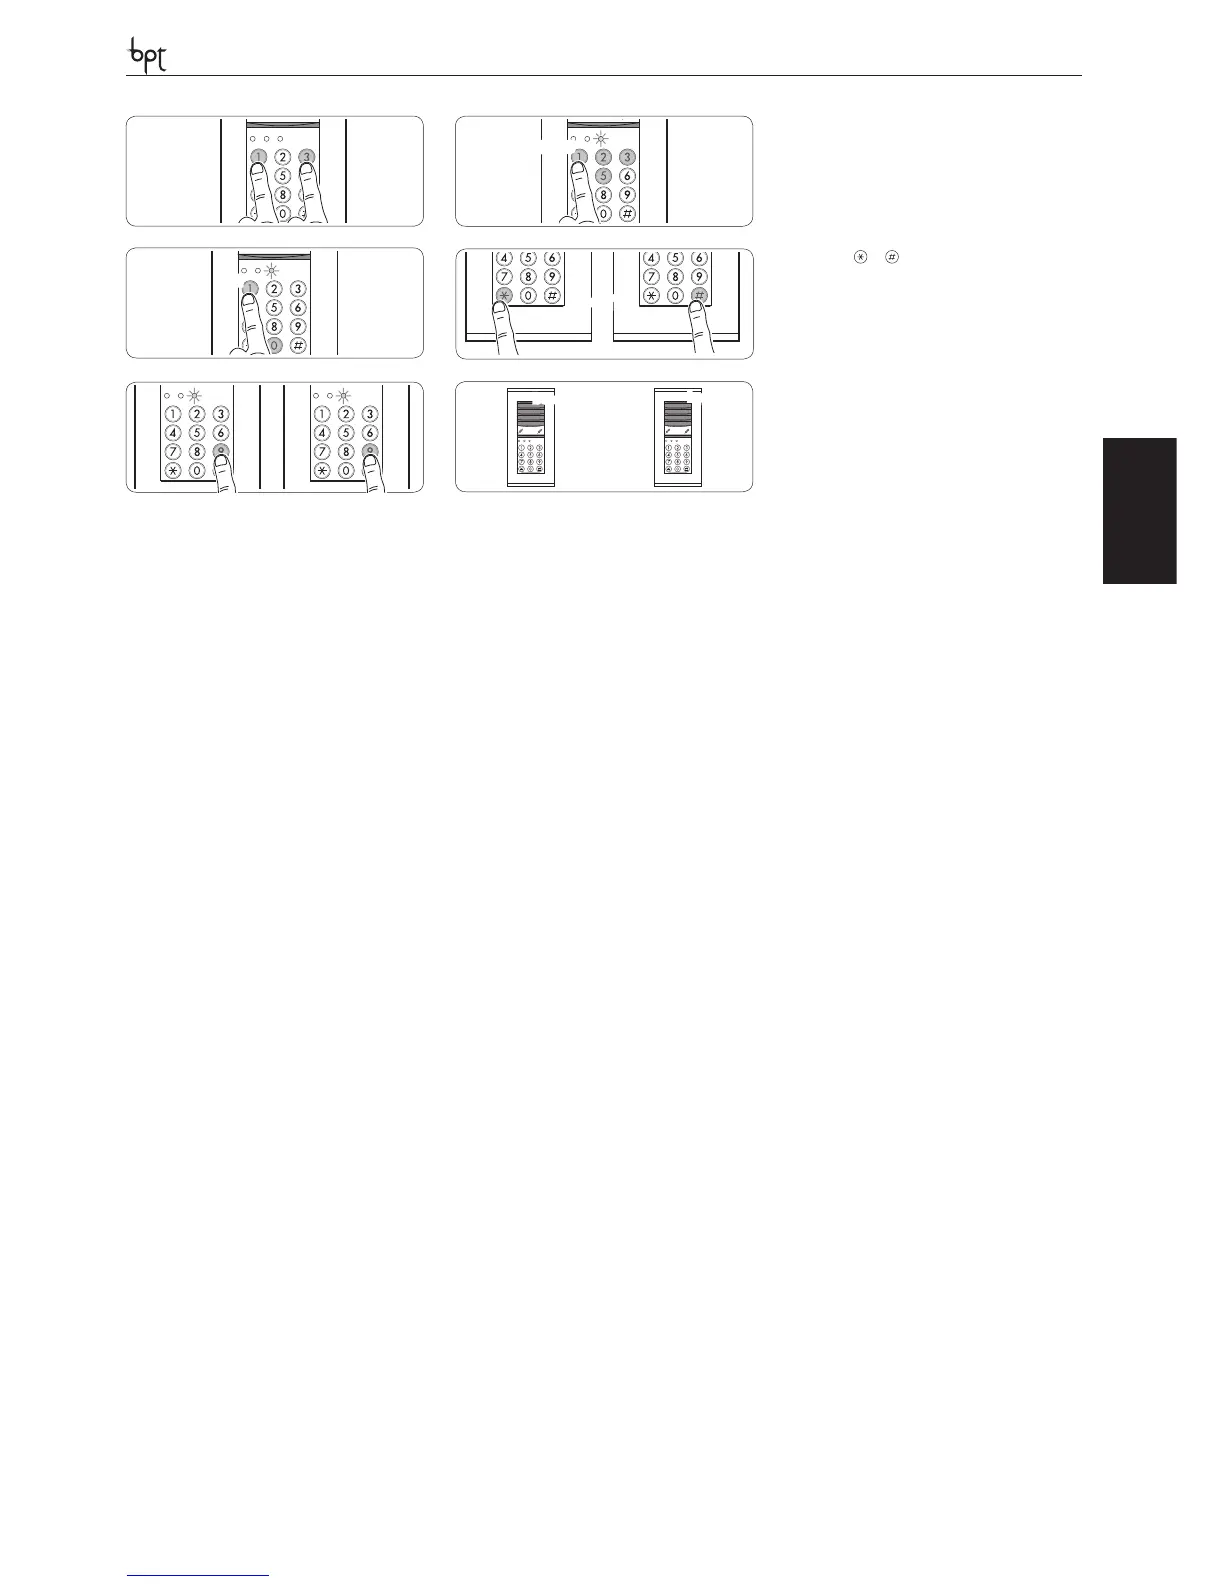
Entering and exiting programming
To enter programming mode, press keys 1 and 3 at
the same time 1 and then enter the PROGRAMMING
CODE (green LED C ashes) 2.
Enter the FUNCTION CODE to select the type of fun-
ction 3.
Once entered the required data, it is possible select
another type of function, exit any function selected
by pressing or 4 other then exit programming
mode by keying in (in this case, green LED C stops
ashing) 5.
Once the data required by the function have been
entered, there is a long buzz if the operation is cor-
rect, or three short buzzes if it is incorrect 6.
FUNCTION 01
Editing the programming code (default setting
12345)
1- Enter FUNCTION CODE .
2- Enter the new PROGRAMMING CODE (5 digits).
FUNCTION 02
Editing the number of digits in the user code (de-
fault setting 4) (all user codes have the same number
of digits)
1- Enter FUNCTION CODE .
2- Enter the NUMBER OF DIGITS (3 digits code, or 4 or
5 digits code).
FUNCTION 03
Adding a user code (default setting relay 1=2580, re-
lay 2=3690)
1- Enter FUNCTION CODE .
2- Enter the number of the FACILITY to be program-
med:
1 = activates relay 1,
2 = activates relay 2,
3 = activates relay 1 in tradesman mode (see FUN-
CTION 11).
3- Enter the USER CODE.
4- Repeat the procedure from point 2) to enter another
user code, select another function.
FUNCTION 04
Deleting a user code
1- Enter FUNCTION CODE .
2- Enter the USER CODE to be deleted.
FUNCTION 05
Deleting all user codes
1- Enter FUNCTION CODE .
2- Enter (USERS DELETION CODE).
FUNCTION 06
Setting relay activation time for activating facili-
ties (default setting 5 s)
1- Enter FUNCTION CODE .
2- Select the RELAY you want by entering 1 or 2.
3- Enter ACTIVATION TIME in the range 01 to 65 s.
4- Repeat the procedure from point 2) to set the other
relay’s activation time or select another function.
FUNCTION 07
Setting keypad lockout time (default setting 10 s)
1- Enter FUNCTION CODE .
2- Enter LOCKOUT TIME in the range 01 to 65 s.
FUNCTION 08
Setting monostable or bistable mode for relays
(default setting monostable)
1- Enter FUNCTION CODE .
2- Enter the FACILITY/RELAY you want (1 or 2 or 3).
1 = activates relay 1,
2 = activates relay 2,
3 = activates relay 1 in tradesman mode.
3- Enter ACTIVATION MODE
= BISTABLE,
1 = MONOSTABLE.
3- Repeat the procedure from point 2) to set another
relay, select another function.
FUNCTION 09
Enabling/disabling the alarm and bell (default set-
ting both disabled)
1- Enter FUNCTION CODE .
2- Enter the mode:
= BOTH DISABLED,
1 = ALARM ENABLED,
2 = BELL ENABLED.
NOTE. Enabling the alarm or bell disables relay 2’s
settings.
FUNCTION 10
Alarm reset
1- Enter FUNCTION CODE ⑩.
FUNCTION 11
Programming input I1 (default setting controls relay
1)
1- Enter FUNCTION CODE ⑪.
2- Enter:
= controls relay 1,
1 = enables tradesman mode (see functions on pag.
3, point h),
2 = controls green LED A,
3 = disabled.
FUNCTION 12
Enabling/disabling the keypad (default setting ena-
bled)
1- Enter FUNCTION CODE ⑫.
2- Enter:
= DISABLED,
1 = ENABLED.
FUNCTION 13
Programming green A
1- Enter FUNCTION CODE ⑬.
2- Enter:
= DISABLED,
1 = LIGHTS WHENEVER A BUTTON IS PRESSED.
Note. Programming is not enabled if the LED is alrea-
dy associated with input I1 (see function 11).
Module resetting procedure
To reset the module:
1 - Cut o power to the unit.
2 - Restore power to the unit (green LED C is unlit) and
enter the RESET CODE within 1 min of the unit being
switched on.
Note. Stored user codes and the number of digits pro-
grammed are kept in the memory.
01
+
 Loading...