EasyManua.ls Logo

Breville VST025 - User Manual

Breville VST025
19 pages
Print Icon
To Next Page IconTo Next Page
Loading...
cáfe style
sandwich press
®
Question and Answer IconNeed help?

Do you have a question about the Breville VST025 and is the answer not in the manual?

Summary

before using your sandwich press

Storage lock

The storage lock must be unlocked before using and locked when storing or transporting.

using your sandwich press

Bread

Details the types of bread suitable for toasting, noting high sugar content breads brown quicker.

Fillings

Advice on using fillings, cautioning about excessive juices and heat retention of cheese/tomato.

Toasting bread

Highlights the flat plate design's suitability for plain and Turkish bread without fillings.

Reheating

Instructions for reheating sandwiches, suggesting paper napkins for condensation and low oven warming.

Fat free snacks

Notes that butter or margarine is not needed on the outside due to the non-stick design.

care and cleaning

Storage

Instructions on how to properly store the sandwich press, including cord wrapping and locking.

after sales service

Replacement parts

Information on how to obtain additional or replacement parts for the appliance.

Troubleshooting

Guidance on where to find troubleshooting information and FAQs for the appliance.

Overview

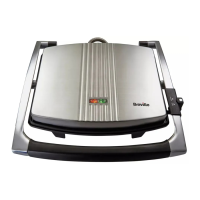
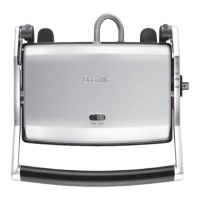
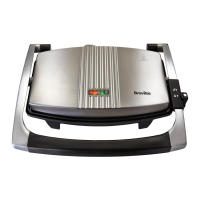
This document describes the Breville Café Style Sandwich Press, a kitchen appliance designed for making toasted sandwiches and other hot snacks. The sandwich press aims to simplify the process of creating café-style sandwiches at home, offering convenience and versatility for various culinary creations.

Function Description

The Breville Café Style Sandwich Press is primarily designed to toast sandwiches and other bread-based items. It features non-stick cooking plates that heat up to cook and brown food evenly. The appliance is equipped with a floating top plate, which is designed to press down on sandwiches uniformly, accommodating different thicknesses of bread and fillings. This ensures consistent cooking and browning across the entire surface of the sandwich.

Beyond traditional sandwiches, the press can be used for toasting various types of bread, such as focaccia, Turkish bread, baguettes, and even bread rolls, either plain or with fillings. Its flat plate design makes it suitable for toasting breads without the need for butter or margarine on the outside, promoting fat-free snack preparation. The appliance also facilitates reheating pre-cooked items, offering a quick way to warm up food while maintaining a crisp texture.

The operation is straightforward: the unit preheats, indicated by a ready-to-cook light, and then the food is placed on the bottom plate, the lid is closed, and cooking commences. The cooking time is adjustable based on personal preference and the type of ingredients used.

Usage Features

The Breville Café Style Sandwich Press incorporates several features to enhance its usability and safety:

  • Handle: A sturdy handle allows for easy opening and closing of the top plate.
  • Ready-to-Cook Light (Green): This indicator light illuminates when the appliance has reached its optimal cooking temperature, signaling that it's ready for use. It will cycle on and off during cooking to maintain the temperature.
  • Power Light (Red): This light indicates that the appliance is switched on and receiving power.
  • Non-Stick Cooking Plates: The plates are coated with a non-stick material, which prevents food from sticking and makes cleaning easier. This also reduces the need for added fats during cooking.
  • Storage Lock: A storage lock is provided to keep the top and bottom plates securely closed when the appliance is not in use, facilitating compact storage and safe transportation. It is crucial to unlock this feature before use to allow the lid to open. The storage lock should not be used to clamp down the top plate during pre-heating or cooking when sandwiches are inside, as the weight of the top plate is designed to gradually press the sandwich during cooking.
  • Cord Storage: The appliance includes a dedicated area underneath for wrapping and storing the power cord, helping to keep countertops tidy and preventing the cord from becoming a hazard.

Before First Use: Prior to its initial operation, users are advised to remove any promotional labels or stickers. The sandwich press should be placed on a flat, level surface. The storage lock must be opened to release the top plate. The cooking plates should be checked for cleanliness and wiped with a damp cloth if necessary to remove any dust.

Operation Steps:

  1. Unwind Cord: Fully unwind the power cord from its storage area.
  2. Plug In: Insert the plug into a mains supply socket and switch it on.
  3. Preheat: Allow the sandwich press to preheat in the closed position until the green ready-to-cook indicator light turns off. Both the red power light and green ready-to-cook light will illuminate during preheating. The green light will cycle on and off during use to maintain temperature.
  4. Prepare Sandwich: While the press preheats, prepare the sandwich or other food item.
  5. Place Food: Once ready, place the food onto the bottom cooking plate, positioning it towards the rear.
  6. Close Lid: Close the top cooking plate, allowing its floating design to evenly press down on the food.
  7. Cook: Toasting typically takes 5-8 minutes, but the exact time will vary based on personal taste, bread type, and filling.
  8. Remove Food: When cooked, open the lid and remove the food using a plastic or wooden spatula. Metal tongs or knives should be avoided to prevent damage to the non-stick coating.

Versatility in Food Preparation: The sandwich press is suitable for a wide range of bread types, including white, wholemeal, kibbled wheat, wholegrain, and raisin loaf. It excels at toasting focaccia, Turkish bread, baguettes, and bread rolls. Sweet breads with high sugar content, such as raisin bread or brioche, may brown quicker.

For fillings, canned or pre-cooked fruits are recommended over fresh fruits to minimize excessive juices during heating. Caution is advised when consuming sandwiches with hot fillings like cheese and tomato or jam, as these can retain heat and cause burns if eaten too quickly.

The flat plate design is ideal for toasting plain breads or Turkish bread without fillings or spreads. It can also be used to toast Turkish bread with jams for a breakfast alternative.

For reheating, sandwiches can be placed on a paper napkin to absorb condensation and then kept warm on a rack in an oven-proof dish in a low oven (around 100°C) for up to 20 minutes, though they may start to dry out after this period.

The non-stick, cooled flat plate design eliminates the need for butter or margarine on the outside of toasted snacks, promoting healthier eating.

Maintenance Features

Proper care and cleaning are essential to maintain the performance and longevity of the Breville Café Style Sandwich Press.

  • Unplug Before Cleaning: Always unplug the appliance from the mains supply before cleaning to ensure safety.
  • No Immersion: Never immerse any part of the appliance, including the power cord and plug, in water or any other liquid.
  • Avoid Abrasive Cleaners: Do not use harsh abrasive cleaners or cleaning materials, as these can damage the non-stick coating and exterior finish.
  • Cooling: Allow the sandwich press to cool slightly after use. Cleaning is often easier when the unit is slightly warm, but it should not be hot to the touch.
  • Regular Cleaning: Clean the sandwich press after each use to prevent the build-up of baked-on food residues.
  • Cleaning Cooking Plates: Wipe the cooking plates with a soft cloth. If stubborn cooked-on food remains, reheat the unit for 1-2 minutes, then brush with a small amount of oil or melted butter. Let it stand for five minutes, then wipe with a damp cloth.
  • Cleaning Exterior: To clean the outside of the sandwich press, wipe it with a damp cloth and then polish with a soft dry cloth.
  • Avoid Spray-On Coatings: Do not use spray-on non-stick coatings, as they can negatively affect the performance of the existing non-stick coating on the cooking plates.

Storage:

  1. Cool Down: Ensure the sandwich press has fully cooled before storing.
  2. Clean: Make sure the unit is clean before storage.
  3. Cord Storage: Wrap the power cord in the designated cord storage area underneath the unit.
  4. Lock Plates: Lower the top plate and press the storage lock clip into the handle to secure the plates together.
  5. Placement: Store the unit on a flat, level surface, away from edges where it could be easily knocked over.

Troubleshooting and Support: For troubleshooting issues or frequently asked questions, users can visit the manufacturer's website. In case of a damaged supply cord, it must be replaced by the manufacturer, its service agent, or similarly qualified persons to avoid hazards. The appliance is designed with no user-serviceable parts. If the unit fails to operate, users should check instructions, the fuse, and the mains supply before returning it for replacement.

Guarantee Information: The appliance is guaranteed for 1 year from the purchase date, provided the terms and conditions are met. This includes prompt notification of problems, ensuring the appliance has not been altered or misused, and providing proof of purchase. The guarantee does not cover faults from improper use, damage, abuse, incorrect voltage, acts of nature, or unauthorized repairs. Normal wear and tear, including minor discoloration and scratches, are also not covered. The guarantee applies to the original purchaser for household use only.

Breville VST025 Specifications

General IconGeneral
Cord storageYes
Product colorStainless steel
Waffle makingNo
LED indicatorsReady
Number of sandwiches3

Related product manuals