1018189 Rev. C
14
STEP 12
-----------------------------------------------------
50
66
• DO NOTwrapthepullropearoundyourwrists,ngersorANYbodyparts.
• DO NOT use the pull rope while the towing vehicle is moving.
• Attachthepullropeasdirectedonpages14-15ofthismanual.
• Avoidoverllingthehamper.Heavyloadsaremoredifculttodump.
• Parktowingvehicleandsettheparkingbrakebeforedumpingmaterial.
• Usethehandlethathasbeenprovided.
•
After dumping the hamper:AlwaysmakesuretofullysecurethePullHandletothe
backofthetowingvehicleusingtheHookandLooptape.
TO PREVENT ANY POTENTIAL INJURY OR DIGITAL AMPUTATION, PLEASE BE AWARE OF THE FOLLOWING:
37
Slacken
50
To Towing
Vehicle
Two
Knots
66
67
50
50
To Sweeper
Cutanddiscardanyexcessropebelowthetwoknotsthathavebeentied.
CAUTION:
The pull rope & handle can get tangled in the sweeper
brushes of the sweeper during operation. After dumping the hamper,
always make sure to fully secure the pull handle (66) to the back of
the towing vehicle using the loop tape.
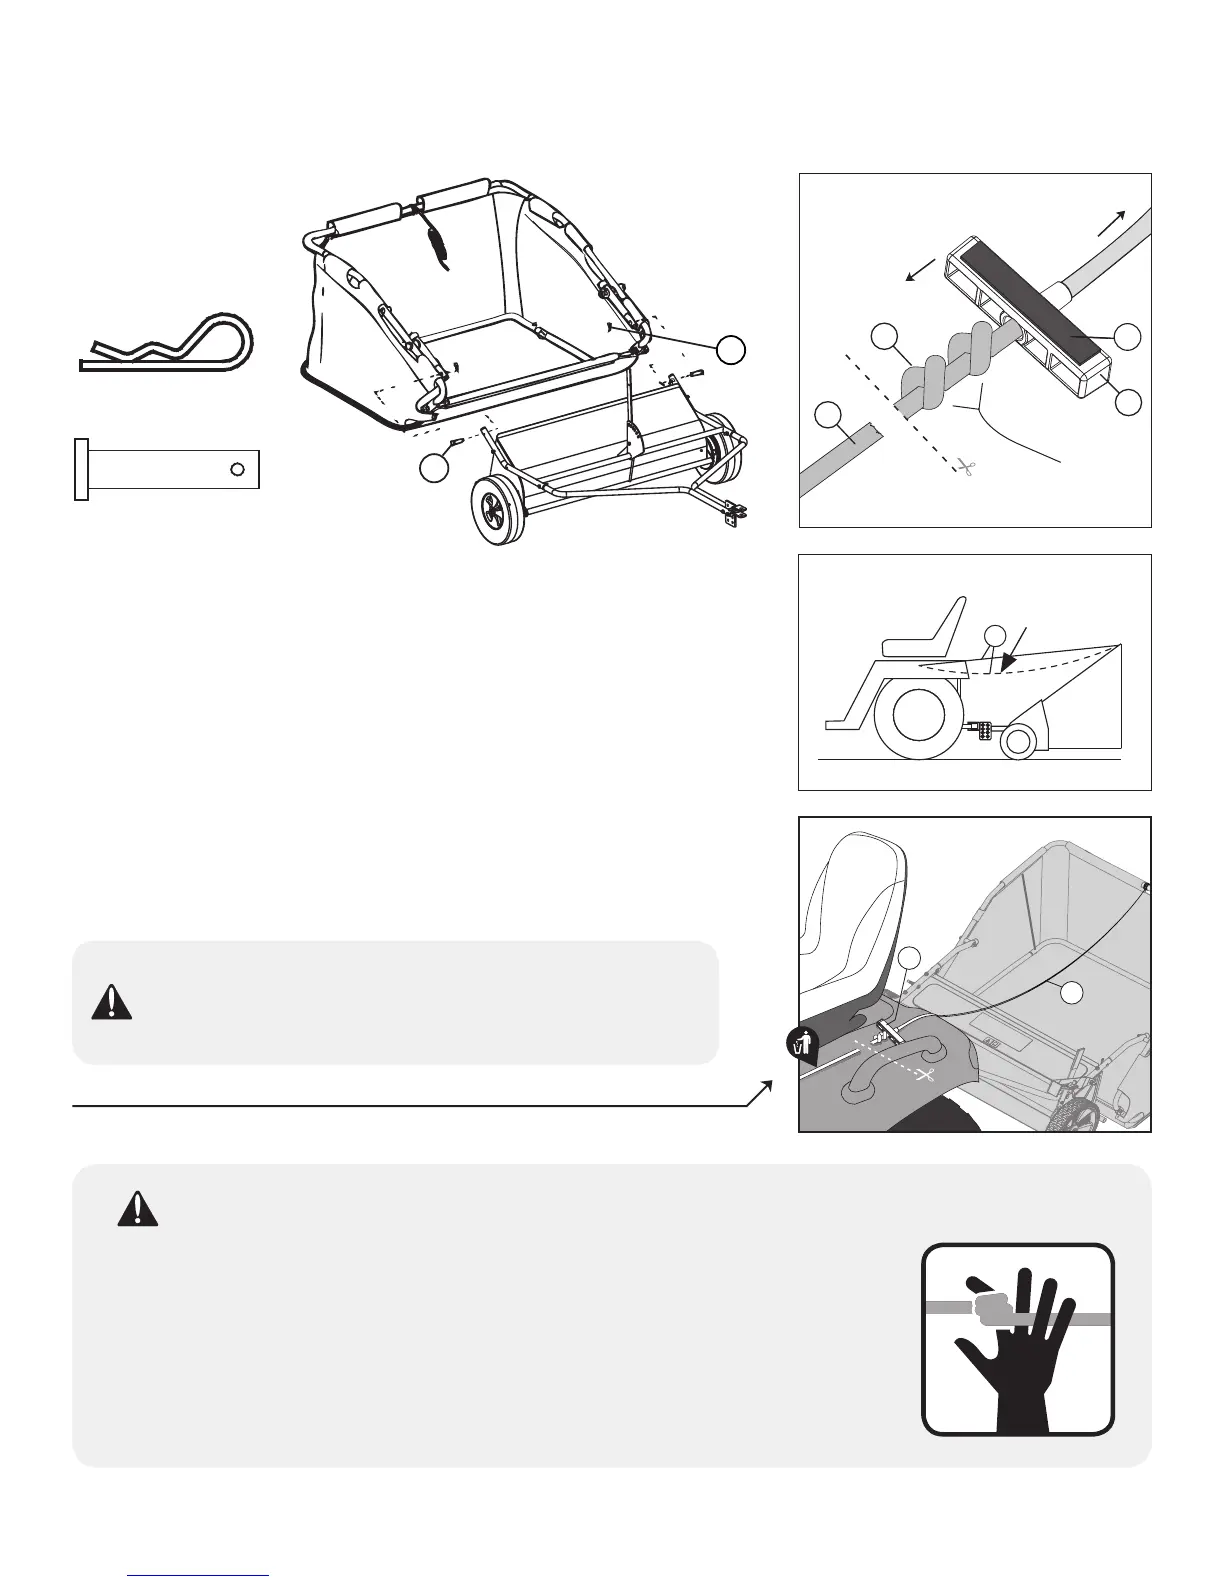
A. With the sweeper attached to the towing vehicle, attach the hamper
assemblytobackofsweeperbyplacingClevisPins(49)throughholesin
HamperMountTubes(57)andupperframeassembly(35).
B. Hamper should not touch ground.For adjustment, see section “Leveling
Hamper”atendofthismanual.
ExtendPull Rope (50)tothe back ofthe towingvehicleto an areathat will
be easily accessible from the towing vehicle seat. This is the area that the
PullHandle(66)willbeattached.AllowthePullRope(50)toslackenseveral
inches. Droop between the towing vehicle & tied point on the Hamper.
Tie2knotsinthisareaofthePullRopeanddragtheHandle(66)towardthe
knots.Pulltosecuretheirpositionontherope.
Cleanthe areaof thetowing vehicle thatthe pullhandle (66) willattachto.
Afxtheadhesivehook&loop(67)tapetothebackofthetowingvehiclein
the cleaned area.
48
Hairpin Cotter, .08 x 1-3/16"
Qty. 2
49
Clevis Pin, 5/16" x 1-3/8"
Qty. 2
49
48
Important: Pull Rope and Handle can get tangled in the sweeper
brushes if they fall on the ground in front of the sweeper during
operation. After dumping the hamper, always make sure to fully
secure the Pull Handle to the back of the towing vehicle using
the Loop tape.
Step 12.1
66
67
50
To Sweeper
To Towing Vehicle
Step 12.2
50
Step 12.3
OPERATION
REMOVING YOUR SWEEPER
CAUTION: Avoid injury! Before installing sweeper
make sure the hamper has been unloaded
1. Lock towing vehicle in park. (See Towing Vehicle Manual)
2. Align clevis with towing vehicle drawbar.
3. Install Hitch Pin (41) through clevis and vehicle drawbar and secure
the Locking Pin (42).
4. Attach hamper assembly to back of sweeper.
5. Hamper should not touch ground. For adjustment see section
“Leveling Hamper” at end of this manual.
CAUTION: Avoid injury! Before removing
sweeper make sure the hamper (55) has been
unloaded of all grass and leaves.
1. Unload Hamper.
2. Secure towing vehicle parking brake.
3. Remove Hairpin Cotter (42) and Hitch Pin (41).
4. Push away from towing vehicle.
5. Install Hitch Pin (41) through Hitch Clevis Assembly (1) and secure with
Hairpin Cotter (42) for storage.
INSTALLING YOUR SWEEPER
42
41
CAUTION: Avoid injury! Keep feet away from
under drawbar.
A) With the sweeper attached to the towing vehicle, attach the hamper
assembly to back of sweeper by placing Clevis Pins (49) through
holes in Hamper Mount Tubes (57) and upper frame assembly (35).
B) Hamper should not touch ground. For adjustment, see section
“Leveling Hamper” at end of this manual.
Pull Handle Attachment
A) With the sweeper attached to the towing vehicle, thread the Pull Rope
(50) through the Pull Handle (66) as shown (Step 12.2).
B) Extend the Pull Rope (50) to the back of the towing vehicle to an area
that will be easily accessible from the towing vehicle seat. Allow the
Pull Rope to slacken several inches (droop between the towing vehicle
and tied point on the hamper; Step 12.3). Tie 2 knots in this area and
pull the knots into the Pull Handle (Step 12.2). Cut excess rope if
needed.
C) Clean the area on the towing vehicle where the Pull Handle (66) will be
located and affix the Loop Tape (68) to the towing vehicle.
Step 12.
48
Hairpin Cotter, .08 x 1-3/16"
Qty. 2
49
Clevis Pin, 5/16" x 1-3/8"
Qty. 2
49
48
Important: Pull Rope and Handle can get tangled in the sweeper
brushes if they fall on the ground in front of the sweeper during
operation. After dumping the hamper, always make sure to fully
secure the Pull Handle to the back of the towing vehicle using
the Loop tape.
Step 12.1
66
67
50
To Sweeper
To Towing Vehicle
Step 12.2
50
Step 12.3
OPERATION
REMOVING YOUR SWEEPER
CAUTION: Avoid injury! Before installing sweeper
make sure the hamper has been unloaded
1. Lock towing vehicle in park. (See Towing Vehicle Manual)
2. Align clevis with towing vehicle drawbar.
3. Install Hitch Pin (41) through clevis and vehicle drawbar and secure
the Locking Pin (42).
4. Attach hamper assembly to back of sweeper.
5. Hamper should not touch ground. For adjustment see section
“Leveling Hamper” at end of this manual.
CAUTION: Avoid injury! Before removing
sweeper make sure the hamper (55) has been
unloaded of all grass and leaves.
1. Unload Hamper.
2. Secure towing vehicle parking brake.
3. Remove Hairpin Cotter (42) and Hitch Pin (41).
4. Push away from towing vehicle.
5. Install Hitch Pin (41) through Hitch Clevis Assembly (1) and secure with
Hairpin Cotter (42) for storage.
INSTALLING YOUR SWEEPER
42
41
CAUTION: Avoid injury! Keep feet away from
under drawbar.
A) With the sweeper attached to the towing vehicle, attach the hamper
assembly to back of sweeper by placing Clevis Pins (49) through
holes in Hamper Mount Tubes (57) and upper frame assembly (35).
B) Hamper should not touch ground. For adjustment, see section
“Leveling Hamper” at end of this manual.
Pull Handle Attachment
A) With the sweeper attached to the towing vehicle, thread the Pull Rope
(50) through the Pull Handle (66) as shown (Step 12.2).
B) Extend the Pull Rope (50) to the back of the towing vehicle to an area
that will be easily accessible from the towing vehicle seat. Allow the
Pull Rope to slacken several inches (droop between the towing vehicle
and tied point on the hamper; Step 12.3). Tie 2 knots in this area and
pull the knots into the Pull Handle (Step 12.2). Cut excess rope if
needed.
C) Clean the area on the towing vehicle where the Pull Handle (66) will be
located and affix the Loop Tape (68) to the towing vehicle.
================================================================================================
ASSEMBLY
Step 12.
48
Hairpin Cotter, .08 x 1-3/16"
Qty. 2
49
Clevis Pin, 5/16" x 1-3/8"
Qty. 2
49
48
Important: Pull Rope and Handle can get tangled in the sweeper
brushes if they fall on the ground in front of the sweeper during
operation. After dumping the hamper, always make sure to fully
secure the Pull Handle to the back of the towing vehicle using
the Loop tape.
Step 12.1
66
67
50
To Sweeper
To Towing Vehicle
Step 12.2
50
Step 12.3
OPERATION
REMOVING YOUR SWEEPER
CAUTION: Avoid injury! Before installing sweeper
make sure the hamper has been unloaded
1. Lock towing vehicle in park. (See Towing Vehicle Manual)
2. Align clevis with towing vehicle drawbar.
3. Install Hitch Pin (41) through clevis and vehicle drawbar and secure
the Locking Pin (42).
4. Attach hamper assembly to back of sweeper.
5. Hamper should not touch ground. For adjustment see section
“Leveling Hamper” at end of this manual.
CAUTION: Avoid injury! Before removing
sweeper make sure the hamper (55) has been
unloaded of all grass and leaves.
1. Unload Hamper.
2. Secure towing vehicle parking brake.
3. Remove Hairpin Cotter (42) and Hitch Pin (41).
4. Push away from towing vehicle.
5. Install Hitch Pin (41) through Hitch Clevis Assembly (1) and secure with
Hairpin Cotter (42) for storage.
INSTALLING YOUR SWEEPER
42
41
CAUTION: Avoid injury! Keep feet away from
under drawbar.
A) With the sweeper attached to the towing vehicle, attach the hamper
assembly to back of sweeper by placing Clevis Pins (49) through
holes in Hamper Mount Tubes (57) and upper frame assembly (35).
B) Hamper should not touch ground. For adjustment, see section
“Leveling Hamper” at end of this manual.
Pull Handle Attachment
A) With the sweeper attached to the towing vehicle, thread the Pull Rope
(50) through the Pull Handle (66) as shown (Step 12.2).
B) Extend the Pull Rope (50) to the back of the towing vehicle to an area
that will be easily accessible from the towing vehicle seat. Allow the
Pull Rope to slacken several inches (droop between the towing vehicle
and tied point on the hamper; Step 12.3). Tie 2 knots in this area and
pull the knots into the Pull Handle (Step 12.2). Cut excess rope if
needed.
C) Clean the area on the towing vehicle where the Pull Handle (66) will be
located and affix the Loop Tape (68) to the towing vehicle.
 Loading...