1018189 Rev. C
15
================================================================================================
OPERATION
INSTALLING YOUR SWEEPER
----------------------------------------
REMOVING YOUR SWEEPER
----------------------------------------
TRANSPORTING YOUR SWEEPER
----------------------------------------
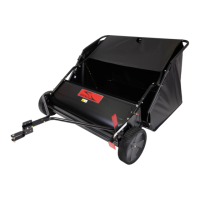
1.Locktowingvehicleinpark.
(See Towing Vehicle Manual)
2.Aligncleviswithtowingvehicledrawbar.
3.InstallHitchPin(41)throughclevisandvehicledrawbarand
securetheLockingPin(42).
4. Attachhamperassemblytobackofsweeper.
5.Hampershouldnottouchground.Foradjustmentseesection
“LevelingHamper”atendofthismanual.
1. Unload Hamper.
2.Securetowingvehicleparkingbrake.
CAUTION: AVOID INJURY! Before installing
sweepermakesurethehamperhasbeenunloaded.
CAUTION: AVOID INJURY! Before removing
thesweepermakesurethehamper(55)hasbeen
unloaded of all grass and leaves.
CAUTION: AVOID INJURY!Keepfeetawayfromunderdrawbar.
3.RemoveHairpinCotter(42)andHitchPin(41).
4. Pushawayfromtowingvehicle.
5. InstallHitchPin(41)throughHitchClevisAssembly(1)andsecurewithHairpinCotter(42)forstorage.
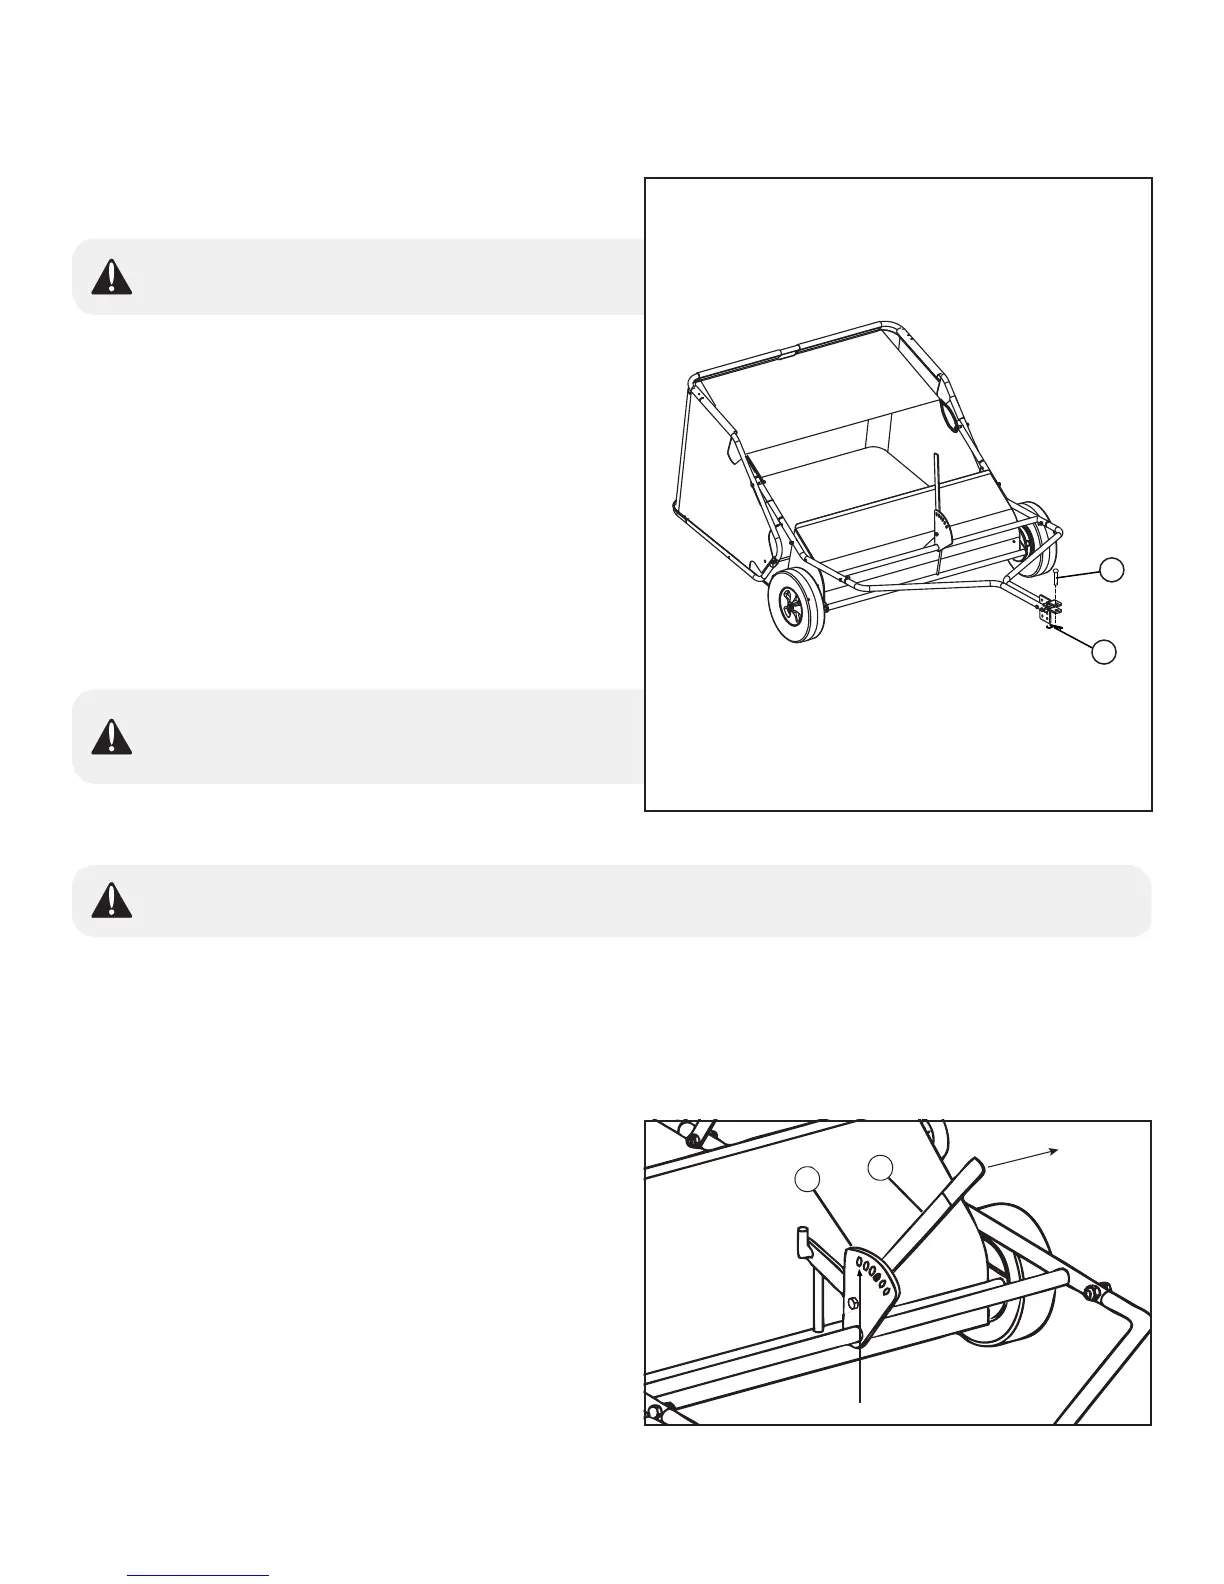
1. Parkvehicleonahard,levelsurfaceandsetparkingbrake.
2. Pivot lift handle(A)away fromlockplate (B) todisengage
lockpinhandlefromindexholeinlockplate.
3. Movelifthandleback(towardthehousing)toraisethebrush
height.
4.Alignthelockpinwiththefarthestindexholeinlockplate(B)
andreleaselifthandle(A)tosecureheightadjustment.
LEVELING HAMPER
After the brush height has been set, the tow tubes may require adjustment
Picture Note: Right front view shown.
to level the tow tubes to the ground. This can be accomplished by removing
the clevis and adjusting the clevis up or down (refer to step 5). After the tow
tubes are approximately level, the hamper stop assembly may have to be
adjusted so the hamper assembly clears the ground.
1. Loosen two nuts (9) slightly, securing each side of hamper stop
bracket (34) to brush housing. The rear bracket mounting holes in
the brush housing are slotted, allowing the bracket to be pivoted
up or down for adjustment.
2. Tap the hamper stop tube (34) up or down to adjust the resting
position of the hamper so that it is approximately level.
Tighten hardware.
TRANSPORTING YOUR SWEEPER
OPERATING YOUR SWEEPER
Determining Weight for Cart
The following maximum loaded weight capacity is the average
weight of the sweeper plus the weight loaded in the hamper and
dethatcher attachment.
CAUTION: Avoid injury! If additional weight is
required when towing, add weight at or forward
of the rear wheels. Adding weight behind the
rear wheels can affect vehicle steering.
Refer to your towing vehicle manual.
ADJUSTING BRUSH HEIGHT
NOTE: Setting brush height too low for sweeping conditions causes
excessive wheel slippage. For maximum performance, adjust brush
height as high as possible for the material and conditions.
1. Pivot lift handle (A) away from lock plate (B) to disengage lock pin in
handle from index hole in lock plate.
2. Move lift handle forward (towards the towing vehicle) to lower brush
height, or back (toward the housing) to raise the brush height. Align
lock pin with appropriate index hole in lock plate and release lift
handle to secure height adjustment.
Normal lawn sweeping is accomplished when the brushes sweep at the
same height as the mower cutting height.
Brush Height Sweeping Conditions
25mm (1 in.) to
50mm (2 in.)
Mowed lawns under normal conditions, or light
leaves.
50mm (2 in.) to
75mm (3 in.)
High grass, heavy leaves or heavy grass clippings.
To adjust the sweeper for transport:
1. Park vehicle on a hard, level surface and set parking brake.
2. Pivot lift handle (A) away from lock plate (B) to disengage
lock pin handle from index hole in lock plate.
3. Move lift handle back (toward the housing) to raise the brush
height.
4. Align the lock pin with the farthest index hole in lock plate (B)
and release lift handle (A) to secure height adjustment.
A
B
Farthest index hole
Towing capacity will vary with weight of towing vehicle and operator.
Add the weight of your machine to operator weight to find the maximum
capacity for towing.
Example:
If Towing vehicle weighs: 400 lbs.
Add your weight: 200 lbs.
Combined weight equals: 600 lbs.
To maintain stability in this example, you cannot safely tow more than
600 lbs. without first adding additional ballast to the towing vehicle.
A
B
CAUTION: Avoid injury! Excessive towed load
can cause loss of traction and loss of control on
slopes. Stopping distance increases with speed
and weight of towed load.
Total towed weight must not exceed combined
weight of towing vehicle, ballast and operator.
Pull to
disengage
A
B
Lowers brush height
Raises brush height
Model Weight Capacity with Dethatcher
STS-42BHDK 102 lbs. dry
222 lbs. with wet grass
9
34
Step 12.
48
Hairpin Cotter, .08 x 1-3/16"
Qty. 2
49
Clevis Pin, 5/16" x 1-3/8"
Qty. 2
49
48
Important: Pull Rope and Handle can get tangled in the sweeper
brushes if they fall on the ground in front of the sweeper during
operation. After dumping the hamper, always make sure to fully
secure the Pull Handle to the back of the towing vehicle using
the Loop tape.
Step 12.1
66
67
50
To Sweeper
To Towing Vehicle
Step 12.2
50
Step 12.3
OPERATION
REMOVING YOUR SWEEPER
CAUTION: Avoid injury! Before installing sweeper
make sure the hamper has been unloaded
1. Lock towing vehicle in park. (See Towing Vehicle Manual)
2. Align clevis with towing vehicle drawbar.
3. Install Hitch Pin (41) through clevis and vehicle drawbar and secure
the Locking Pin (42).
4. Attach hamper assembly to back of sweeper.
5. Hamper should not touch ground. For adjustment see section
“Leveling Hamper” at end of this manual.
CAUTION: Avoid injury! Before removing
sweeper make sure the hamper (55) has been
unloaded of all grass and leaves.
1. Unload Hamper.
2. Secure towing vehicle parking brake.
3. Remove Hairpin Cotter (42) and Hitch Pin (41).
4. Push away from towing vehicle.
5. Install Hitch Pin (41) through Hitch Clevis Assembly (1) and secure with
Hairpin Cotter (42) for storage.
INSTALLING YOUR SWEEPER
42
41
CAUTION: Avoid injury! Keep feet away from
under drawbar.
A) With the sweeper attached to the towing vehicle, attach the hamper
assembly to back of sweeper by placing Clevis Pins (49) through
holes in Hamper Mount Tubes (57) and upper frame assembly (35).
B) Hamper should not touch ground. For adjustment, see section
“Leveling Hamper” at end of this manual.
Pull Handle Attachment
A) With the sweeper attached to the towing vehicle, thread the Pull Rope
(50) through the Pull Handle (66) as shown (Step 12.2).
B) Extend the Pull Rope (50) to the back of the towing vehicle to an area
that will be easily accessible from the towing vehicle seat. Allow the
Pull Rope to slacken several inches (droop between the towing vehicle
and tied point on the hamper; Step 12.3). Tie 2 knots in this area and
pull the knots into the Pull Handle (Step 12.2). Cut excess rope if
needed.
C) Clean the area on the towing vehicle where the Pull Handle (66) will be
located and affix the Loop Tape (68) to the towing vehicle.
 Loading...