20
1
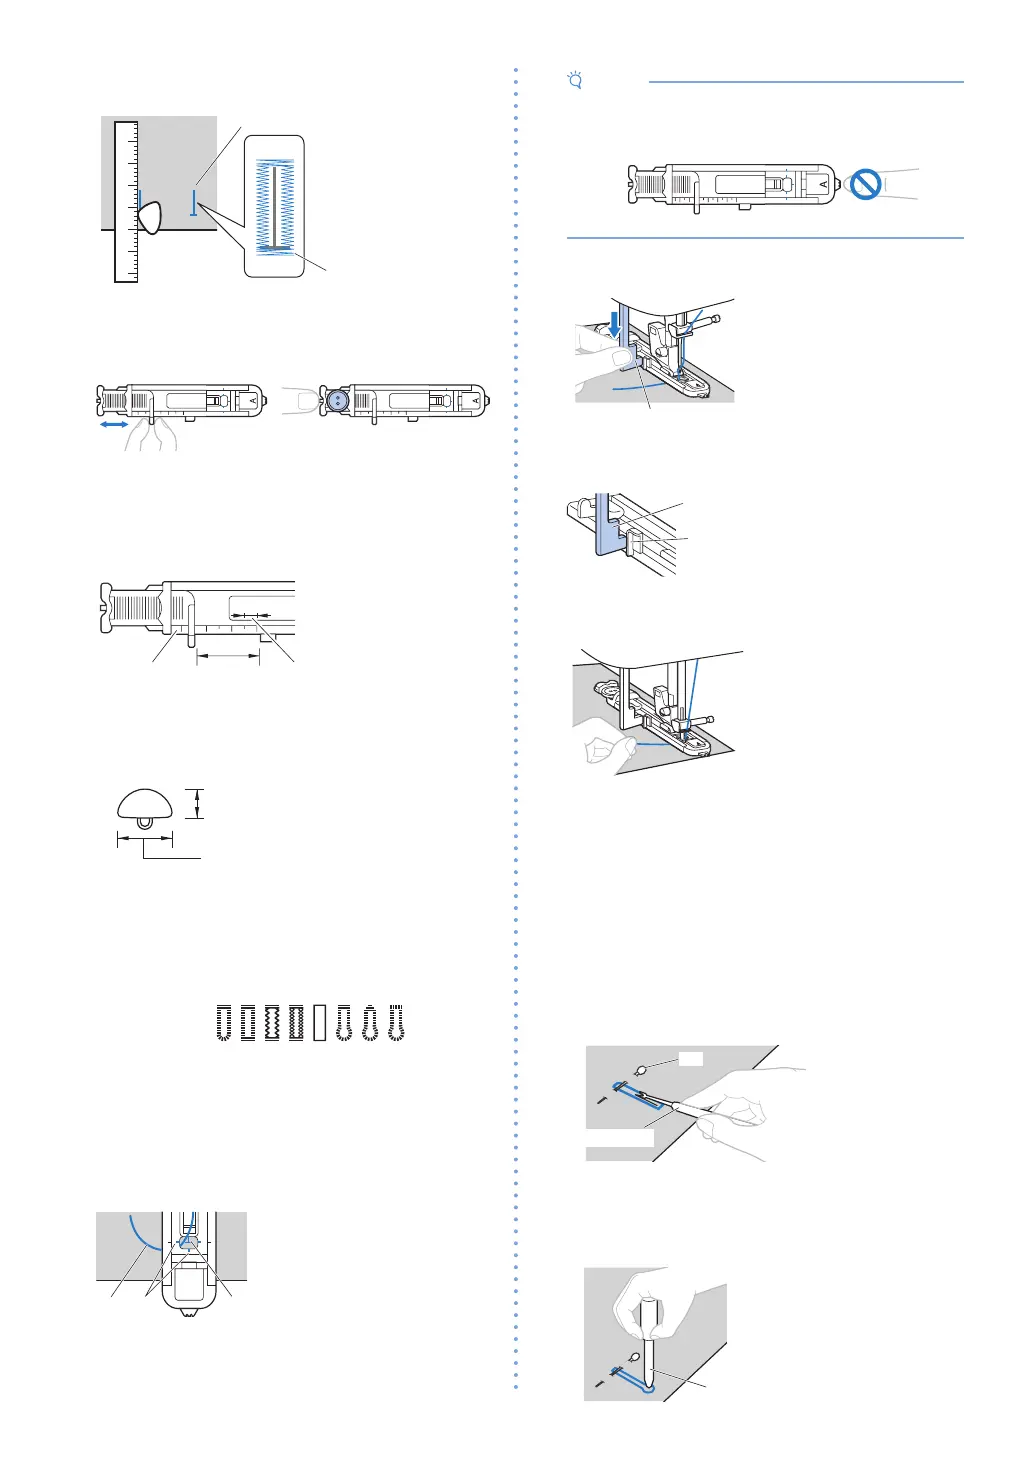
Use chalk to mark on the fabric the position and
length of the buttonhole�
Marks on fabric
Buttonhole sewing
2
Pull out the button guide plate of buttonhole foot
“A”, and then insert the button that will be put
through the buttonhole�
*
If the button does not fit in the button
guide plate
Add together the diameter and thickness of the
button, and then set the button guide plate to the
calculated length�
b
1 Presser foot scale
2 Length of buttonhole
(diameter + thickness
of button)
3 5 mm (3/16 inch)
Example: For a button with a diameter of 15 mm
(9/16 inch) and a thickness of 10 mm (3/8 inch),
the button guide plate should be set to 25 mm (1
inch) on the scale�
10 mm (3/8 inch)
15 mm (9/16 inch)
X
The size of the buttonhole is set�
3
Attach buttonhole foot “A”�
Before attaching the buttonhole foot “A”, pass the
upper thread underneath the presser foot through
the hole�
4
Select a stitch�
*
Stitches may differ depending on the model� Check
stitch selections on the machine's body, and then
select the stitch number�
5
Position the fabric with the front end of the
buttonhole mark aligned with the red marks on
the buttonhole foot, and then lower the presser
foot lever�
A
b
1 Mark on fabric (front)
2 Red marks on buttonhole
foot
3 Upper thread
• When lowering the presser foot, do not push in
the front of the presser foot, otherwise the bar
tack will not be sewn with the correct size�
6
Pull down the buttonhole lever as far as possible�
Buttonhole lever
The buttonhole lever is positioned behind the
bracket on the buttonhole foot�
Buttonhole lever
Bracket
7
Gently hold the end of the upper thread in your
left hand, and then start sewing�
X
Once sewing is completed, the machine automatically
sews reinforcement stitches, then stops�
8
Raise the needle and presser foot, then remove
the fabric, and then cut the threads�
9
Raise the buttonhole lever to its original position�
10
Insert a pin along the inside of one bar tack at
the end of the buttonhole stitching to prevent
the stitching from being cut�
11
Use the seam ripper to cut towards the pin and
open the buttonhole�
Pin
Seam ripper
For keyhole buttonholes, use the eyelet punch
to make a hole in the rounded end of the
buttonhole, and then use the seam ripper to cut
open the buttonhole�
Eyelet punch

 Loading...