•
Ot~
Reference line
• , Bezugslinie
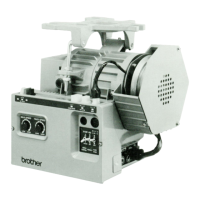
Synchronizer Adjustment
When raised 5
mm
above
the
down
position
Von der Tiefstellung urn
5
mm
angehoben
* The synchronizer uses elements in
two
locations to detect the needle position. Also, a singel element is used to control the
needle down position signal and the thread
trimming
signal.
* Turn the power switch on, and stop the sewing machine
with
the needle down; there should be
18-
22
mm
from the
bottom
of
the needle set screw to the top
of
the needle plate. When the machine is stopped in the needle up position, the
distance from the needle plate to the needle
tip
should
be
9-
11
mm
with
medium thick materials, and
10-
12
mm
with
thick materials.
Adjust
as
follows
if
necessary.
* Turn the power switch off.
Ill Needle down, thread
trimming
signal position adjustment
1.
Turn the sewing machine pulley in the normal forward direction and raise the needle bar 0 5
mm
from the down position.
2.
If the bottom
of
the magnet
f)
and the needle down/thread trimming element
E)
are not aligned, loosen screw
8,
and
move the needle down/thread
trimming
element e
to
adjust.
Move the needle down/thread
trimming
element
E)
in the direction
of
normal pulley rotation to raise the needle bar 0 stop
position. Move the element
E)
in the opposite direction to lower the needle bar position.
Ill Needle up stop position adjustment
1.
Looser screw
0,
and move the needle up stop element 0
to
adjust.
Move the needle up stop element
0 in the direction
of
normal pulley rotation to lower the needle bar 0 stop position.
Move the element
0 in the opposite direction to raise the needle bar position.
Einstellung des Synchronisators
*
Die
Nadelposition
wird
vom Synchronisator
an
zwei Stellen von Steuerelementen abgetastet. Fur das Signal zum
Abschneiden des Fadens bei tiefgestellter Nadel ist ein Steuerelement vorhanden.
*
Den
Netzschalter einschalten und die Nahmaschine bei tiefgestellter Nadel stoppen,
so
daB
der Abstand zwischen der
unteren Kante der Nadelstangenschraube und der Stichplatte
18
-
22
mm
betragt. Wenn die Nahmaschine
mit
hochgestellter Nadel gestoppt wird, muB der Abstand zwischen der Stichplatte und der Nadelspitze 9 -
11
mm
fUr
mitteldicke stoffe und
10
-
12
mm
fur
dicke Stoffe betragen.
Falls notwendig, die Einstellung wie folgt vornehmen.
*
Den
Netzschalter ausschalten.
Ill Positionseinstellung fUr das fadenabschneidesignal bei tiefgestellter nadel
1.
Die Riemenscheibe in normaler Vorwartsdrehrichtung drehen, urn die Nadelstange 0 5
mm
von der Tiefstellung
hochzustellen.
2.
Falls die Unterseite des Magnets 8 und das Steuerelement zum Fadenabschneiden
E)
nicht aufeinander ausgerichtet sind,
die Schraube
8 losen und das Steuerelement
E)
zum Einstellen verschieben.
Wenn das Steuerelement
E)
in die normale Riemenscheibendrehrichtung gedreht wird,
wird
die Stopposition der
Nadelstange
0 hoher gestellt, wahrend sie beim Drehen in die Gegenrichtung tiefer gestellt wird.
Ill Einstellung der stopposition bei hochgestellter nadel
1.
Zum Einstellen die Schraube 0
Jasen
und das Steuerelement 0 verschieben.
Wenn das Steuerelement
0 in die normale Riemenscheibendrehrichtung gedreht wird,
wird
die Stopposition der
Nadelstange
0 tiefer gestellt, wahrend sie beim Drehen in die Gegenrichtung hoher gestellt wird.
-12-