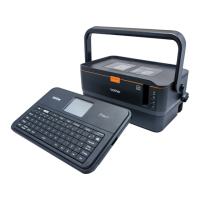
The Brother PT-E800W is an intuitive, easy-to-operate, and feature-rich P-touch electronic labeling system designed to produce professional-looking, high-quality labels. It can be used as a standalone device with its integrated keyboard LCD unit, or connected to a computer or mobile device for more complex label creation.
Function Description
The PT-E800W's primary function is to create and print various types of labels. It utilizes thermal transfer printing technology and supports a range of Brother TZe tape cassettes, FLe label cassettes, HSe tube cassettes, and HGe tape cassettes, allowing for diverse labeling needs. The device features a keyboard LCD unit for direct input and control, as well as USB and Wi-Fi connectivity for integration with computers and mobile devices.
When used as a standalone unit, the keyboard LCD unit provides a comprehensive interface for label creation. The "Home Screen" allows users to select from various menus such as "Auto Format (Templates)" for preset label formats, "Create Label" for custom designs, "Auto Format (Block Layouts)" for preset layouts, and "File" to retrieve saved data. It also includes options for specific label types like "Cable Label" (Faceplate/Cable Wrap/Cable Flag/Patch Panel/Punch-Down Block/Die-cut Flag/Inverted Label), "Transferred Templates" from a computer, "Settings" for device configurations, and "Register Programmable Function" to manage programs. The "Wireless Connection" icon indicates Wi-Fi status, and the "Battery Level" icon shows the remaining charge when using the Li-ion battery.
The "Label Creation Screen" offers detailed control over label design. Users can adjust font, character size, width, style, line settings, frame, and alignment through "Style Guidance." "Layout Guidance" allows for orientation, layout, separator, reverse, and repeated text settings. The screen also displays block and line numbers, page and block separator lines, and an "Enter/Return Symbol" to indicate line breaks. A cursor shows the current data input position, and various indicators display wireless connection status, tab length settings, tape size, and battery level.
The device supports various input methods through its keyboard, including letters, numbers, symbols, and accented characters. It also features functions for inserting time stamps, barcodes, databases, and transferred symbols. The "Serialize/Adv.Serialize" function enables the creation of serialized numbers, which is useful for inventory or asset management.
Usage Features
Power On/Off: To turn on the device, press the (Power) button, which will light up green. For the first-time use, a language selection screen will appear. To turn off, press and hold the (Power) button again; the indicator may light orange briefly before turning off. It's crucial not to remove the battery or disconnect the AC adapter until the power indicator turns off completely.
Keyboard LCD Unit: The keyboard LCD unit is the primary interface for standalone operation. It can be installed on the P-touch labeling system by sliding it onto the top cover. For storage, it's recommended to turn it upside down and install it to the top cover to prevent dust or dirt. The excess cable can be placed in the cable holder.
Coin Cell Battery Installation: A coin cell battery acts as a backup power supply for the internal clock settings of the keyboard LCD unit. To install, ensure the device is off, open the top cover, and use a coin to slowly turn and remove the coin cell battery cover. Insert the new battery with the correct polarity (+ and - sides) and return the cover, turning it in the opposite direction until it stops. Forcing the cover past the stop position may damage it. It's recommended to replace the battery every two years and dispose of old batteries properly.
Rechargeable Li-ion Battery: The device can be powered by a rechargeable Li-ion battery (PA-BT-4000LI). To install, turn off the device, open the battery cover on the bottom, insert the battery into the compartment, and close the cover.
Charging: To charge the Li-ion battery, ensure it's installed, then connect the AC adapter and power supply cord to an AC power outlet. The (Battery) indicator will light orange during charging and turn off when fully charged. Charging may take up to three hours. Charging will pause if the device is used for printing or other operations but will resume automatically afterward.
Stopping Charge: To stop charging, simply disconnect the AC adapter.
Battery Care: For optimal performance and longevity, charge the battery in environments between 32°F and 104°F (0°C and 40°C). Avoid using or storing the battery in extreme temperatures. Store batteries with less than 50% charge in a cool, dry place away from direct sunlight and recharge them every six months if stored for long periods. It's normal for the device to feel warm during charging.
Connecting Power Supply (AC Adapter): Use the AD9100ESA AC adapter. Insert the AC adapter cord plug into the DC IN 24 V outlet on the device, then insert the power supply cord plug into the AC adapter, and finally, plug the power supply plug into a standard AC power outlet. Always turn off the device before disconnecting the AC adapter. Avoid pulling or bending the cords.
Inserting a Tape Cassette: Before inserting a new tape cassette, remove any cardboard stopper. Ensure the tape end is not bent and passes through the tape guides. Open the top cover using the cover open button. Carefully insert the tape cassette into the compartment, ensuring the tape end faces the tape exit slot, and push down evenly until it clicks into place. Make sure the tape and ink ribbon do not catch on the print head and that there is no slack in the tape to prevent jams. Close the top cover. Store tape cassettes in a cool, dark, and dry place.
Feeding Tape: The "Feed and Cut" function feeds approximately 22.3 mm of blank tape and then cuts it. Press the (Feed and Cut) button, select "Feed & Cut" on the LCD, and press OK or Enter. The "Feed Only" function ejects 22.3 mm of blank tape without cutting, which is recommended for fabric tapes that need to be cut with scissors. Press the (Feed and Cut) button, select "Feed Only," and press OK or Enter. Do not pull the label while the device is ejecting it, as this can cause the ink ribbon to discharge, rendering the tape unusable.
Setting Language and Unit: In the "Home Screen," navigate to "Settings," then "Language" or "Unit." Select your desired language (e.g., English, Spanish, French) or unit (inch or mm) using the arrow keys and press OK or Enter.
Adjusting LCD Settings:
Contrast: From "Settings," select "LCD Contrast" to adjust the screen contrast to one of five levels (+2, +1, 0, -1, or -2) for better readability. The default is "0."
Backlight: From "Settings," select "Backlight" to turn it "On" or "Off." The backlight improves display visibility and automatically turns off to save power. It will turn on again with any key press.
Connecting to a Computer (USB/Wi-Fi):
USB: Connect the USB cable from the device's USB port to your computer's USB port. Turn on the device.
Wi-Fi: Turn on the device, then press and hold the (Wi-Fi) button for one second until the (Wi-Fi) indicator starts flashing green. For Windows, configure Ad-Hoc mode using the Printer Setting Tool; for Mac, use the Wireless Device Setup Wizard.
Connecting to a Mobile Device: Turn on the device, then press and hold the (Wi-Fi) button until the (Wi-Fi) indicator is lit green. Enable Wi-Fi on your mobile device (iPhone/iPad/iPod touch or Android™ device). Start the Brother application on your mobile device and select "PT-E800W" or "DIRECT-_PT-E800W" as the printer. The "" represents the last five digits of the product serial number, found on the bottom of the device. If a password (network key) is required, enter "00000000."
Maintenance Features
Cleaning the Print Head: If labels are not printed correctly, the print head might be dirty. Clean it with a cotton swab or an optional print head cleaning cassette (TZe-CL6).
Troubleshooting: The device provides LED indicators to communicate its status, including power on/off, charging, battery level, Wi-Fi connection, and various errors (e.g., system error, cutter error, wrong media error, no cassette error, media end error, top cover open error). These indicators help users diagnose issues.
LCD Problems:
- Screen Locked/Unresponsive: Reset the internal memory to factory settings. If the problem persists, disconnect the AC adapter and remove the battery for over 10 minutes.
- Blank Display/No Power Indicator: Ensure the device is receiving power. If using AC power, check connections. If using a rechargeable Li-ion battery, ensure it's firmly installed and fully charged. Verify the keyboard LCD unit cable is securely connected.
- Foreign Language Display: Refer to the "Setting Language and Unit" section to select the desired language.
Printing Problems:
- Label Not Printed: Check if text has been entered and if the tape cassette is installed correctly with sufficient tape. If the tape is bent, cut off the bent section and re-thread the tape. Ensure the computer or mobile device is correctly connected if printing from them.
- Label Not Printed Correctly: Remove and reinstall the tape cassette, pressing firmly. Clean the print head if dirty.
- Tape Jammed: Remove the tape cassette. Check the compartment and tape exit slot for scraps or jammed tape and remove any debris. Examine and cut away any damaged tape. Ensure the tape end is not bent and passes through the tape guides.
- Ink Ribbon Separated: Replace the tape cassette if the ink ribbon is broken. If not, wind the loose ink ribbon onto the spool.
- Stops While Printing: Replace the tape cassette if striped tape is visible (indicating the end of the tape). Connect the AC adapter or charge the Li-ion battery.
- Not Cut Automatically: Check the "Cut Option" setting. To cut labels manually, press the (Feed and Cut) button.
- Tape Jam Error Cannot Be Cleared: Contact Brother customer service.
- Fine Adjustments to Print Result: Adjust length and margins using the Printer Setting Tool.
- Firmware Version: To check the firmware version, go to "Settings" in the Home screen, then "Version Information."
- Print Report: Turn on the device, then press and hold the (Feed and Cut) button for more than 10 seconds to print a report (use 0.94" (24 mm) or 1.4" (36 mm) tape).
- Software Version: Use the P-touch Update Software to confirm if you have the latest version.
The Brother PT-E800W is designed for ease of use and versatility, offering both standalone and connected operation for a wide range of labeling applications. Regular maintenance and attention to troubleshooting tips will ensure optimal performance and longevity of the device.