CHAPTER 4
Type 4606 Features and Functions
43
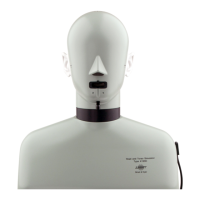
Fig.4.7
Handset Positioner
Calibration Tool UA-1549
as delivered
(disassembled)
(1) Allen Bolt YQ-0096
(2) Support Arm UC-0220
(3) Ear Brick UC-0219
(4) Mounting Collar
DB-3761
1) Remove the rubber pinna by sliding it forward (towards the face of HATS) and then pull
outwards at the rear of the pinna.
2) Using Ear Mounting Tool QA-0167 (Fig.1.1.3) supplied with Type 4128-C, loosen and
remove Microphone Retaining Collar DB-3021 (Fig.4.8.1).
3) Again using the ear mounting tool, mount (by screwing in) the mounting collar (Fig.4.7.4)
until hand tight (see Fig.4.8.2).
4) Remove the upper left and lower right head brick retaining screws from the pinna socket,
mount the ear brick UC-0219 (Fig.4.7.3) with its thicker end downwards and the long
locating spikes fitting into the retaining screw sockets (see Fig.4.8.3).
5) Mount Support Arm Type UC-0220 (Fig.4.7.2) on the ear brick, taking care to position it
on the locating pins with the support arm pointing rearwards and upwards. Use Allen Bolt
YQ-0096 (Fig.4.7.1) to securely fasten the support arm to the mounting collar through the
ear brick. Tighten carefully using the 3mm allen key (Fig.4.2.7) supplied (see Fig.4.8.4).
6) Using the 2.5 mm allen key (Fig.4.2.8) supplied, retract the four adjustment screw studs
until they reach their adjustment stops (see Fig.4.8.5).
7) Mount the cradle positioner assembly on the mounting bracket in the right ear measuring
position, using the mounting locators and the two allen bolts to secure it firmly (see
Fig.4.8.6).
8) Set the barrel so that the arm and swivel joints are as far right as possible and then set the
quick release collar to “Lock”. Use the adjustment sleeve to adjust the barrel until the
displacement graduation is at the ERP position (see Fig.4.9.10).
9) Set
A to 33
on the mounting bracket by loosening the locking knob and sliding the top
of the assembly to the desired position and re-tightening the locking knob (see Fig.4.9.7).
 Loading...