11
BÜCHI Mini Spray Dryer B-191 4 Putting into operation
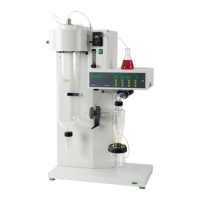
Figure 11: Automatic nozzle cleaner
4.9 Installation of the automatic nozzle cleaner
For products which tend to clog the nozzle during the spray
process, the cleaning of the nozzle can be automated.
1. Install the complete control unit with the angle piece on
the rear panel as illustrated. The short screws are for
mounting the angle piece on the housing and the some-
what longer screws are for mounting the control unit on
the angle piece. The compressed air hose must first be
removed if the control unit is being retrofitted.
2. Screw the supplied double nipple into the apparatus-side
compressed air connection.
3. Install the connecting hose 쎻 between the control unit
and the installed double nipple 쎻.
4. Connect the control unit with the attached power supply
cable to the receptacle on the back of the apparatus.
5. Now connect the black connecting hose to the nozzle on
the control unit as illustrated. Loosen the screw cap and
then retighten to fix the hose in position.
6. Connect the central compressed air hose 쎻 with the con-
trol unit.
7. Open compressed air cock (5-8 bar).
8. Now set the nozzle pressure to 4.5 bar. The turning knob
can be turned by lightly pulling out and the nozzle pressure
of 4.5 bar can be set. Do not reduce pressure on the cen-
tral pressure connection since the apparatus requires 5-8
bar air pressure for normal operation.
9. Turn control unit on. The action interval of the cleaning
needle from 1-10 seconds can now be selected by hand
with the rotary switch. For products which clog the nozzle
very quickly the interval must be kept very small.