8
Name Hopper
This option allows the operator to assign a recipe name to either hopper. Default hopper names are
stored under this menu and be changed.
To assign a hopper name:
1. Ensure machine is powered on.
2. Access programming by pressing the right hidden button until the program menu appears.
3. The first screen should read “NAME HOPPER”. Press SELECT to enter this option.
4. The next screen will ask which side to name (left of right hopper). Select LEFT or RIGHT. You can
always revisit this step to choose the other side to name at a later time.
5. The next screen will allow the operator to navigate through a list of default coffee names stored in
the grinder. Use the buttons under the display to navigate. Once a name has been found, select
SAVE to confirm the name.
6. The next screen will ask “Are you sure?”. Select YES to save the name.
NOTE: If the hopper wasn’t named when performing this procedure, ensure the hopper is properly
installed on top of the grinder as described in the Installation and Operating manual, available on
the BUNN website.
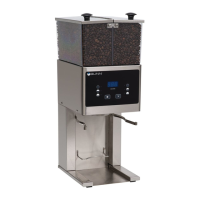
NAME HOPPER
SELECT
RECIPES
SELECT
SETTINGS
SELECT
SERVICE
SELECT
NAME HOPPER
SELECT
WHICH SIDE?
LEFT RIGHT
REGULAR
PREV SAVE NEXT
Modify Recipes
This option allows the operator to modify recipes stored in programming.
To modify recipes:
1. Ensure machine is powered on.
2. Access programming by pressing the right hidden button until the program menu appears.
3. The first screen should read “NAME HOPPER”. Use the right hidden button to navigate to
“RECIPES”.
4. At the “RECIPE” screen, press SELECT.
5. The next screen will read “REVIEW RECIPES”. Press SELECT.
6. Press NEXT to navigate to the recipe to modify, if necessary.
7. Select MODIFY.
8. The first setting to appear when modifying recipes is Grind Time. Adjusting this value will affect the
amount of coffee grounds being dispensed into the brew funnel. A longer grind time will increase
the weight of coffee grounds dispensed into the brew funnel. A shorter grind time will decrease the
weight of coffee grounds dispensed. Three different batch settings are selectable for each hopper.
Each batch is independently adjustable by setting.
9. Use the plus (+) or minus (-) buttons under the display to increase or decrease the grind time.
10. Select DONE to proceed with the changes.
11. The next screen will ask “3 BATCHES DONE?”. If so, select YES to save the changes. Selecting
NO will allow the operator to make more adjustments to the remaining batches for that particular
recipe.
12. The next setting to appear when modifying recipes is Run Time. Adjusting this value will affect
how long the grind motor continues to run after the slide gate closes. This time is set long enough
to ensure that all the beans dropped into the grind chamber are ground and dispensed. A shorter
grind time will decrease the weight of coffee grounds dispensed. Three different batch settings are
selectable for each hopper. Each batch is independently adjustable by setting.
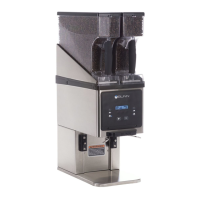
RECIPES
SELECT
REVIEW RECIPES
SELECT
REMOVE RECIPE
SELECT
REVIEW RECIPES
SELECT
ORIGINAL
MODIFY SHOW NEXT
GRIND TIME: 2.7
(-) DONE (+)
RUN ON TIME
(-) DONE (+)
REVIEW RECIPES
SELECT
ORIGINAL
MODIFY SHOW NEXT
GRIND TIME: 2.7
(-) DONE (+)
RUN ON TIME
(-) DONE (+)
INITIAL SET-UP & PROGRAMMING (Continued)
050919
 Loading...