Installing your Built-in Hob
Bringing it all together
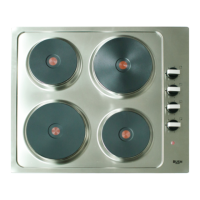
Getting to know your Built-in Hob
15
or online at www.bush-support.com If you still require further assistance, call one of our experts
on 01759 487838
Fixing the seal to the back of the Hob
The hob must be sealed to the work surface to prevent liquid
from entering into the cabinet. A tape seal is supplied with the
hob. Refer to Fig. 1
1.
Turn the hob over and place on a secure, level surface.
2.
Spread the seal around the left, front, right and rear
outer edges of the cooktop. Take special care in the
corners making sure there are no gaps. The ends of the
strips must fit together without overlapping.
3.
If the surface that the hob is to be fitted to is tiled or is
not reasonably smooth, additional sealing with a
waterproof silicone sealant may be required.
4.
Turn the hob back the right way up and position it in
the worktop cut-out.
Fastening the Installation Brackets
Each cooktop is provided with an installation kit including
brackets and screws for fastening the top to fixture panels
from 20 to 40 mm thick. Refer to Fig. 2
1.
Turn the cooktop upside down and fasten the brackets
“F” and “R” to the appropriate socket holes, without
tightening the screws for the moment.
2. NOTE: Dependent on the thickness of the worktop as
shown in Fig. 2 Slide the optional sleeve onto the
bracket if fitting to thin work surfaces.
3.
Make sure that the brackets are fastened as shown in
Fig. 2
Installing the Hob
1.
Turn the hob back the right way up and position it in
the worktop cut-out.
2.
Insert the cooktop into the hole and position it correctly.
3.
Adjust the position of the brackets “F” and “R” and
tighten “Rear Screw” and “Front Screw” to lock
the cooktop firmly in position (Fig. 2).
4.
With a sharp cutter or trimmer knife trim the excess
sealing material around the edge of the cooktop. Take
care not to damage the workbench.
If the surface that the hob is to be fitted to is tiled or is not
reasonably smooth, additional sealing with a waterproof
silicone sealant may be required.