48
TP700 USER GUIDE 42370 Rev A
11
10
Balboa Water Group | Your Single Source Solution
A
C
H
Main Screen
Navigate the Main menu
1 - Start from the Main screen (A), and press the
RIGHT navigation button to enter the Main menu.
If the Selection box (B) is on the Message icon, you
need to press the RIGHT navigation button twice to
enter the Main menu.
2 - Spa is the first item in the Main menu (C).
Continue pressing the RIGHT navigation button to
view all items in the Main menu.
3 - If you want to navigate back to the Main screen,
press the UP navigation button to select the Back
button (D). Once the back button is selected, press
the SELECT navigation button and the Main screen
(A) will appear.
Navigate the Settings menu
1 - Start from the Main screen (A), and press the
RIGHT navigation button to enter the Main menu.
2 - Spa is the first item in the Main menu (C).
Continue pressing the RIGHT navigation button until
the Settings menu is selected (E).
3 - Press the SELECT navigation button to enter the
Settings menu (F).
4 - The Navigation arrow (H) indicates more
settings. Press the DOWN navigation button to
scroll down the list.
Press-and-Hold
If you need to navigate a long list, press-and-hold
the navigation button. For example, press-and-hold
the DOWN navigation button to scroll down the
Settings menu list (G). The Navigation arrow (H)
indicates more menu items.
View Message Screen
1 - Start from the Main screen (A), and press the
LEFT navigation button to select the
Message icon (B).
2 - Pressing the SELECT navigation button to view
the Message screen.
3 - The Message screen may have an Exit button or
a Clear button. Select the button on the screen and
press the SELECT navigation button. View
“Exit and Clear Buttons” on page 31 for
more information.
F
A
H
C
D
B
G
F
E
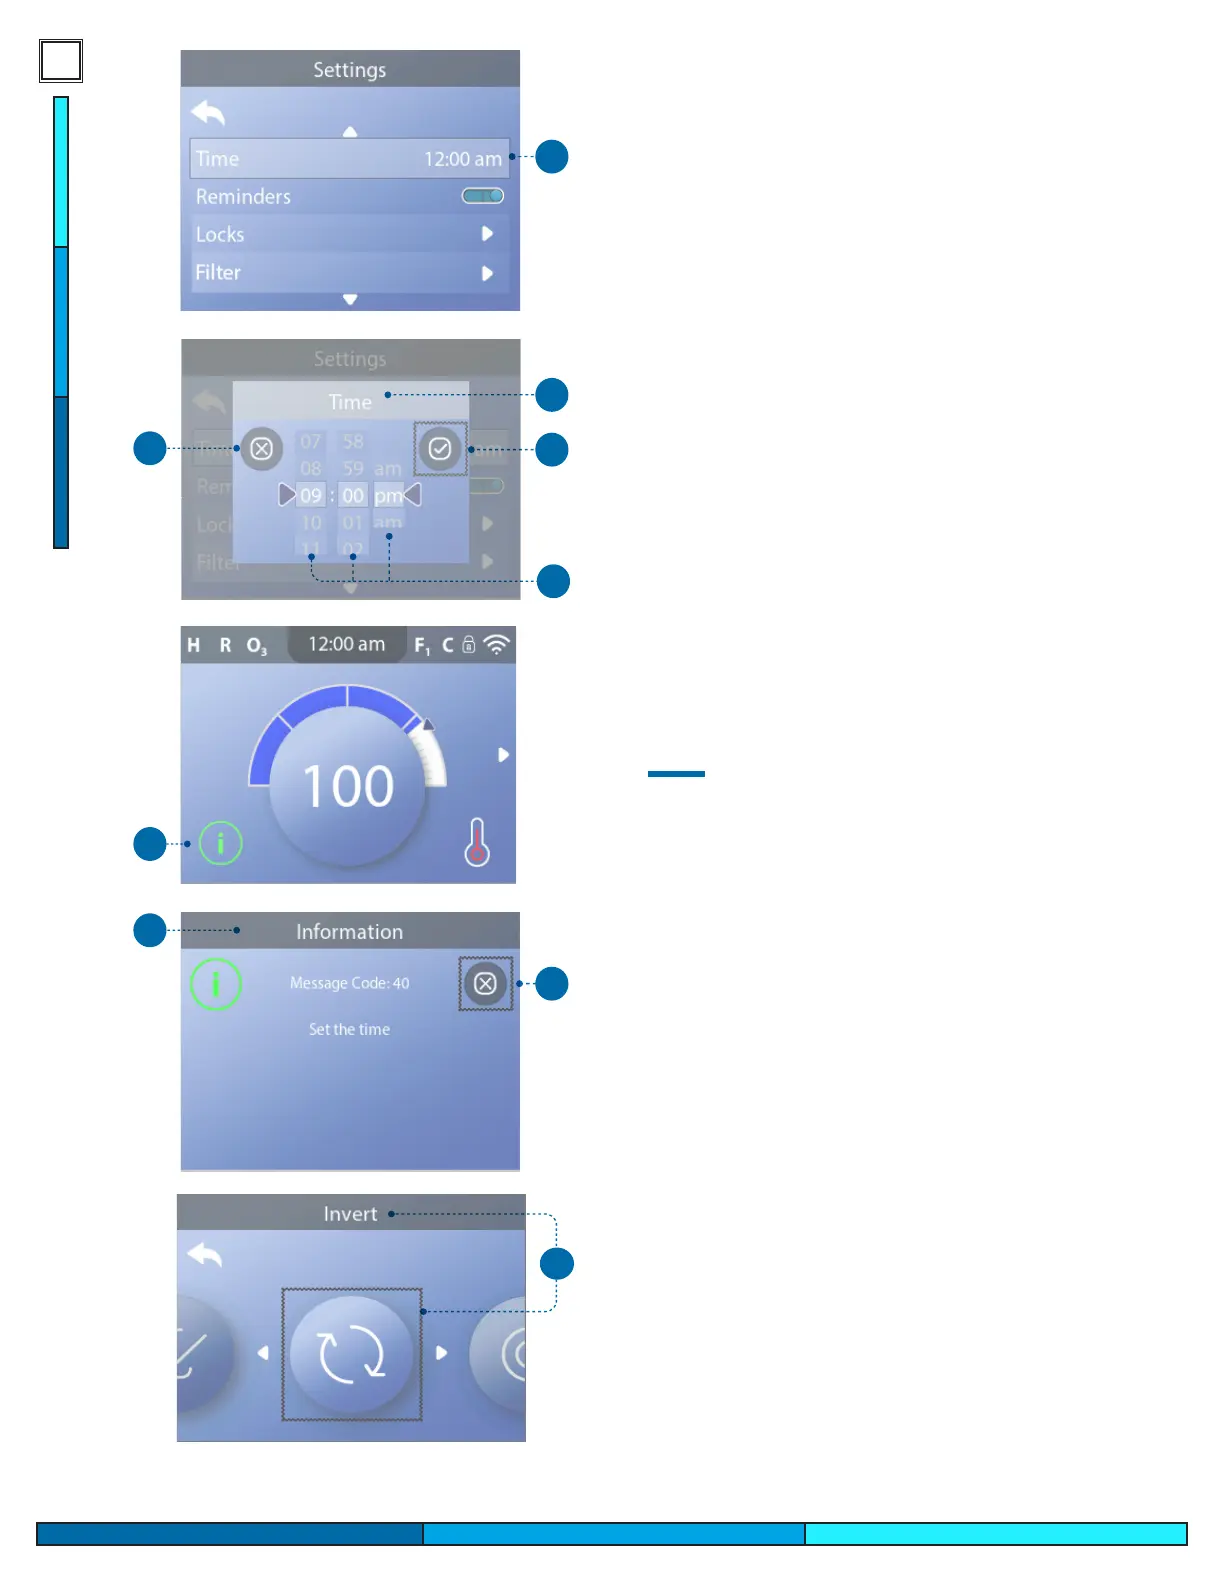
Be sure to set the
Time-of-Day
Setting the Time-of-Day can be important for
determining water filtration times and other
background features.
Follow these steps to set the time-of-day:
1 - Navigate to Time (A).*
2 - Press the SELECT navigation button, and the
Time screen will appear (B).
3 - Use the navigation buttons to adjust your
settings (D).
4 - Select the Save button (C), and press the
SELECT navigation button.
You have set the time-of-day.
If you do not want to save your settings, select
the Cancel button (H), and press the SELECT
navigation button.
If Time-of-Day has not been set, this Information
icon appears (G). Select the Information icon
and press the SELECT navigation button to view
the corresponding message in the Information
screen (F). Select the Exit button (E) and press the
SELECT navigation button to exit the
Information screen.
You can choose a 12-hour or 24-hour time display
(View “UNITS” on page 29). If you choose
24-hour time, “am” and “pm” are removed. CE
control systems default to a 24-hour time display.
SET TIMEOFDAY
* View page 10 for information on navigating the Settings menu.
TP700 USER GUIDE 42370 Rev A
17
16
Balboa Water Group | Your Single Source Solution
H
A
The control can be restricted to prevent unwanted use
or temperature adjustments.
Locking the Panel (D) prevents the controller from
being used, but all automatic functions are still active.
Locking the Settings (C) allows Jets and other features
to be used, but the Set Temperature and other
programmed settings cannot be adjusted. Settings
Lock allows access to a reduced selection of menu
items. These include Filter Cycles, Invert, Information
and Fault Log. They can be seen, but not changed
or edited.
Follow these steps to lock the Settings:
1 - Navigate to Locks (A).*
2 - Press the SELECT navigation button to view the
Lock screen (B).
3 - Navigate to Settings (C). In this example the Settings
are unlocked.
4 - Press-and-hold the SELECT navigation button for
approximately 5 seconds. After 5 seconds, the toggle
switch will move to the right and turn blue (G), and a
lock icon will appear (E).
You have locked the Settings.
Follow the same steps to lock/unlock the Settings
and/or Panel.
5 - Navigate back to the Main screen. The lock icon on
the Main screen (H) indicates that the Settings
are locked.
Can Settings and Panel be locked simultaneously?
Yes. The lock icon (H) appears if the Settings or the
Panel or both are locked. The current lock states are
indicated by the toggle switches in the Lock
screen (C, D).
* View page 10 for information on navigating the Settings menu.
RESTRICT
OPERATIONS
B
C
G
F
Main Screen
Follow these steps to invert the display:
1 - Navigate to Invert (A).*
2 - Press the SELECT navigation button to invert the
panel display (B). Every screen will be inverted.
You have inverted the display (B).
Follow the same steps to restore the default
display orientation (C).
INVERT DISPLAY
Default Display Orientation
C
Inverted Display
B
* View page 10 for information on navigating the Settings menu.
A
 Loading...