EasyManua.ls Logo

Canon MV200 - Page 8

Canon MV200
100 pages
Print Icon
To Next Page IconTo Next Page
To Previous Page IconTo Previous Page
Loading...
Mastering
the
Basics
Your
battery
pack
was
partially
charged
before
it
left
the
factory.
It
should
have
enough
power
for
you
to
check
that
your
camera
is
working
properly.
However,
you
must
charge
the
battery
pack
fully
if
you
want
it
to
power
the
camera
for
more
than
a
few
minutes.
1.
Set
the
POWER
switch
to
OFF
before
you
charge
the
battery
pack.
2.
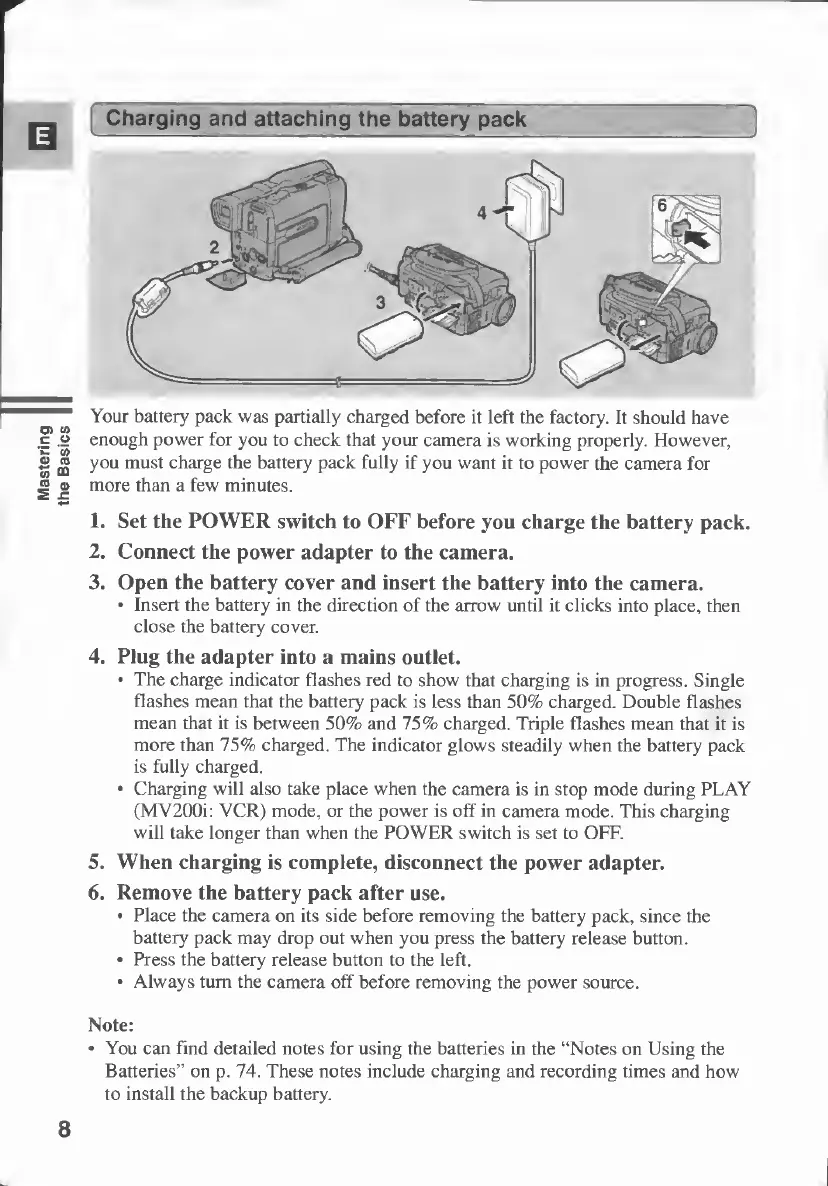
Connect
the
power
adapter
to
the
camera.
3.
Open
the
battery
cover
and
insert
the
battery
into
the
camera.
•
Insert
the
battery
in
the
direction
of
the
arrow
until
it
clicks
into
place,
then
close
the
battery
cover.
4.
Plug
the
adapter
into
a
mains
outlet.
•
The
charge
indicator
flashes
red
to
show
that
charging
is
in
progress.
Single
flashes
mean
that
the
battery
pack
is
less
than
50%
charged.
Double
flashes
mean
that
it
is
between
50%
and
75%
charged.
Triple
flashes
mean
that
it
is
more
than
75%
charged.
The
indicator
glows
steadily
when
the
battery
pack
is
fully
charged.
•
Charging
will
also
take
place
when
the
camera
is
in
stop
mode
during
PLAY
(MV200i:
VCR)
mode,
or
the
power
is
off
in
camera
mode.
This
charging
will
take
longer
than
when
the
POWER
switch
is
set
to
OFF.
5.
When
charging
is
complete,
disconnect
the
power
adapter.
6.
Remove
the
battery
pack
after
use.
•
Place
the
camera
on
its
side
before
removing
the
battery
pack,
since
the
battery
pack
may
drop
out
when
you
press
the
battery
release
button.
•
Press
the
battery
release
button
to
the
left.
•
Always
turn
the
camera
off
before
removing
the
power
source.
Note:
•
You
can
find
detailed
notes
for
using
the
batteries
in
the
“Notes
on
Using
the
Batteries”
on
p.
74.
These
notes
include
charging
and
recording
times
and
how
to
install
the
backup
battery.
8

Table of Contents