Do you have a question about the Canon PowerShot SX610 HS and is the answer not in the manual?
Covers package contents and compatible memory cards.
Explains icons, abbreviations, and conventions used throughout the guide.
Labels and illustrates the various parts of the camera.
Denotes the possibility of serious injury or death.
Denotes the possibility of property damage.
Covers initial preparations, shooting, and playback.
Steps to prepare the camera for shooting, including attaching the strap.
Guide to using the automatic shooting mode for optimal settings.
Steps for capturing still photographs using the camera.
Explains basic operations and setup for using the camera.
How to turn the camera on and off in shooting and playback modes.
Automatic screen deactivation and camera shutdown during shooting.
How to configure common functions using the FUNC. menu.
Steps to access and navigate the camera's main menu system.
How to use the on-screen keyboard to enter text for Wi-Fi connections.
How to check and display the current time on the camera.
Guide to using automatic settings for optimal shots in various scenes.
How to play back digest movies created from still images.
Explains background types and their corresponding scene icons.
Explains the various frames displayed on screen during shooting.
How to use digital zoom for magnification when optical zoom is insufficient.
How to set up the self-timer for group shots or timed photos.
Utilizes the self-timer to delay shutter release and prevent camera shake.
How to enable the camera to add shooting date/time to images.
How to change the image aspect ratio for display or printing.
Chooses from 4 levels of image resolution for shooting.
How to display grid lines on the screen for shooting reference.
Detects and warns if subjects' eyes are closed during shooting.
How to turn off image stabilization when using a tripod.
Turns off the AF-assist lamp that aids focusing in low light.
Configures the information displayed after an image is taken.
Captures six images with effects for each shot, managed as a group.
Applies visual effects like Retro, Monochrome, or Special to captured images.
Captures portraits with a softening effect.
Shoots with minimal camera shake in low-light conditions.
Captures shots with rich, vivid colors.
Creates a miniature model effect by blurring image areas above and below a selected area.
Table showing playback time for different speeds of movie clips.
Camera shoots automatically after detecting a smile.
Camera shoots automatically after detecting a new person's face.
Steps for composing a long exposure shot and preparing to shoot.
How to shoot a series of shots in rapid succession.
Customizes settings for preferred shooting style in Program AE mode.
Adjusts standard exposure in 1/3-stop increments within a range of –2 to +2.
Automatically adjusts brightness and contrast for optimal subjects.
Adjusts white balance to make image colors appear more natural.
Disables color tone adjustments.
Restricts focus to subjects at close range.
Detects faces and sets focus, exposure, and white balance accordingly.
Steps to select and track a subject for focus.
Continuously focuses on moving subjects and adjusts exposure.
Controls flash modes for different shooting scenarios.
Chooses between two compression ratios for image quality.
Turns off image stabilization when using a tripod.
Instructions for viewing captured images and movies on the camera screen.
Steps to play movies, adjust volume, and pause playback.
Warns of washed-out highlights in images on the detailed information display.
Displays multiple images in an index for quick searching.
Selects criteria like people, shot date, or favorites to filter images.
Selects a grouped image for individual viewing.
Zooms in on images to view details.
Offers related images based on the current image for unexpected viewing.
Selects how to choose images for protection.
Specifies a range of images to protect or manage.
Protects all images on the memory card simultaneously.
Selects the method for choosing images to erase.
Changes the orientation of images and saves them.
Accesses menu options to control image rotation.
Accesses menu options to tag images as favorites for organization.
Saves copies of images at a lower number of recording pixels.
Adjusts image colors and saves the edited image as a new file.
Automatically corrects red-eye in images and saves the corrected image.
Removes unneeded portions from the beginning and end of movies.
Selects individual clips from digest movies for erasure.
Explains how to send images and control the camera via Wi-Fi.
Simplifies connecting and sending images via NFC.
Precautions for using NFC connections between devices.
Installs the dedicated Camera Connect app on a smartphone.
Accesses the camera's Wi-Fi menu.
Steps to prepare for connecting the camera via an existing access point.
Details system requirements and software installation for computer connection.
Verifies the computer's network connection before proceeding.
Displays available Wi-Fi networks for connection.
Adds Web services for image transfer via the camera.
Registers Web services other than CANON iMAGE GATEWAY.
Accesses the Wi-Fi menu for printer connection.
Accesses the Wi-Fi menu to send images between cameras.
Selects multiple images at once for sending, with options to change size.
Sends all images tagged as favorites together.
Adds comments to images sent to email or social networks.
Prepares the camera and computer for automatic image transfer.
Sends images automatically to the computer or web services.
Adds location data (latitude, longitude, elevation) to images.
Secures the camera, possibly with a tripod, before remote shooting.
Modifies connection details for Wi-Fi devices.
Resets all Wi-Fi settings to their original default values.
Configures basic camera functions for convenience.
Registers destinations to ensure correct local date and time for shots.
Adjusts automatic camera and screen deactivation timing.
Formats the memory card for use with the camera, erasing all data.
Changes how the camera assigns sequential file numbers to shots.
Creates folders daily to store shots taken on that day.
Resets all camera settings to their original default values.
Illustrates how camera accessories connect to the camera.
Lists battery packs and chargers for powering the camera.
Describes external flash units for illuminating subjects.
Connects the camera to a TV to view shots on a larger screen.
Uses an AC adapter kit for continuous power, eliminating battery monitoring.
Software for saving images to a computer and transferring images.
Verifies computer compatibility and system requirements for software.
Steps to connect the camera to a computer using a USB cable.
Prints shots directly by connecting to a PictBridge-compatible printer.
Selects an image to print and specifies print options.
Prints a desired image area instead of the entire image.
Lists options for arranging multiple images on a single sheet.
Specifies printing format, date/file number addition, and other settings.
Sets up printing for a selected range of images.
Selects how to choose images for a photobook.
Addresses issues related to the camera's power supply and battery.
Troubleshooting steps when the camera cannot take pictures.
Troubleshooting for issues with movie recording time or interruptions.
Troubleshooting steps for issues connecting to Wi-Fi access points.
Explains error messages encountered during shooting or playback.
Troubleshooting for Wi-Fi connection failures.
Explains the various icons and information displayed during shooting.
Lists the controls available on the movie playback panel.
Tables showing function availability across different shooting modes.
Explains metering method options and their availability in shooting modes.
Shows aspect ratio availability in various shooting modes.
Lists AF frame options and their availability by shooting mode.
Shows AF-assist beam availability in shooting modes.
Shows date stamp availability in shooting modes.
Lists items and reference pages for the Playback tab menu.
Provides essential safety and handling advice for the camera.
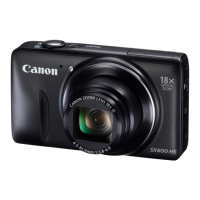
Technical specifications of the camera, including resolution and dimensions.
Estimates shots and recording time based on memory card capacity.
Details the focus range for different shooting modes.
Details stringent security measures required for Wi-Fi usage.
| Megapixel | 20.2 MP |
|---|---|
| Camera type | Compact camera |
| Sensor type | CMOS |
| Image stabilizer | Yes |
| Total megapixels | 21.1 MP |
| Image sensor size | 1/2.3 \ |
| Image formats supported | JPG, EXIF |
| Supported aspect ratios | 16:9, 4:3, 3:2, 1:1 |
| Maximum image resolution | 4608 x 3456 pixels |
| Still image resolution(s) | 4608 x 2592; 3264 x 1832; 1920 x 1080; 640 x 360, 4608 x 3072; 3264 x 2176; 2048 x 1368; 640 x 424, 4608 x 3456; 3264 x 2448; 2048 x 1536; 640 x 480, 3456 x 3456; 2448 x 2448; 1536 x 1536; 480 x 480, 2592 x 1944 |
| Digital zoom | 4 x |
| Optical zoom | 18 x |
| Combined zoom | 72 x |
| Focal length range | 4.5 - 81 mm |
| Maximum aperture number | 6.9 |
| Minimum aperture number | 3.8 |
| Maximum focal length (35mm film equiv) | 450 mm |
| Minimum focal length (35mm film equiv) | 25 mm |
| Focus | TTL |
| Focus adjustment | Auto/Manual |
| Normal focusing range | 0.05 - ∞, 1 - ∞ m |
| Macro focusing range (tele) | 0.05 - 0.5 m |
| Normal focusing range (wide) | 0.05 - ∞ m |
| Auto Mode focusing range (tele) | 1 - ∞ m |
| Light metering | Centre-weighted, Evaluative (Multi-pattern), Spot |
| ISO sensitivity | Auto, 3200, 80 |
| Light exposure modes | Manual |
| ISO sensitivity (max) | 3200 |
| ISO sensitivity (min) | 80 |
| Light exposure correction | ± 2EV (1/3EV step) |
| Fastest camera shutter speed | 1/2000 s |
| Slowest camera shutter speed | 15 s |
| Flash modes | Auto, Slow synchronization, Flash off, Red-eye reduction, Flash on |
| Flash range (tele) | 1 - 2 m |
| Flash range (wide) | 0.5 - 3.5 m |
| Video resolutions | 1080 x 720, 640 x 480, 1920 x 1080 pixels |
| Motion JPEG frame rate | 30 fps |
| Video formats supported | H.264, MPEG4, MP4 |
| Maximum video resolution | 1920 x 1080 pixels |
| Analog signal format system | NTSC, PAL |
| Resolution at capture speed | 1920x1080@30fps, 640x480@30fps, 1280x720@30fps |
| Audio formats supported | AAC |
| Compatible memory cards | SD, SDHC, SDXC |
| Field of view | 100 % |
| Display diagonal | 3 \ |
| Display aspect ratio | 4:3 |
| Display resolution (numeric) | 922000 pixels |
| HDMI connector type | Micro |
| Scene modes | Portrait, Night, Fireworks, Snow |
| Photo effects | Sepia, Vivid, Black&White, Neutral, Positive film |
| White balance | Auto, Cloudy, Fluorescent, Custom modes, Fluorescent H, Daylight, Tungsten |
| Camera playback | Single image, Movie, Slide show |
| Self-timer delay | 10, 2 s |
| Camera file system | DPOF 1.1, Exif 2.3 |
| On Screen Display (OSD) languages | ARA, DUT, NOR, ENG, IND, ESP, ITA, POL, SWE, CHI (SIMPL), JPN, POR, THA, CHI (TR), TUR, FRE, KOR, RUS, UKR, CZE, GRE, DAN, DEU, HUN |
| Operating temperature (T-T) | 0 - 40 °C |
| Operating relative humidity (H-H) | 10 - 90 % |
| Product color | White |
| Power source type | Battery |
| Battery type | NB-6L/NB-6LH |
| Battery voltage | 3.7 V |
| Depth | 26.7 mm |
|---|---|
| Width | 105.3 mm |
| Height | 61 mm |
| Weight | 167 g |




 Loading...