Instruction manual C2402/C2402SS/C2402GM
18
Please keep this instruction manual for future reference
PYROLYTIC CLEANING
With the Pyro clean mode, the internal temperature of the oven reaches 475ºC. The pyrolytic cycle
is activated, burning away food and grime residues. Dirt is literally incinerated. Keep children away
from the appliance during the automatic cleaning cycle as surfaces may become very hot. Particles
may ignite inside the oven due to the combustion process. There is no cause for concern: this
process is both normal and hazard-free.
Before initiating the PYRO CLEAN mode:
» Remove large or coarse food residues from the inside of the oven using a damp sponge. Do
not use detergents.
» Clean the inside of the oven door with a damp cloth. This will prevent cooking residue from
sticking to the glass.
» Remove the side racks, telescopic runners, trays and wire shelves.
» Remove all accessories.
» Do not place tea towels or pot holders over the oven handle.
» Ensure any tin foil is removed from the oven cavity.
NOTE:
If the oven is too hot, the pyrolytic may not start. Wait for the oven to cool down.
NOTE:
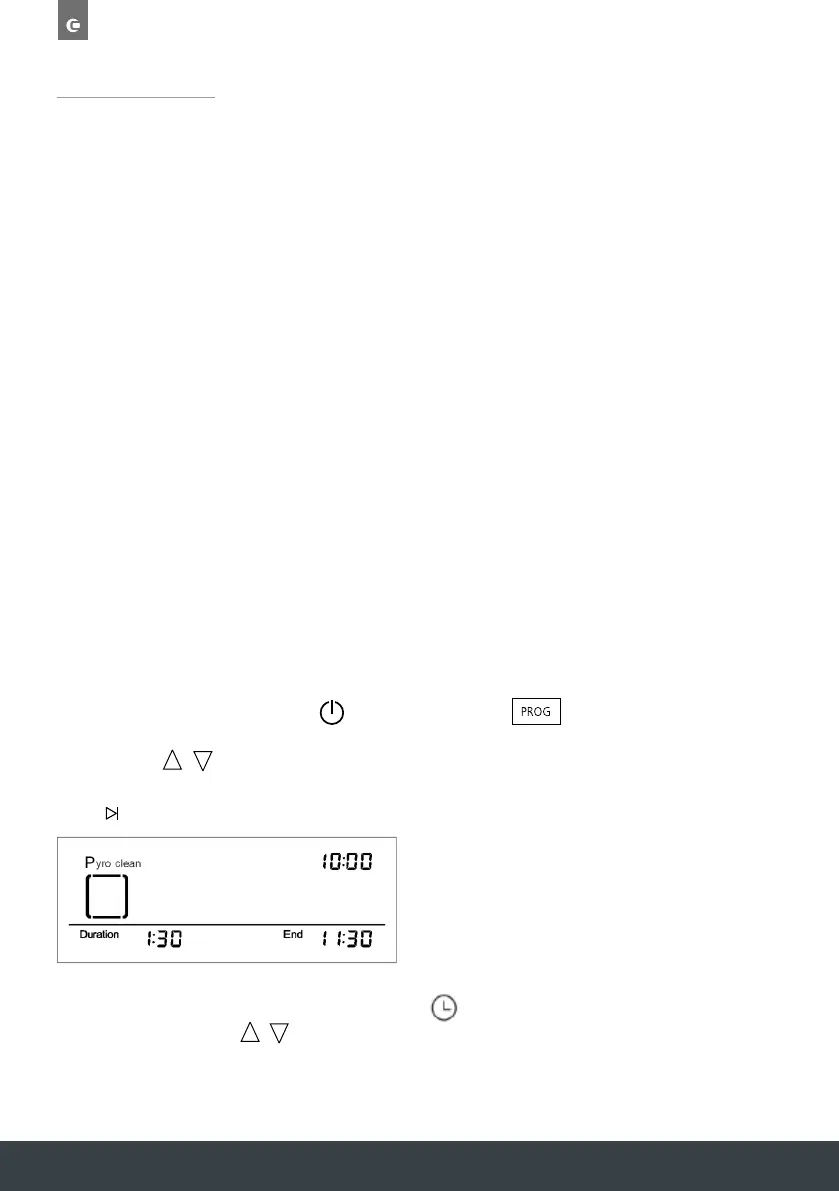
The program may only be started once the oven door has been closed. To use the Pyro cleaning
function, turn the oven on with the button, and using the button select the Pyro
cleaning function. The defult display is as below and DURATION will keep flashing. Adjust the
time using the / buttons followed by SELECT to confirm. The available time settings are 1:15,
1:30 and 2:00.
END TIME:
Once the DURATION time has been set, press the until the END time starts to flash. Adjust
the end time by pressing / and press SELECT to confirm. Oven start time = End time -
Duration time.
For example: if you select the 1:30 duration and the time is 3pm you can select an end time of
6pm and the pyro clean will automatically start at 4:30pm.
Alarm setting
Time setting
Cooking time (0 - 10 hrs)
Children safety lock
Press the button until the alarm symbol flashes. Then press the + / -
buttons to set the time, and SELECT to confirm. To cancel the alarm, set the time
to '0:00' and confirm.
To set or change the time, turn the oven on with the power key (do not select a
function). Press the button twice to start the time setting. press the + / -
buttons to change the time and SELECT to confirm.
When the oven is first turned on or restarts, the time must be re set.
Press the button to select the cooking time function. The symbol will keep
flashing and the time will show '0:30'. Press the + / - buttons to set the required
cooking time and SELECT to confirm.
if you want to cancel the cooking time, set the cooking time to '0:00' and press
SELECT to confirm.
End of cooking time
You must set the 'Cooking time' ( ) before setting the 'End of cooking time'.
Press the button until the symbol keeps flashing. The time zone will
display the current time + the set cooking time. Press the + / - buttons to set the
end cooking time, and SELECT to confirm. The oven will then calculate the End
cooking time - Cooking time to determine when to start cooking. The oven will
then start at the calculated time.
When the symbol shows, the 'End of cooking time' cannot be set.
To cancel the 'End of cooking time' set it to current time + cooking time.
Press and hold the SELECT button for 5 seconds to activate the Child safety lock.
The display will show the symbol.
to deactivate, press and hold the SELECT button again for 5 seconds.
Please keep this instruction manual for future reference
PYROLYTIC CLEANING
With the Pyro clean mode, the internal temperature of the oven reaches 475ºC. The
pyrolytic cycle is activated, burning away food and grime residues. Dirt is literally
incinerated. Keep children away from the appliance during the automatic cleaning
cycle as surfaces may become very hot. Particles may ignite inside the oven due to
the combustion process. There is no cause for concern: this process is both normal
and hazard-free.
Before initiating the Pyro clean mode:
- Remove large or coarse food residues from the inside of the oven using a damp
sponge. Do not use detergents.
- Remove the side racks, telescopic runners, trays and wire shelves.
- Remove all accessories.
- Do not place tea towels or pot holders over the oven handle.
- Ensure any tin foil is removed from the oven cavity.
NOTE:
If the oven is too hot, the pyrolytic may not start. Wait for the oven to cool down.
NOTE:
The program may only be started once the oven door has been closed. To use the
Pyro cleaning function, turn the oven on with the button, and using the
select the Pyro cleaning function, the default display is as below and
Children safety lock
Press the button until the alarm symbol flashes. Then press the + / -
to '0:00' and confirm.
To set or change the time, turn the oven on with the power key (do not select a
function). Press the button twice to start the time setting. press the + / -
buttons to change the time and SELECT to confirm.
re set.
Press the button to select the cooking time function. The symbol will keep
flashing and the time will show '0:30'. Press the + / - buttons
to set the required
cooking time and SELECT to confirm.
if you want to cancel the cooking time, set the cooking time to '0:00' and press
You must set the 'Cooking time' ( )
before setting the 'End of cooking time'.
Press the button until the
symbol keeps flashing. The time zone will
display the current time + the set cooking time. Press the + / - buttons to set the
end cooking time, and SELECT to confirm. The oven will then calculate the End
cooking time - Cooking time to determine when to start cooking. The oven will
then start at the calculated time.
When the symbol shows, the 'End of cooking time' cannot be set.
To cancel the 'End of cooking time' set it to current time + cooking time.
Press and hold the SELECT button for 5 seconds to activate the Child safety lock.
The display will show the symbol.
to deactivate, press and hold the SELECT button again for 5 seconds.
Cooking time (0 - 10 hrs)
Children safety lock
buttons to set the time, and SELECT to confirm. To cancel the alarm, set the time
To set or change the time, turn the oven on with the power key (do not select a
function). Press the button twice to start the time setting. press the + / -
buttons to change the time and SELECT to confirm.
When the oven is first turned on or restarts, the time must be re set.
if you want to cancel the cooking time, set the cooking time to '0:00' and press
SELECT to confirm.
End of cooking time
You must set the 'Cooking time' ( ) before setting the 'End of cooking time'.
Press the button until the symbol keeps flashing. The time zone will
display the current time + the set cooking time. Press the + / - buttons to set the
end cooking time, and SELECT to confirm. The oven will then calculate the End
cooking time - Cooking time to determine when to start cooking. The oven will
then start at the calculated time.
When the symbol shows, the 'End of cooking time' cannot be set.
To cancel the 'End of cooking time' set it to current time + cooking time.
Press and hold the SELECT button for 5 seconds to activate the Child safety lock.
The display will show the symbol.
to deactivate, press and hold the SELECT button again for 5 seconds.
Instruction manual C24 02SS19
Please keep this instruction manual for future reference
Turbo conventional heat
7KHRYHQLVKHDWHGE\WRSDQGERWWRPHOHPHQWVDQGWKHIDQPRXQWHGLQWKHEDFNSDQHOKHOSVWR
GLVWULEXWHGLVWULEXWHKHDWKHDWWKURXJKRXWWKURXJKRXWWKHWKHRYHQRYHQ6XLWDEOH6XLWDEOHIRUIRUSHUIHFWSHUIHFWSDVWU\SDVWU\QRQRQHHGQHHGWRWREOLQGEOLQGEDNHEDNH
GLVWULEXWHWKHKHDWEHWZHHQDQGć7KLVIXQFWLRQFDQEHXVHGIRUVWHULOL]LQJJODVV
MDUV
7KH7KHDLUDLUZKLFKZKLFKLVLVKHDWHGKHDWHGE\E\WKHWKHORZHUORZHUKHDWLQJKHDWLQJHOHPHQWHOHPHQWLVLVFLUFXODWHGFLUFXODWHGE\E\WKHWKHIDQIDQDQGDQGVRVRKHOSVKHOSVWRWR
GLVWULEXWHWKHKHDWEHWZHHQDQGć7KLVIXQFWLRQFDQEHXVHGIRUVWHULOL]LQJJODVV
C2105SS Single Oven Instruction manual.indd 18 28/05/2019 15:57
DURATION will keep fashing. Adjust time by pressing + / - and press to confirm.
� . Press to bring up . The display will flash
Setting the time - Press for 3sec
Press to start Pyrolytic Cleaning function.
Once the DURATION time has been set, press the until the END time starts to flash. Adjust
the end time by pressing + / - and press SELECT to confirm. Oven start time = End time –
Duration time.
Adjust the end time by pressing
/
and press to confirm.
Oven start
-
Press for 3
sec
to set current
time. Adjust time by pressing
Automatic cooking -
Adjust the end time by pressing
/
and press to confirm.
back to “0:00” to cancel.
5. Safety Lock .
Pressing
for 5sec
to enter or cancel
the safety lock function.
6. Temperature
Setting.
Once the
function is selected, press
to confirm setting.
Setting timer/alarm. Press to bring up
back to “0:00” to cancel.
back to “0:00” to cancel.
Setting timer/alarm. Press to bring up
This page needs amending.
I have printed out with
written amends.
15
Instruction manual C24 02SS
Please keep this instruction manual for future reference
CONTROL PANEL AND DISPLAY
1
Control Panel and display
Button Description
1
○
Power
2
○
Programme
○
3 T imer
4
○
Temperature
5
○
Light
6
○
Up / Down (+/-)
○
7 Select
8
○
Boost
○
9 S ta rt
/ Pause
Display
Description
10
○
/ programme
11
○
Time r
12
○
Actual Temperature/Time
13
○
Set Temperature
14
○
Curr ent Time
15
○
Safety Lock
61
○
Boost
71
○
Cooking Dura tion Time
81
○
Rotisserie
91
○
Alarm
02
○
Heating Indicator
12
○
Light
2
2
○
Cooking End Time
1 2
4 3 10 11
13
12
16
14
15
6
5
19
17
18
21
20
22
7 8 9
B UTTON
DESCRIPTION
1. Power
2. Programme
3. Timer
4.
Temperature
5. Light
6. Up / Down (+/-)
7. Select
8. Boost
9. Start / Pause
DISPLAY
DESCRIPTION
10. Function / programme
11. Timer
12. Actual Temperature/Time
13. Set Temperature
14. Current Time
15. Safety Lock
16. Boost
17.
Cooking Duration Time
18.
Pyro Lock
19.
Alarm
20.
Heating Indicator
21.
Light
22.
Cooking End Time
2 x Chrome oven shelves
1 x Grill pan with rack and handle
2 x Telescopic runners (x2 pairs)
To purchase additional or replacement accessories, please visit www.caple.co.uk
A CCESSORIES
C2105SS Single Oven Instruction manual.indd 15 28/05/2019 15:57
yro
clean
P
Instruction manual C24 02SS16
Please keep this instruction manual for future reference
OPERATION
POWER BUTTON
To turn on/off the display panel. When turned on, the time of day will be shown.
PROGRAMME BUTTON
Press to shift between functions. When you shift to a new function, the current function will stop
and the cooking time must be reset. The Function list is as per the below order:
2
Operation
1. Power button . To turn on/off the display panel. When turned on, the time of day will be shown.
2. Programme button . Press to shift between functions. When you shift to a new function, the
current function will stop and the cooking time must be reset. The Function list is as per the below order:
3. Start/Pause button . Once the required function has been selected, press to start cooking.
Once cooking has started the display will show the current oven temperature. For example;
when the oven is paused, the display will show the current time. For example;
START/PAUSE BUTTON
Once the required function has been selected, press to start cooking. Once cooking has started
the display will show the current oven temperature. For example;
When the oven is paused, the display will show the current time. For example;
2
Operation
1. Power
button . To turn on/off the display panel. When turned on, the time of day will be shown.
2. Programme button . Press to shift between functions. When you shift to a new function, the
current Function list is as per the below order:
3. Start/Pause button . Once the required function has been selected, press to start cooking.
Once cooking has started the display will show the current oven temperature. For example;
when the oven is paused, the display will show the current time. For example;
2
Operation
1. Power button . To turn on/off the display panel. When turned on, the time of day will be shown.
2. Programme button . Press to shift between functions. When you shift to a new function, the
current Function list is as per the below order:
3. Start/Pause button . Once the required function has been selected, press to start cooking.
Once cooking has started the display will show the current oven temperature. For example;
when the oven is paused, the display will show the current time. For example;
1
Control Panel and display
○
4
○
Temperature
5
○
Light
6
○
Up / Down (+/-)
○
7 Select
8
○
Boost
○
Pause
Display Description
10
○
Function / programme
11
○
Time r
12
○
Actual Temperature/Time
13
○
Set Temperature
14
○
Curr ent Time
15
○
Safety Lock
61
○
Boost
71
○
Cooking Duration Time
81
○
Rotisserie
91
○
Alarm
02
○
Heating Indicator
12
○
Light
22
○
Cooking End Time
4
3 10 11 13
12 16
14 15
6
21
20 22 7 89
C2105SS Single Oven Instruction manual.indd 16 28/05/2019 15:57
Defrost
Full grill
Eco grill
Turbo grill
Base heat
Turbo conventional heat
Fan heat
Conventional heat
Turbo base heat
Turbo Eco grill
Fan heat and grill
function
will stop and
the cooking
time must
be
reset.
Th
e
function will stop and the cooking time must be
reset.
The
ower
2
○
Programme
3 T imer
1
2
5 19
17 18
 Loading...