Do you have a question about the Capstone 10012 and is the answer not in the manual?
Slide the hitch tube into the receiver and secure with the safety bolt, lock washer, and R-pin.
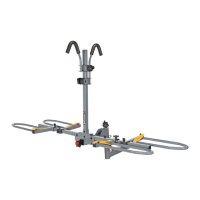
Connect the rotatable post tube to the hitch tube using the attached wire lock pin.
Secure the rotatable post tube using the locking knob.
Connect the main square post to the base with carriage bolts, flat washers, and nuts.
Press the button to fold down the wheel tubes and be mindful of pinch points.
Loosen knobs on wheel holders and slide them onto the wheel tubes.
Install wheel holder stop screws and internal toothed lock washers with a screwdriver.
Position frame hooks on the vertical post, ensuring correct orientation for bike security.
Position bikes on the rack and secure wheels using the provided Velcro straps.
Final check after completing the installation of the bike carrier.
Operate the tilting device to lower the carrier for rear vehicle access.
Loosen the knob and pull the pin to swing the carrier left or right for access.
Details on what the limited lifetime warranty covers for the main body and other components.
Conditions to keep the limited warranty in effect, including assembly and maintenance.
Items and conditions not covered by the limited warranty.
Information on the duration of the warranty and the process for replacement.
What the manufacturer will do to fulfill warranty obligations (repair, replace, refund).
Instructions on how to obtain service or make a warranty claim.
Information on consumer rights granted by the limited warranty.
| Brand | Capstone |
|---|---|
| Model | 10012 |
| Category | Bicycle Accessories |
| Language | English |